The Personalization Problem
How do we personalize a user’s web experience based upon real-time activity? To spell it out more plainly. How do we show a banner to a user that depends upon the the results of a user logging in, that happened on the previous page?
In the beginning I thought this was a simple process of supplying extension data to a VIEW event and then segmenting that user based upon said data. That would’ve been easy, except that users are not immediately added to Segments that you can then pull. And what happens if the data returned from the login changes? The Segment the user is on may have to change thus changing their personalization.
Decision Models and Decision Tables to the rescue. As I don’t get to play with CDP that much and Personalize even less, it’s easy to forget some of these extremely powerful features exist. And this is where I have to call out Freddy Rueda Barros for sharing his article, How to get Sitecore Personalize Decision Model result on my Sitecore Backend code. It gave me a solid starting point for building what I needed.
So he’s what we’re going to cover.
Supplying a VIEW / IDENTITY Event With a Data Extension
Create a Decision Model to Grab Recent Session Data
- Create and Setup a Variant in Our Decision Model
- Setup a Programmable in Our Decision Model
- Setup a Decision Table in our Decision Model
- Setting Up Output Columns
Supplying a VIEW / IDENTITY Event With a Data Extension
While it might not always be required, depending on your needs, leveraging a data extension within your Personalization, whether it be for display or calculation, can truly open up the doors of possibilities.
If we look back at the previous article on triggering events, Trigger a CDP Event With Custom Extension Data Using Sitecore Engage SDK, we can see how custom events and utilizing the data extension can be useful. You’ll also remember seeing seeing the data extension in the code below:
const addToCart = async (burger: Burger) => {
    setCartItems((prevItems) => {
      const existingItem = prevItems.find(item => item.id === burger.id);
      if (existingItem) {
        return prevItems.map(item =>
          item.id === burger.id ? { ...item, quantity: (item.quantity ?? 1) + 1 } : item
        );
      } else {
        return [...prevItems, { ...burger, quantity: 1 }];
      }
    });

      const extensionData = {
        cartId: burger.id,
        cartName: burger.name
      };
      await engage?.event("mythicalburger:ADD_TO_CART", eventData, extensionData);
  };
Specifically, the bit of code referencing extensionData.
const extensionData = {
  cartId: burger.id,
  cartName: burger.name
};
It’s a key value pair object. This time around we’re going to extend that data a bit to include additional features.
const extensionData = {
  cartId: burger.id,
  cartName: burger.name,
  isChicken: burger.isChicken,
  isBeef: burger.isBeef,
  isVegan: burger.isVegan
};
We’re going to obtain that information by extending our Burger type object.
interface Burger {
  id: string; // Unique identifier for each burger
  name: string; // Name of the burger
  price: number; // Price of the burger
  image: string; // Image URL of the burger
  quantity?: number; // Quantity of the burger in the cart
  isChicken: boolean; // is the menu item made of chicken
  isBeef: boolean; // is the menu item made of beef
  isVegan: boolean; // is the menu item vegan
  isDrink: boolean; // is the menu item a drink
  isSide: boolean; // Is the menu item a side
}
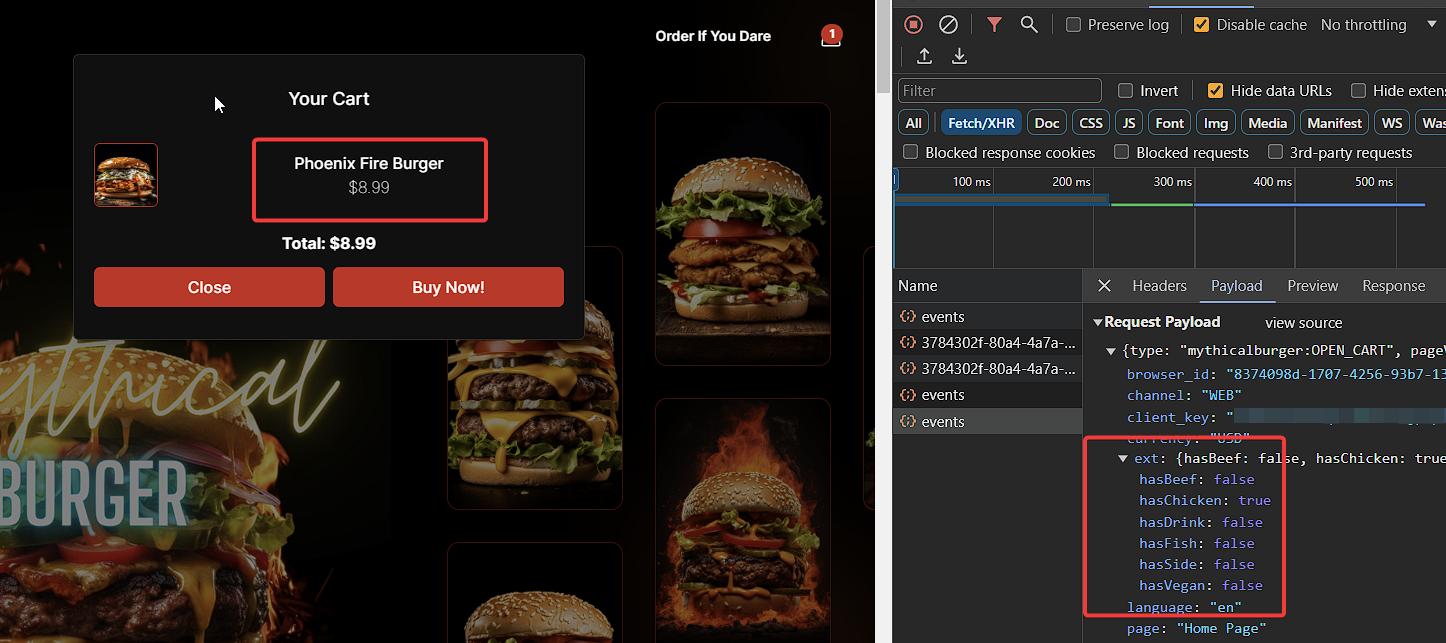
Now, when the user opens the cart we’re going to send an event mythicalburger:OPEN_CART. And the
extension data we’re sending is going to look like this:
interface CDPExtensionData {
  hasBeef: boolean;
  hasChicken: boolean;
  hasFish: boolean;
  hasVegan: boolean;
  hasSide: boolean;
  hasDrink: boolean;
}
If we left it as this we’d actually get this error:
Argument of type 'CDPExtensionData' is not assignable to parameter of type 'INestedObject'.
  Index signature for type 'string' is missing in type 'CDPExtensionData'.
So to avoid it, we’re going to reduce that object to this.
interface CDPExtensionData {
  [key: string]: boolean;
}
And now we have to build our data extension object based upon objects in the cart. So let’s create that. This is a simple function to run through all the cart items and determine whether or not the cart items matches the type. We could very easily extend this to more complicated features.
// Function to create extensionData from cart
  const createExtensionData = (cart: Burger[]): CDPExtensionData => {
    return cart.reduce<CDPExtensionData>(
      (acc, burger) => {
        if (burger.isBeef) acc.hasBeef = true;
        if (burger.isChicken) acc.hasChicken = true;
        if (burger.isFish) acc.hasFish = true;
        if (burger.isVegan) acc.hasVegan = true;
        if (burger.isSide) acc.hasSide = true;
        if (burger.isDrink) acc.hasDrink = true;
        return acc;
      },
      {
        hasBeef: false,
        hasChicken: false,
        hasFish: false,
        hasVegan: false,
        hasSide: false,
        hasDrink: false,
      }
    );
  };
And lastly we’re going to, when a user opens the modal, trigger that event with the data extension.
const toggleCartModal = async () => {
    if (!isCartModalOpen) {
      const cdpExtensionData = createExtensionData(cartItems);
      await engage?.event("mythicalburger:OPEN_CART", eventData, cdpExtensionData);
    }
    setIsCartModalOpen(!isCartModalOpen);
  };
We’re going to come back to this in a bit when we want to trigger a personalization. Because we’re not actually
changing pages here, we need to fire off a personalize event so that it actually triggers. You won’t need to do this
if you have your CDPPageView.tsx component initialized on every page as Engage (pre-21.6.0) will
actually determine if a Personalization needs to be run.
Now you can see, when we open the cart after first adding the Phoenix Fire Burger to the cart, that an event is fired off with our cart details.
If we close this, add another option, and then re-open the cart, another event will be fired off.
This got us setup. CDP is now receiving our information and Personalize will be able to act upon it via our Decision Model, so let’s go create that now.
Create a Decision Model to Grab Recent Session Data
One of the best ways to personalize based upon real-time data is to explore the recent session activity of a guest. This includes all the events, like the one above,
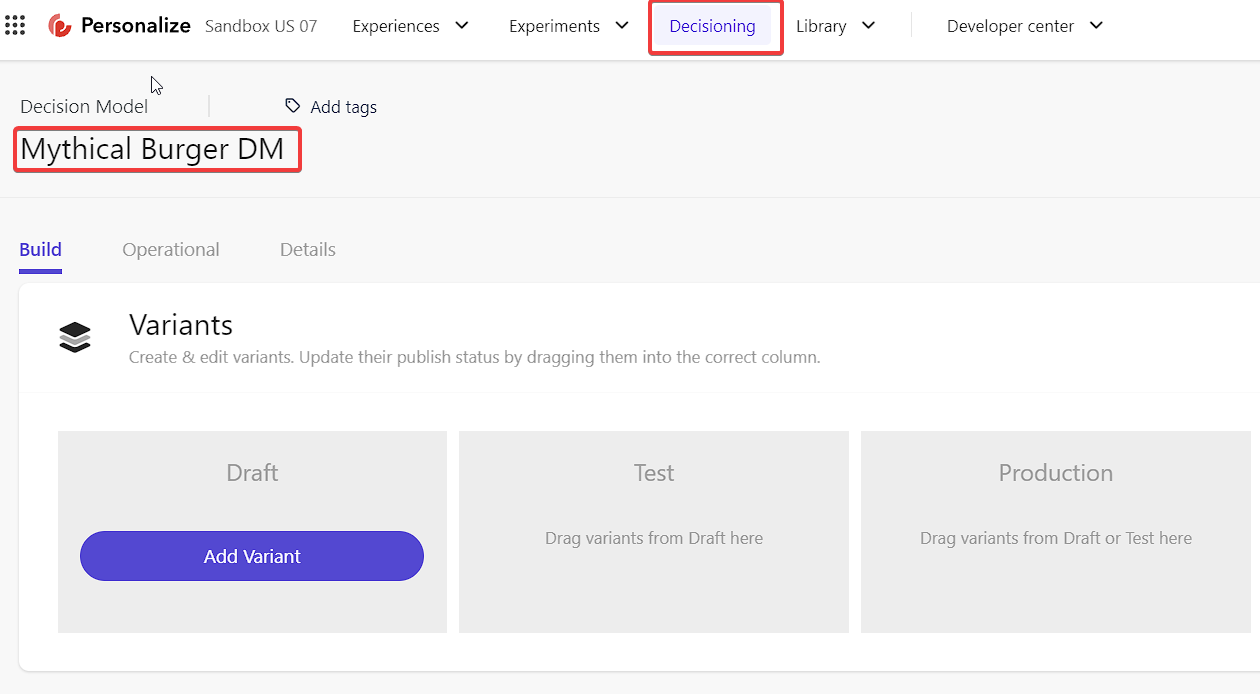
In Personalize inside the Decisioning section, we created a Decision Model called
Mythical Burger DM. After which we will need to create a variant. Think of this as a
version of the Decision Model itself.
Create and Setup a Variant in Our Decision Model
Let’s walk through some steps creating the variant and the Canvas of our Decision Model.
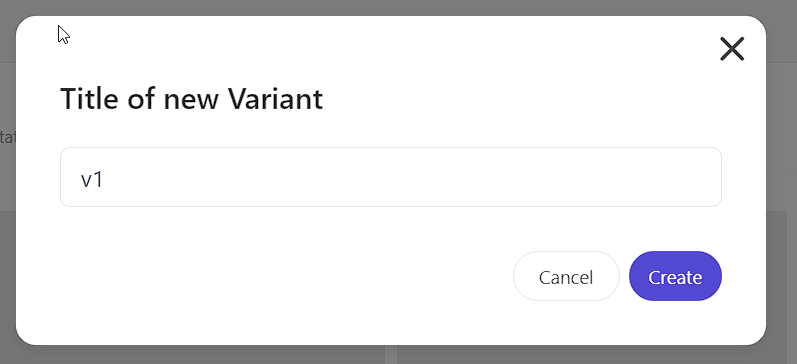
Now we will click Add Variant and name it v1. You can use any alpha numeric name you wish.
I like the version notation as it allows me to keep track which version is the most recent. If we had already
created a variant, it would give us the option to base the new variant on that older version.
Clicking on the Variant will now take us to the Decision Model canvas.
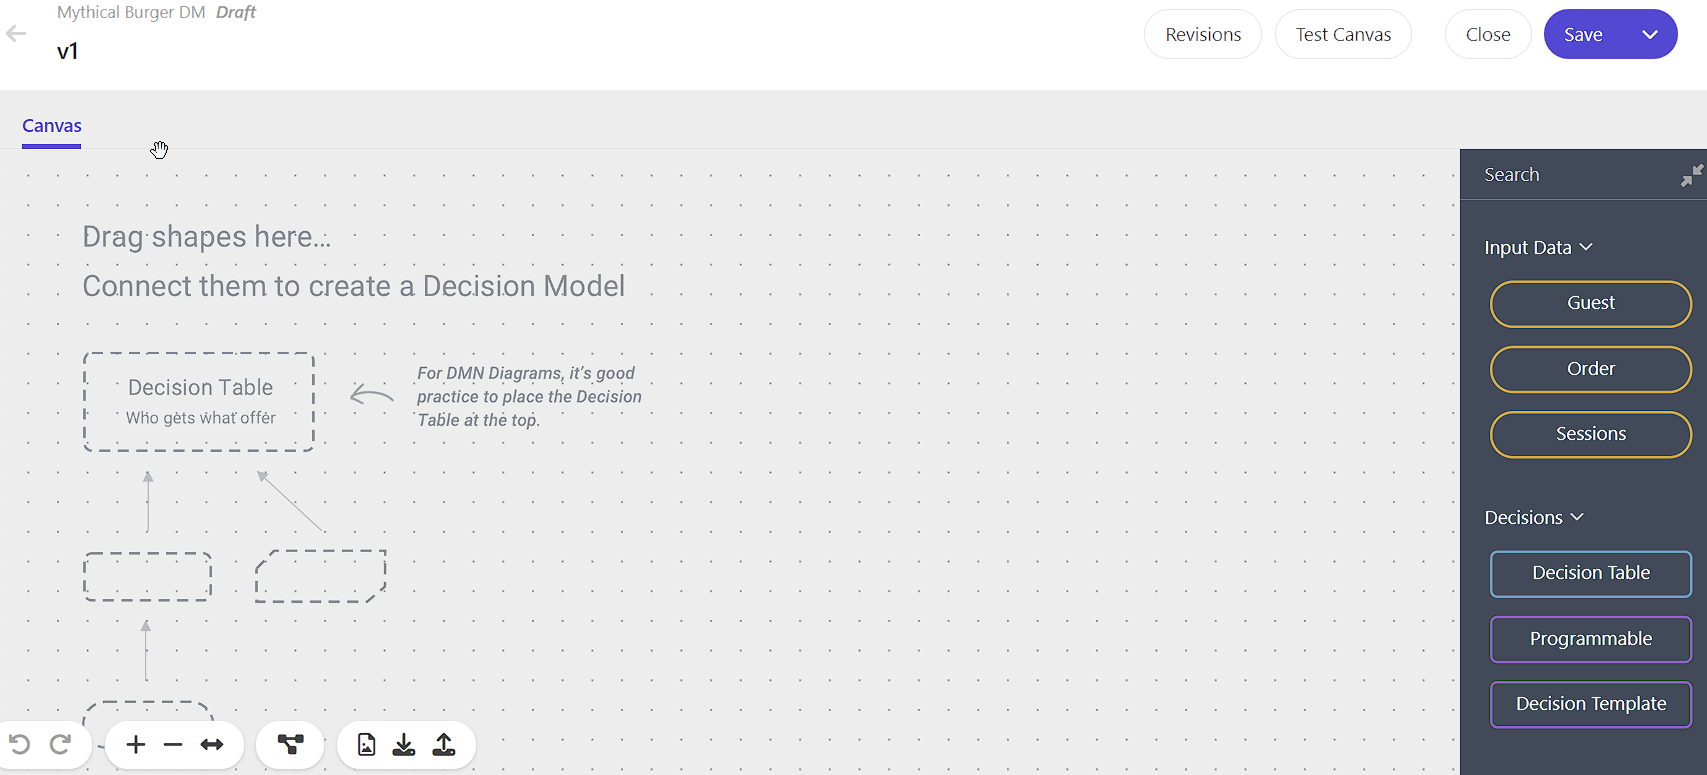
It’s here we’re going to create a really simple process for our Model to follow.
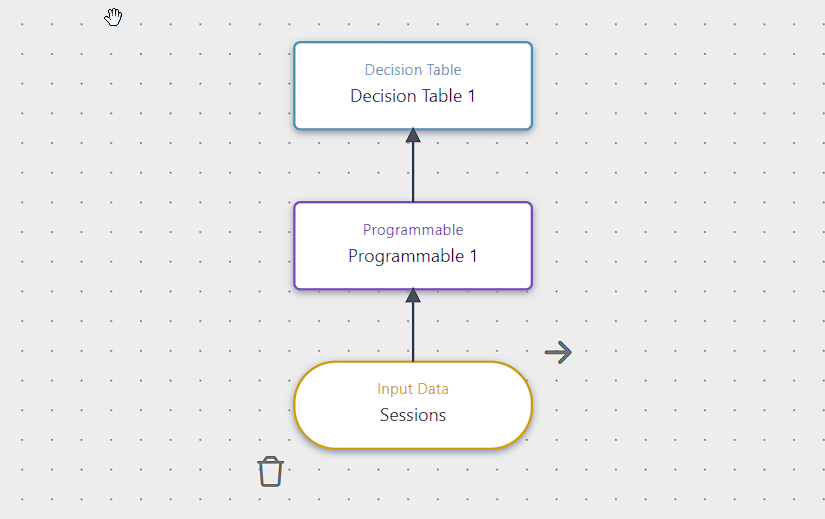
We have set our Input Data to be Sessions and are using the Programmable Decision
type and that flows into our Decision Table.
Important: While you can indeed add more Programmable types, they warn you that it will impact performance. Optimally Decision Models should run in their entirety in under 200ms. Going beyond that and it will potentially impact the experience for your user.
Selecting Sessions as our Input Data allows us to access recent session data of our visitors which
includes the data extension information we built above.
Setup a Programmable in Our Decision Model
If we open up our Programmable, we will get an area to add JavaScript. It’s going to be very simple.
(function () {
  var session = guest.sessions[0];
  if (!session) {
    return {};
  }
  for (var j = 0; j < session.events.length; j++) {
    var data = session.events[j].arbitraryData;
    if (
      (session.events[j].type === "mythicalburger:OPEN_CART") &&
      data &&
      data.ext
    ) {
      return data.ext;
    }
  }
  return {}; //Default
})();
Here you can see we’re looking for the latest session type that matches mythicalburger:OPEN_CART. Once
we have that we’re going to check there is a data extension and then return that.
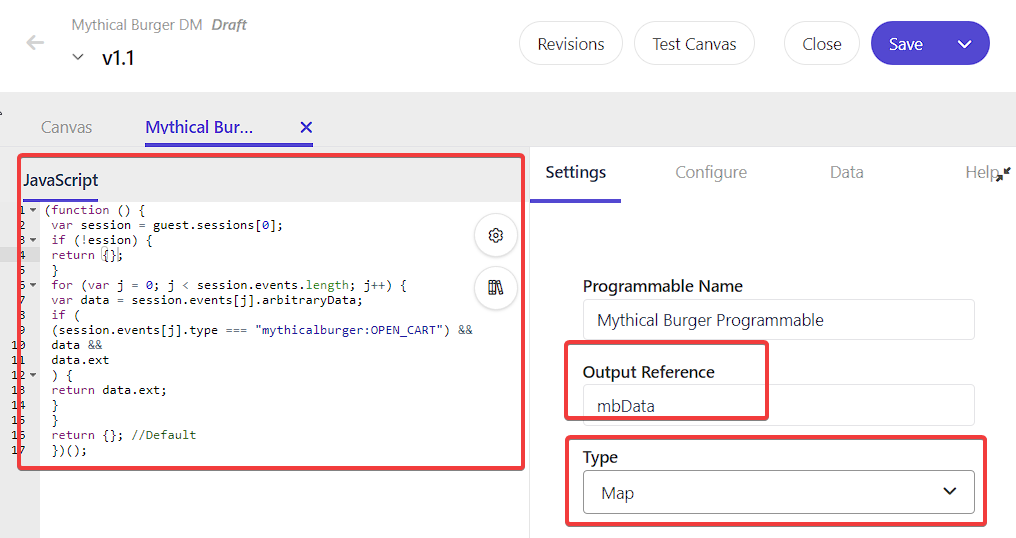
On the right hand side we’ve created our Output Reference as mbData. Think of this as the variable that
will receive the return type which is of type Map. By using Map we can effectively take
the entire data extension and send it to the Decision Table.
Now you don’t have to just return the arbitrary data that is in that Event. You could very well add in additional logic and transform that data. The trouble with doing so though is maybe you have a marketing team and they aren’t JavaScript savvy. Moving the logic to the Decision Table allows them to maintain that power in a more user friendly way.
If you want to validate the information we’re obtaining, you can click Test Canvas at the top.
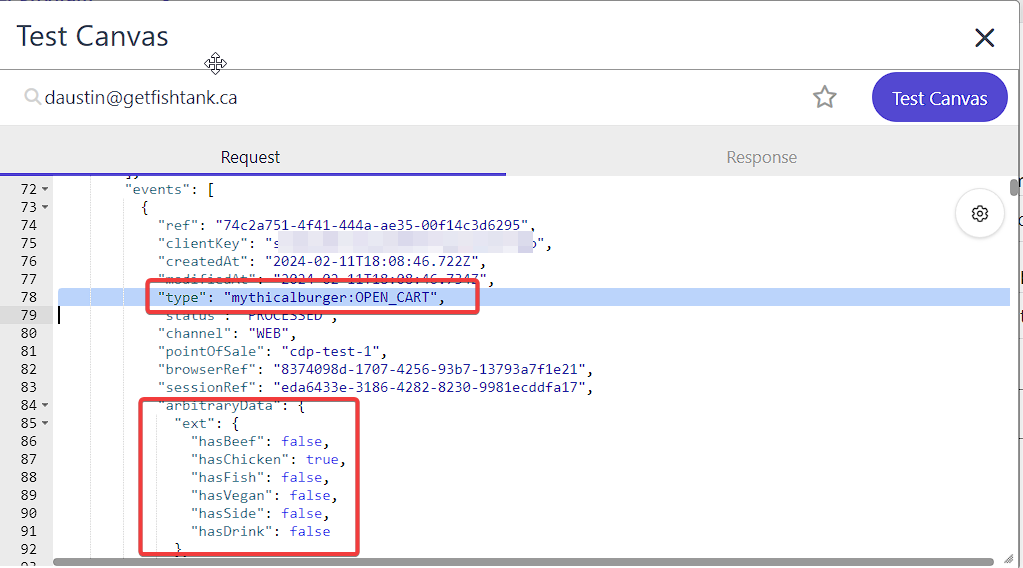
Inside the Test Canvas we can select either a Visitor or a Customer or if we know someone we’re trying
to validate against, we can look them up and in our case search for the mythicalburger:OPEN_CART event.
And voila, we can see our event data showing.
Now if we click Test Canvas right now, we’re going to get an error that looks like this and that’s
because we haven’t yet gone and setup the Decision Table.
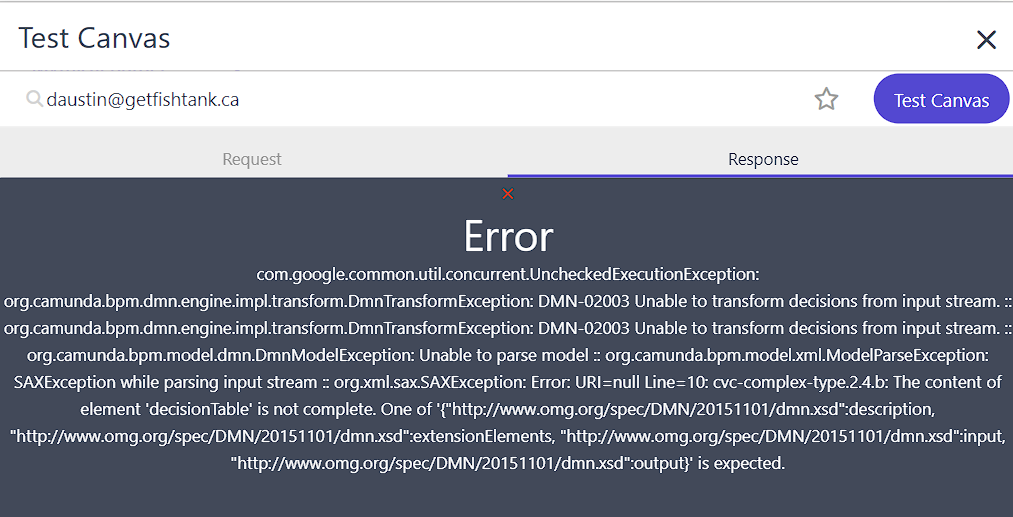
So let’s go set that up now.
Setup a Decision Table in Our Decision Model
Let’s open up the Decision Table that’s back on our Canvas that we setup in the beginning. First thing we see is, well, a table. You have the option to add both input and output fields.
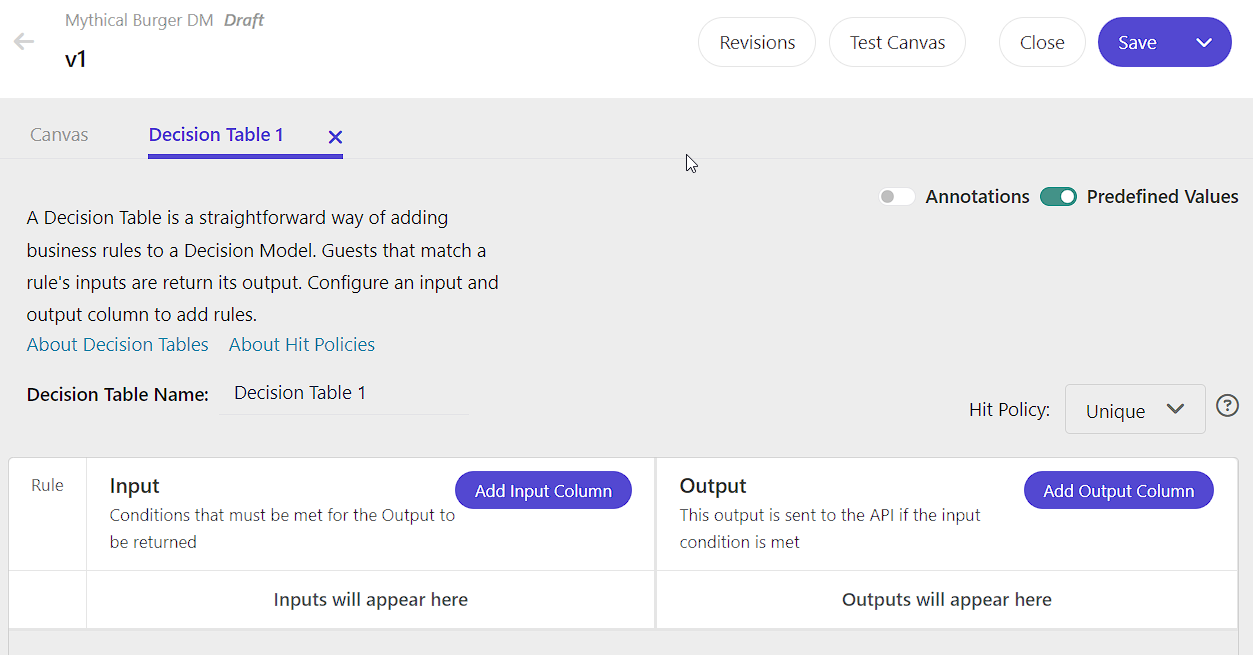
The input fields are all the fields that are returned from our Programmable and the output fields are all the fields that will be available to our API of our Web Experience. In our case, we’re going to create input columns for every key within our data extension. Once we’re done, it will look like this.
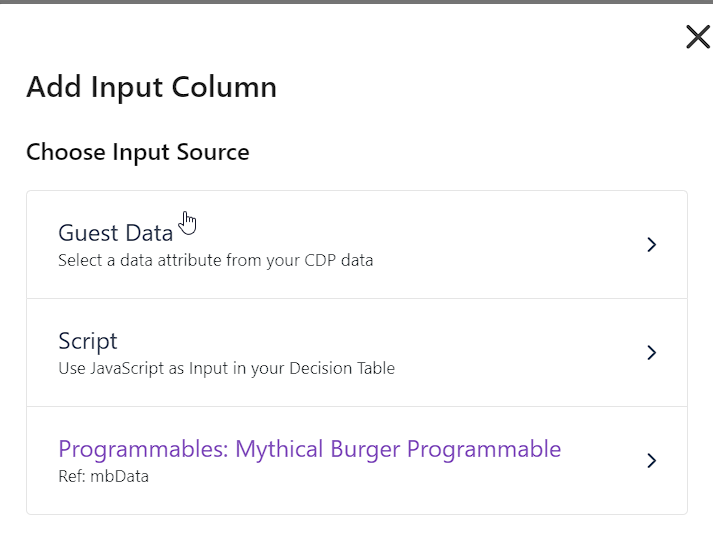
Clicking Add Input Column allows us to select the source of the input. We will select our
Programmable Mythical Burger Programmable.
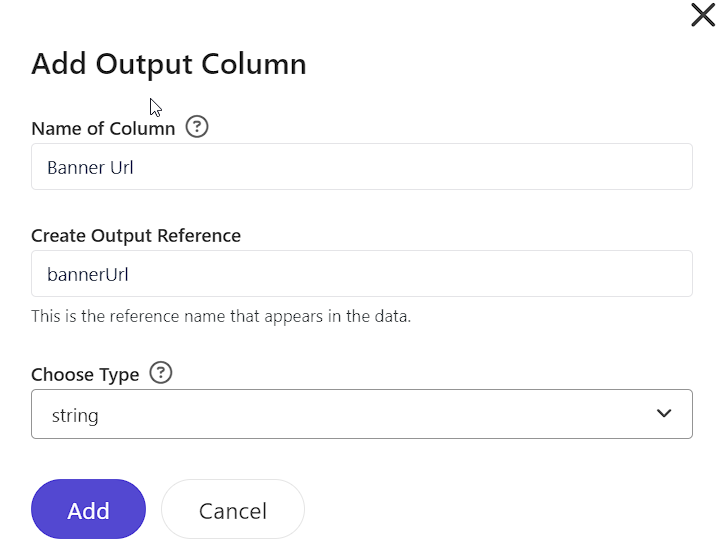
After selecting it, we will be prompted to name our reference our first column.
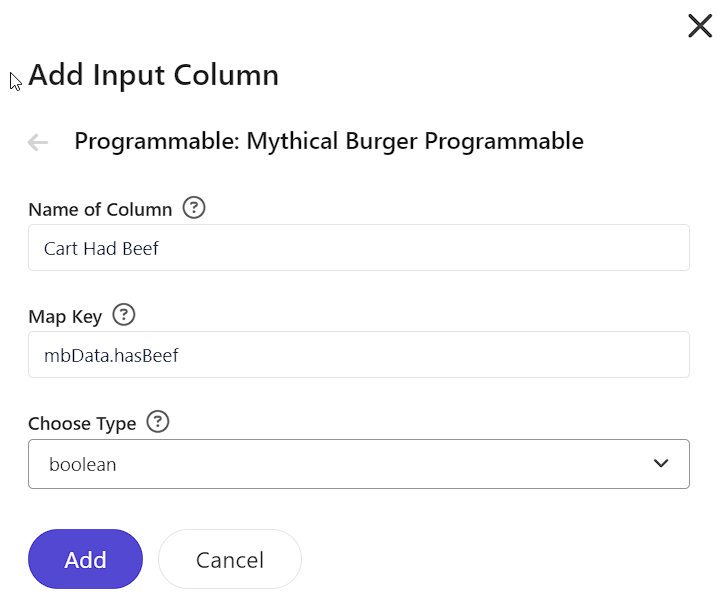
The Map Key is initially filled out and all we had to do was add in the attribute hasBeef
on to it. We also selected the type as boolean. The Name of the Column is a human readable
name for that column.
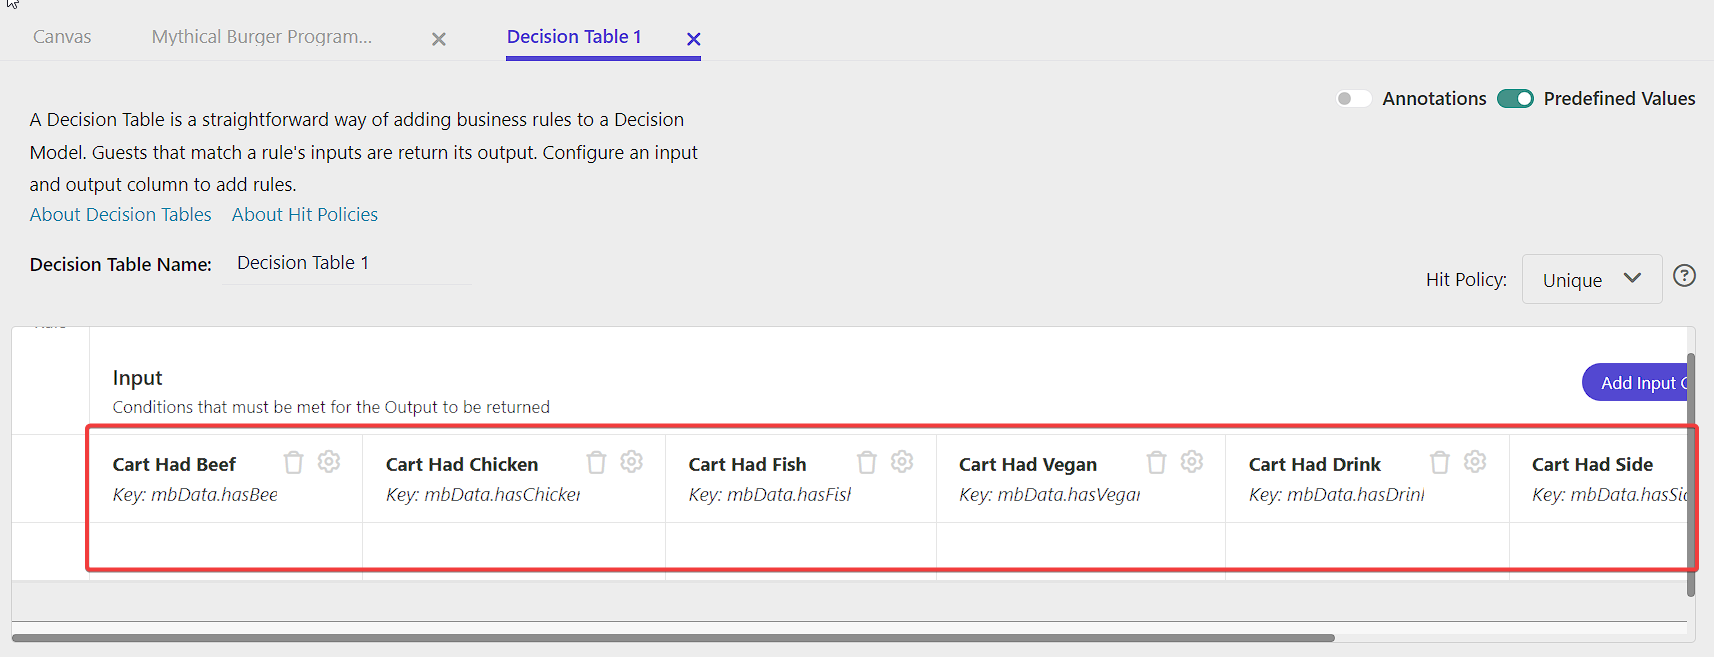
We will then repeat this for all of the attributes within the returned mbData object. It gets a bit
unwieldly but it’s now complete and we need to move on to setting up the Output Columns.
Setting Up Output Columns
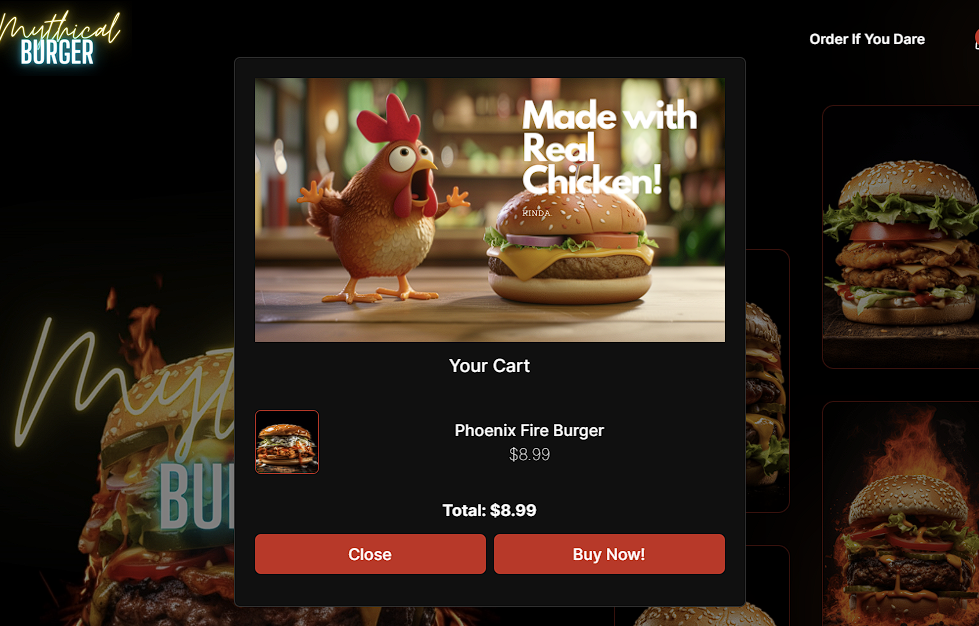
The complexity of the output columns is really dependent on how the data will be used. For us, my strategy is to, depending upon the results, display an appropriate banner at the top of the cart.
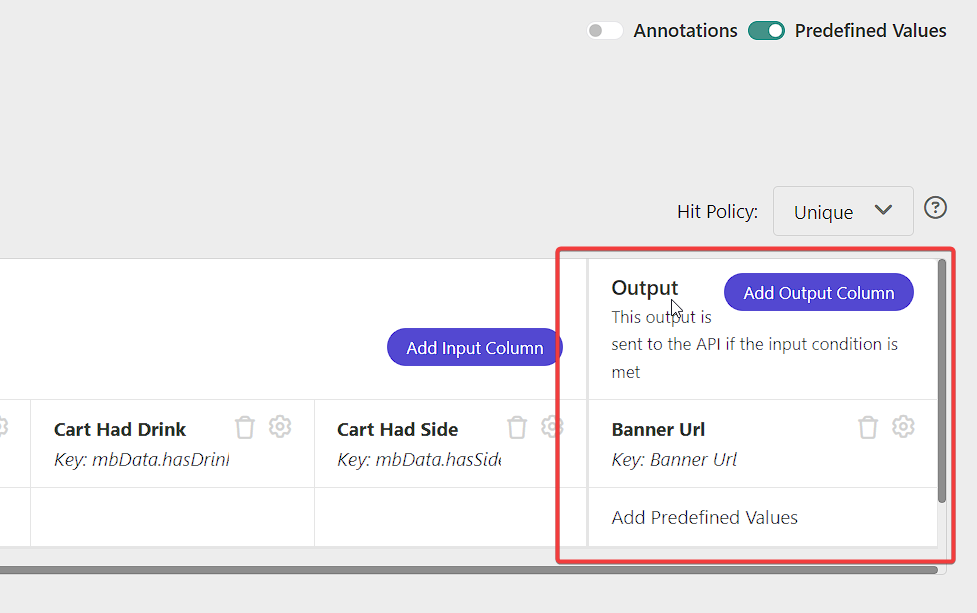
You can see what it looks like here.
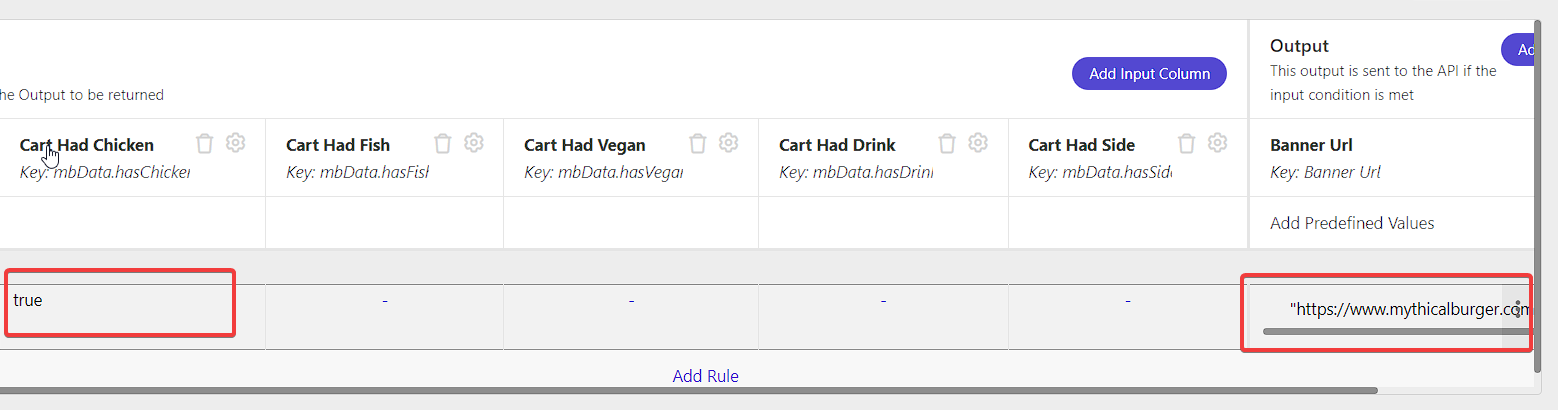
What will be important next is to fill in some of the potential results with inputs and corresponding outputs.
For the purposes of this example, I’m only going to need one row, because I want to display the following ad if someone chooses a chicken burger. This is a “mythical” burger restaurant after all, so we can have a little fun.

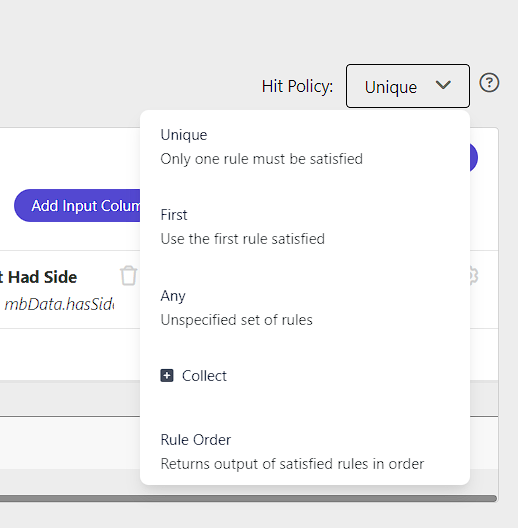
It’s also important to determine what’s called the Hit Policy. This will determine whether one or more
or no results are returned to the Web Experience API. It allows for one or more result to be returned to the
Personalization API. It’s also one of the first places I often look when I don’t receive any results returned.
For us, we’re going to pick the First option. This way, whatever rule is satisfied first, that’s the one
that is returned. Again, this depends on the purpose of your personalization.
We’ve added in our rule for when the Cart Had Chicken is set to true we return a bannerUrl
value with the URL to the banner above.
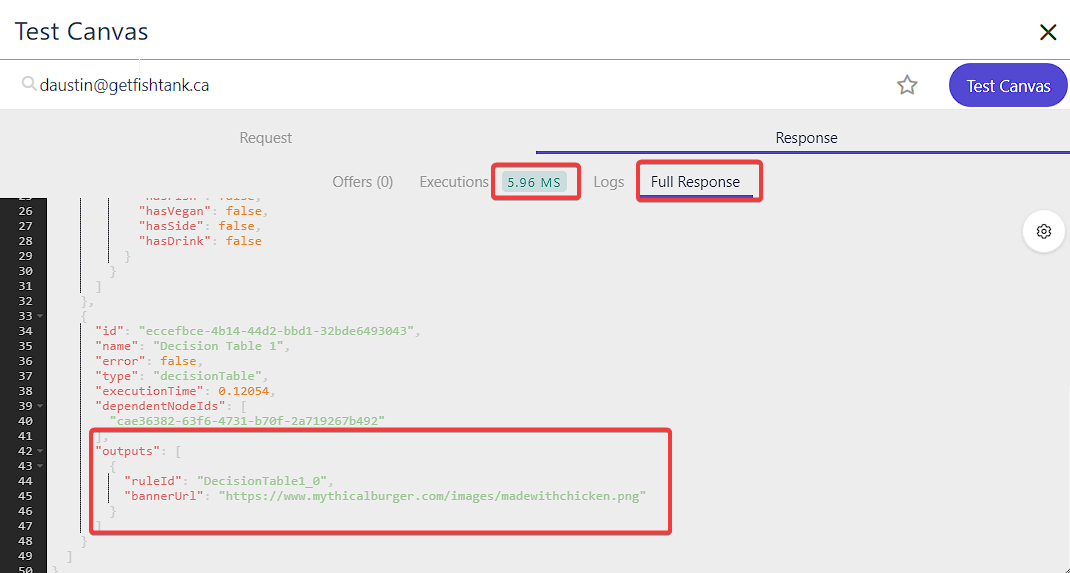
Before we move on, let’s ensure everything is working as it should. We’re going to go back into Test Canvas,
reselect our customer, and click Test Canvas. No more error. We can see in the
Full Response the JSON that’s being sent to the API. We can see it successfully chose the rule in the
Decision Table and is returning the bannerUrl with the right value. We can also see just how
fast this whole process ran. A mere 5.96ms. Fantastic!
If there were errors, it might look something like this. I would strongly recommend you click Save prior
to running your Test Canvas otherwise you might not be looking at what the true result might be.
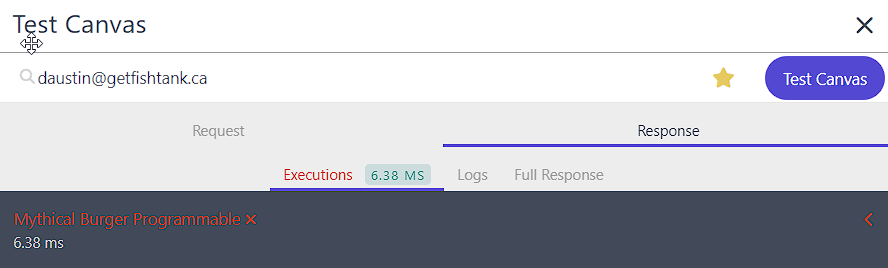
While it’s not immediately obvious, if you click the Mythical Burger Programmable and it will expand and
show you the real error.
As we’re satisfied with the outcome we need to move that variant to Production in order for it to be used.
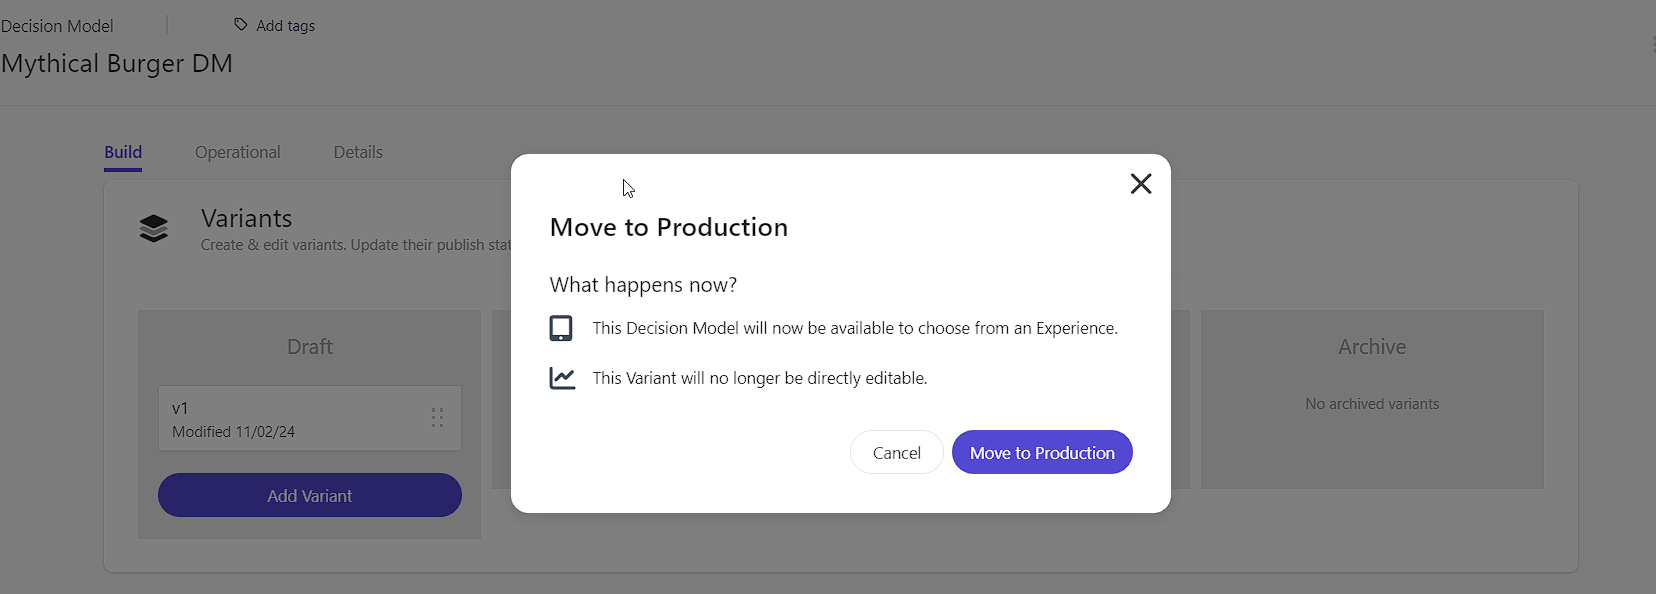
An important thing to note. Once we move this variant to production we can no longer edit it. In order to make
changes we must first create a new variant based upon v1 and then move that to production and archive
the old one.
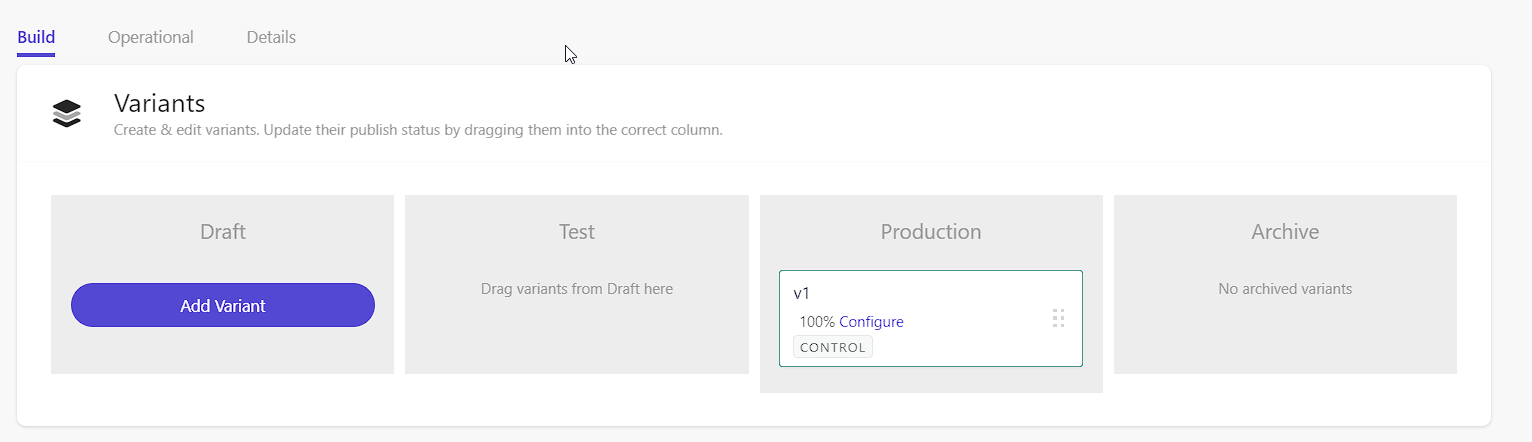
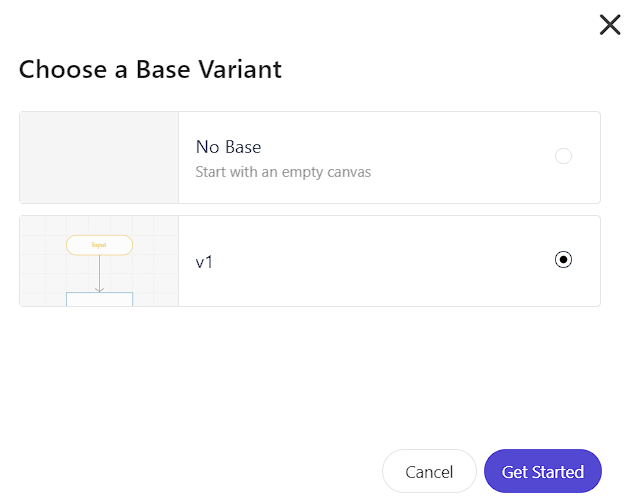
Let’s say we needed to make some changes, then we can click Add Variant. And in the popup, we can select
v1 as the Base Variant.
Create a Web Experience Using Decision Model API Output
We’re nearly there. The last step within Sitecore Personalize is to create a Web Experience.
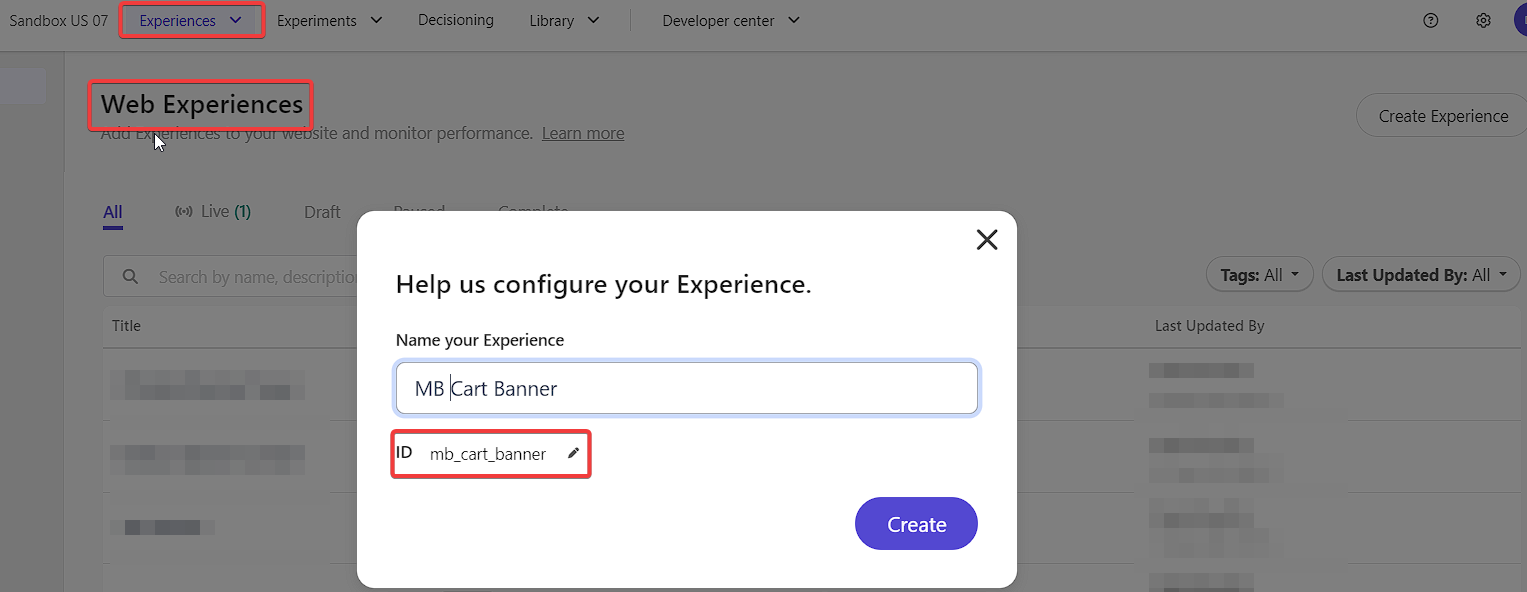
We’re naming our Web Experience MB Cart Banner and that generates an ID with a
value of mb_cart_banner. We will be utilizing this value later when initiating our
Personalization.
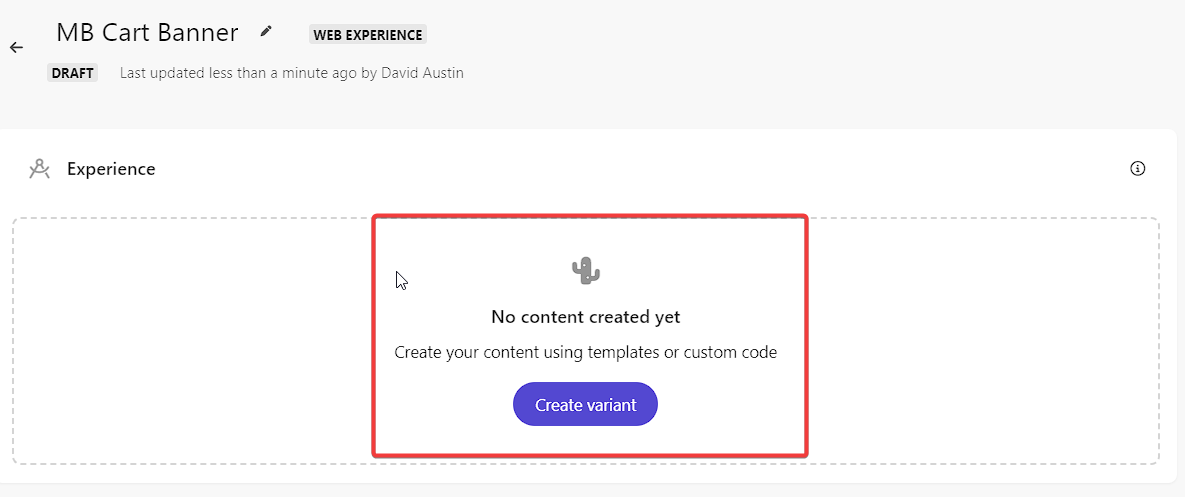
Once we click Create we will next need to create a Variant for the experience.
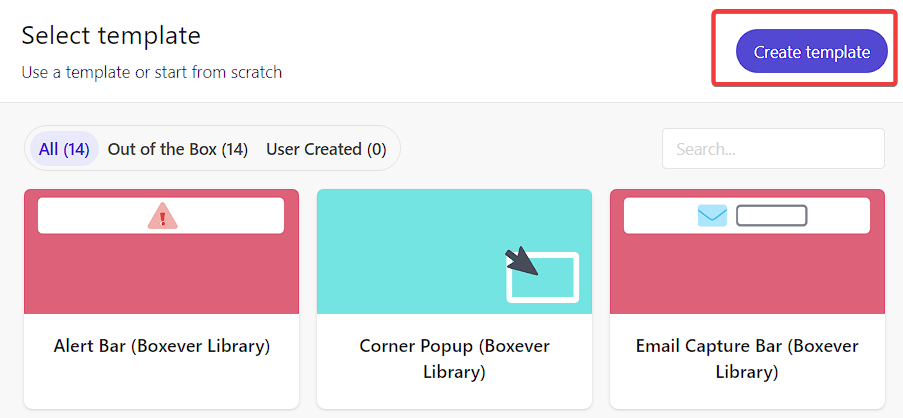
As we are creating something unique, we’re going to select Create Template.
We’re now presented with four tabs:
- HTML
- CSS
- JavaScript
- API - in the format of a JSON object
Setup the API Response of the Web Experience
Let’s look at the API tab first as this is where we need to input the data coming from the Decision Table. The code below is in template engine called Freemarker.
<#-- Construct the API response using Freemarker -->
{
   <#if (decisionModelResults)??>

    <#if (decisionModelResults.decisionModelResultNodes)??>
    <#list decisionModelResults.decisionModelResultNodes as result>
    <#if (result.outputs)??>
    <#list result.outputs as output>
    <#list output as outputName, outputValue>
    <#if (!outputValue?is_hash) && outputName != "ruleId">
    "${outputName}" : "${outputValue}",
    </#if>
    </#list>
    </#list>
    </#if>
    </#list>
    </#if>
  </#if>
  "guestref": "${guest.ref}"
}
Now Freemarker isn’t the easiest to work with. Thankfully Sitecore has snippets you can copy from to get you
going and you can find these on the right side under the Snippets tab.
You might be asking, why am I returning the guest.ref attribute from the guest object? The
answer is simple. I don’t plan on using it, but by returning something simple at the end, I’ve avoided complex loop
logic from being needed within the Freemarker template. You can see how complicated the Freemarker
script can get so just simplify it as best as you can. I could have just as easily created an empty attribute value.
Selecting Preview API at the top of the page, selecting a test subject within the Test Scenario tab and running it, we can now see we’re returning this to the Web Experience.
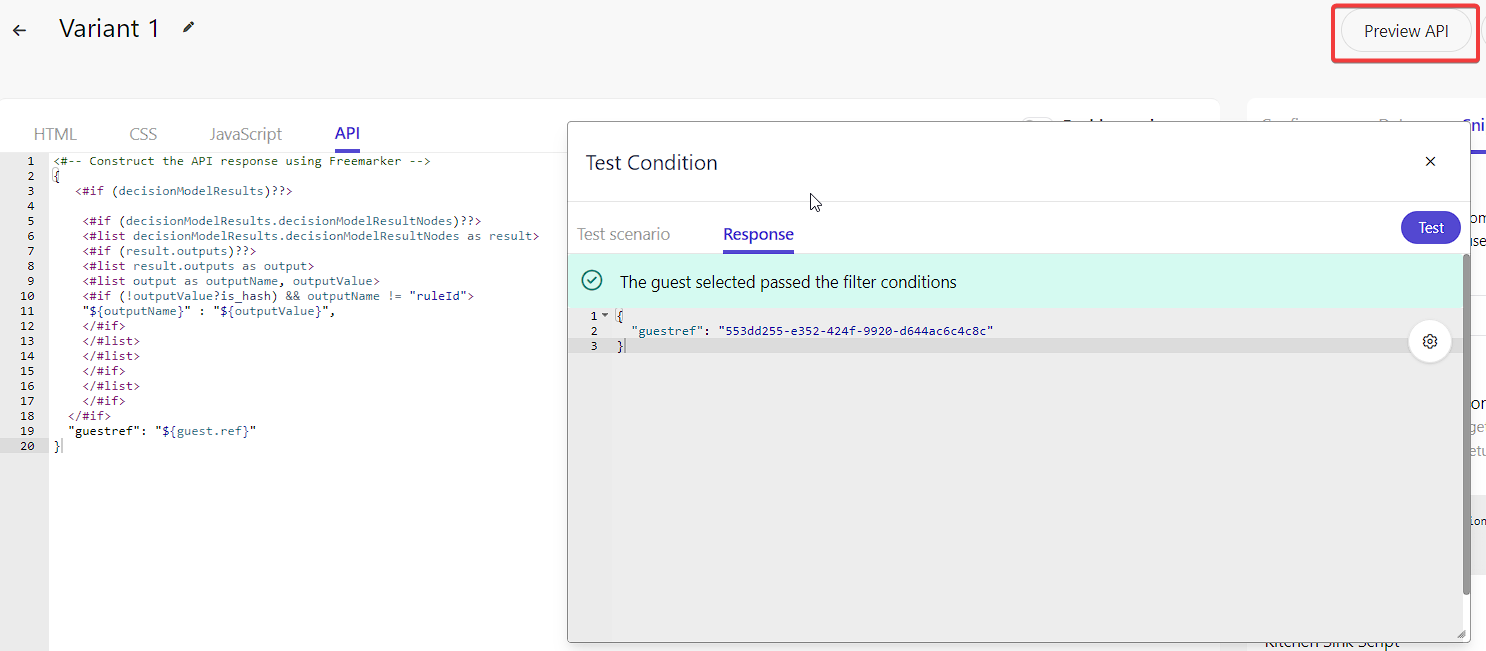
But where is the bannerUrl you ask? It’s not there, because we haven’t hooked up the Decision
Model to the Web Experience so let’s go do that. Save and then hit the arrow next to
Variant 1.
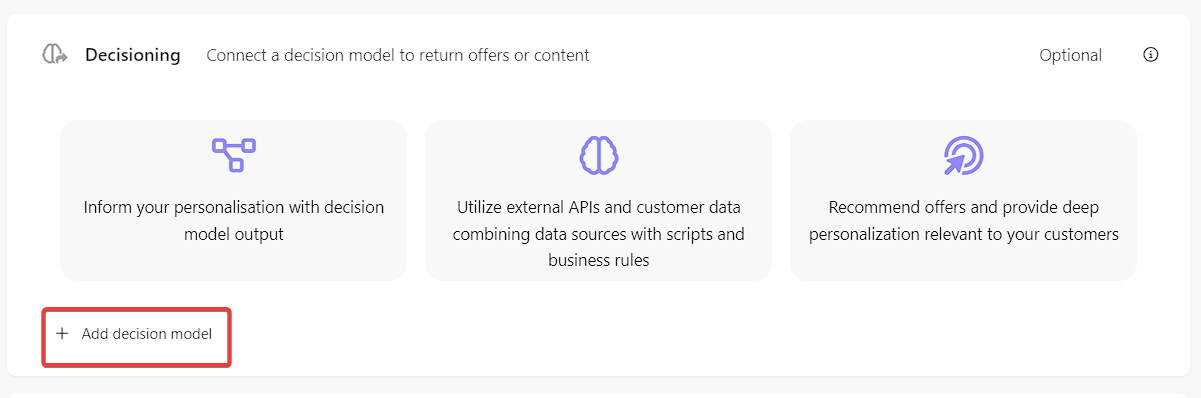
Click the Decisioning option.

And then click Add decision model.
Then select the Decision Model we created earlier.
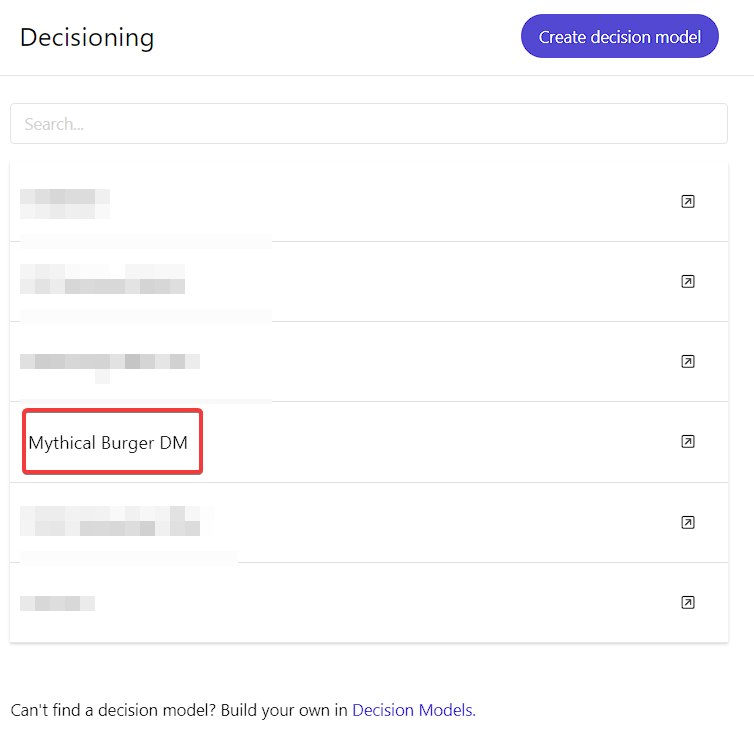
Once selected, click the X and close the tab.
Now with the Decision Model selected, back in our variant, let’s click Preview API again.
Now, the next bit it very different. If we had changed pages in between initiating the OPEN_CART and displaying of said cart, we could run the entire personalization from within Personalize. However, in our case, because it’s a modal, we can’t.
That said, I’m going to show both ways this would work, because I’m a nice guy.
If We Changed Pages
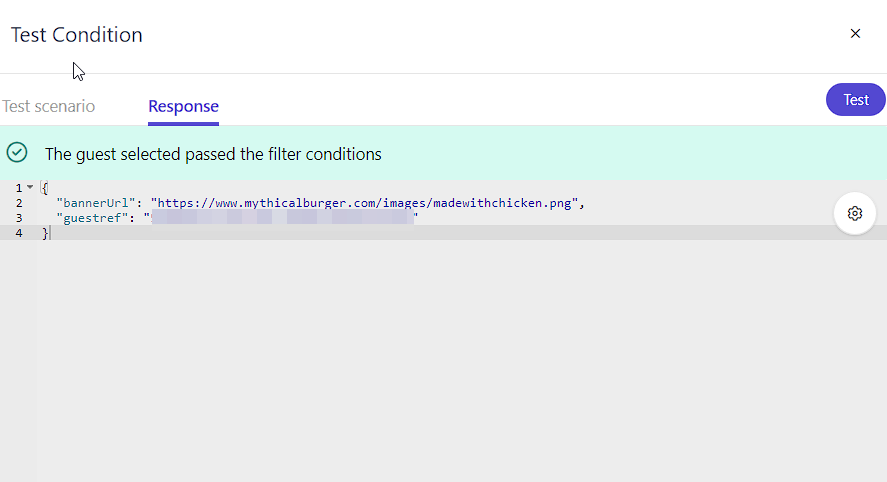
Voila, choosing our guest, we can see the bannerUrl now being processed. This is vital as we need to
access bannerUrl as part of our HTML template.
Within our CartModal.tsx file, we’ve got a div tag ready to accept a marketing banner.
<div id="#marketing-banner"></div>
Thus, in our HTML tab we would change it to be this.
<div id="#marketing-banner">
    <img src="{{bannerUrl}}" />
</div>
In our JavaScript tab, we would change it to be this.
(function () {
  replaceHTMLExact('#marketing-banner');
})();
Now if triggering the opening of a cart changed the page and caused effectively a new VIEW event, we’d see this Web Experience. Sadly, we don’t have that option this time around.
If We Stayed on the Same Page
If we are not changing pages, which in our case we aren’t, we will need to redraw the CartModal.tsx file
using a useEffect. We can do this by first initiating the Personalize Web Experience manually as
follows.
const toggleCartModal = async () => {
    if (!isCartModalOpen) {
      const cdpExtensionData = createExtensionData(cartItems);
      await engage?.event("mythicalburger:OPEN_CART", eventData, cdpExtensionData);


      // Manually call personalize via friendlyId of Web Experience 'mb_cart_banner'.
            const personalizeData = {
        channel: "WEB",
        currency: "USD",
        pointOfSale: "cdp-test-1",
        friendlyId: "mb_cart_banner"
      }
      const response = await engage?.personalize(personalizeData) as MarketingBannerType;
      // Add marketing banner response to cart context
            setModalMarketingBanner(response);
    }
    setIsCartModalOpen(!isCartModalOpen);
  };
From within the CartModal.tsx file we can add the following useEffect to update the
bannerUrl.
useEffect(() => {
    // Update bannerUrl whenever modalMarketingBanner changes
    setBannerUrl(modalMarketingBanner.bannerUrl);
  }, [modalMarketingBanner]);
And then inside the return statement, right where we had our empty div tag from earlier, add the image
being returned.
<div id="#marketing-banner">
  {bannerUrl ? <img src={bannerUrl} alt="Marketing Banner" /> : <></>}
</div>
And that’s it.
Now, when a user adds a chicken related item to their cart, proceeds to open their cart, they’re shown the banner and if they don’t have chicken, they don’t see it.
I wonder what we should personalize next?

Meet David Austin
Development Team Lead | Sitecore Technology MVP x 3
📷🕹️👪
David is a decorated Development Team Lead with Sitecore Technology MVP and Coveo MVP awards, as well as Sitecore CDP & Personalize Certified. He's worked in IT for 25 years; everything ranging from Developer to Business Analyst to Group Lead helping manage everything from Intranet and Internet sites to facility management and application support. David is a dedicated family man who loves to spend time with his girls. He's also an avid photographer and loves to explore new places.