Decisioning in Sitecore CDP & Personalize
Sitecore Personalize is a tool that helps you use your data in a way that improves the experience for your customers, no matter where they interact with your brand. You can use Sitecore Personalize for various tasks, like running experiments on your website, interactive platforms, and triggered events. These experiments help make decisions in real time, test different scenarios, and track how well they're performing.
Here's what Sitecore CDP decisioning empowers your organization to do:
- It takes the reins of intricate decisions, applying business rules to reveal the next optimal action or offer for your guests.
- It champions superior customer experiences by ensuring decisions are spot-on, precise, noticeable, and well-managed.
- It provides the capability to instantly test decision model variants right from the canvas, letting you see offers returned (complete with images!) just as they would appear on your customers' devices.
- It offers access to the complete revision history, enabling an easy reversion of decision model variants (a lifesaver when you want to backtrack or revisit previous models).
Sounds great, right? Now, the hard part: setting it all up. But don’t worry, hopefully this blog will help make decision management a bit less daunting.
In this blog you’ll learn:
- The difference between a decision model and a decision table
- Setting up offers via offer templates
- How to set up your first decision model
- How to add rules and input and output columns
- Best practices for decision modelling
Managing Decision Models
Before we get into it, let's explore how decision models and decision tables work together.
What is a Decision Model?
In Sitecore CDP & Personalize, a decision model is a comprehensive framework designed to automate and enhance decision-making processes that are crucial for personalized customer interactions. It's like a master plan that leverages a variety of technologies to streamline and improve business decisions.
To include business rules in a decision model, you will create a decision table. A decision table:
- Helps you clearly and efficiently set out your requirements when the business rules are complicated.
- Makes it simpler to work out complex logic.
- Makes it easier to spot if any conditions have been overlooked.
What is a Decision Table?
A decision table is a key component of the decision model that helps in making personalized decisions for customer interactions. Essentially, a decision table is a structured, tabular format that holds a set of conditions and corresponding actions.
The decision table works by evaluating each incoming event from a customer against the conditions defined in the table. When a condition is met, it triggers the corresponding action. This action can be anything from personalizing content, recommending a product, sending a promotional email, or any other customer engagement activity.
Our Decision Model Tutorial Use Case
For this tutorial, we’re going to keep it simple and use our guest's nationality to determine the next best offer for our guests. In particular, we’re going to leverage guest data to offer American guests a different discount than Irish guests.
Step 1: Set Up Your Offers
Creating an Offer Template
We’re going to start by creating an offer template for our decision model. An offer is a marketing message that can be presented to guests across various channels.
Before adding an offer to your decision model, you have to make an offer template first.
-
Navigate to Library > Offer templates. (Note: This used to be located in the Developer center.)
-
Click on Create Offer Template at the top right.
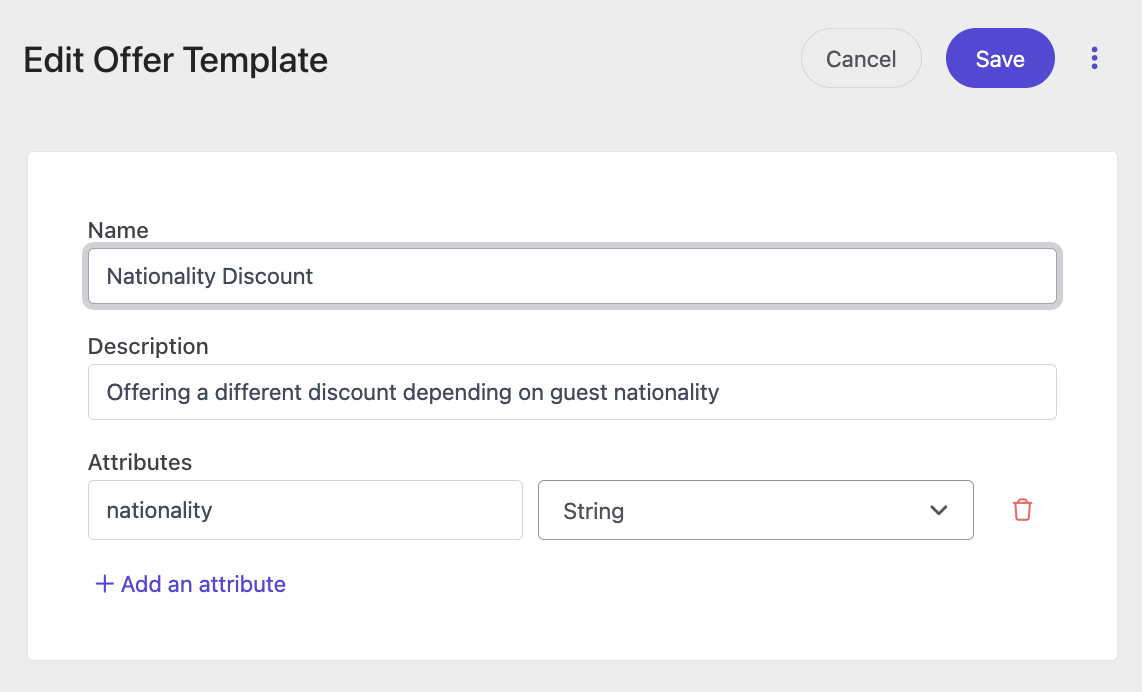
- From the Create Offer Template screen, complete the following fields:
- Name: Name your offer in a way that allows you to clearly identify what the offer is. For this example, I’m going to name mine, ‘Nationality Discount.'
- Description: Enter a description for the offer template. The more descriptive, the better.
- Add attributes by clicking on the + Add an attribute button. To share your offers correctly with the service or webpage that uses them, you need to add some details (attributes) to the export from your offer template. It's important to note that the names you use for these attributes have to match what the service or webpage expects. For instance, if the webpage is looking for something called "linkUrl", and you instead write it as "link-url", this difference will cause an error when you try to run the program. Always double-check your attribute names to make sure they're correct.
- Click Save.

Create an Offer
- Navigate to Decisioning > Offers to set up the unique offers for each nationality.
- Right-click on Create Offer at the top right.
-
Select the offer template we just created (Nationality Discount). We’re going to use it as a base for our offers.
-
From the Create Offer screen, complete the following fields:
- Name: I am going to create two offers (one for each nationality).
- Description: Describe the offer.
- Status: Set to active. If you leave it as inactive, the offer can not be shown to a guest.
- We’re not going to schedule our offer, but you can schedule yours by toggling the Scheduled button.
- Offer Attributes: Complete the appropriate offer attributes fields.
-
Click Save and repeat for the other nationality.

Step 2: Set Up a Decision Model
Follow steps 1-4 from this blog to set up a decision model. I’d also encourage you to read through the rest of the blog to get a better understanding of critical topics like decision model components, the decision model lifecycle, and variant states, as we won’t be covering that in this blog.
Step 3: Start Adding Rules With a Decision Table
Add a Decision Table
-
Add a Decision Table by dragging and dropping it from the component palette to the canvas.
-
Hover over the decision table and click on the pencil icon to edit.
- In the Decision Table Name field of your new decision table, enter a name for the decision table. Choose a name that accurately reflects the outcome of the decision table. This will help with readability and assists others in understanding the logic and intent of the decision model variant.
-
At the top right of the Decision Table, select a Hit Policy.
Each decision table must have a designated hit policy. A hit policy determines the number of rules that can be satisfied simultaneously and identifies which of those satisfied rules contribute to the decision table's final result. When a decision table is called, Sitecore Personalize examines each rule. The process of Personalize evaluating each rule to determine if the condition is met is called a "hit". If the condition is satisfied, it’s labelled as a "satisfied" rule. See Sitecore’s documentation to learn about the behaviour of each hit policy.
For our purposes, we’re going to select Any.
Add an Input Column
The input column is where the information required to make a decision is stored. For this blog, we're going to configure an input column using guest data, but you can also configure an input column that uses a data source or JavaScript.
-
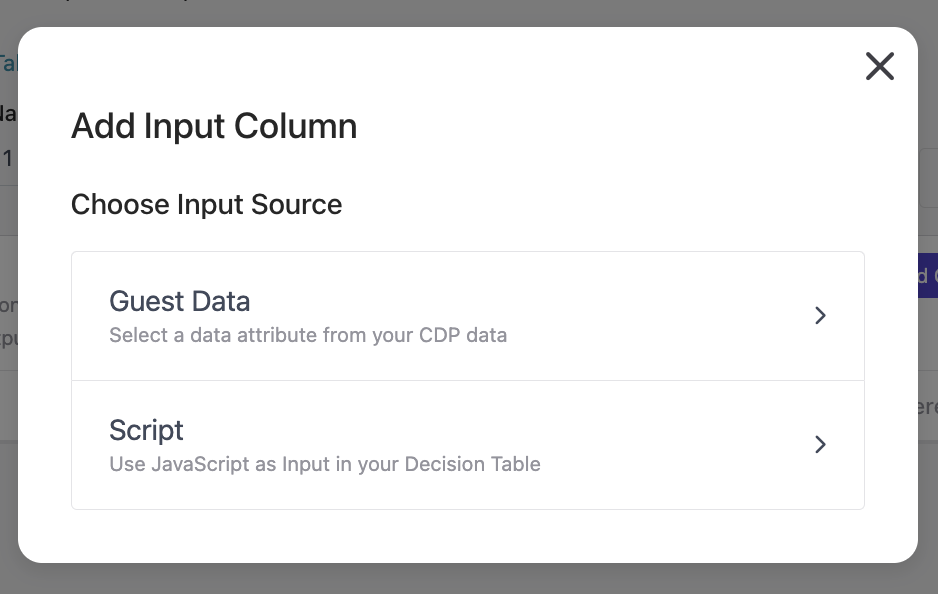
To add an input column, click on the Add Input Column button. From the pop-up tile, select Guest Data as your input source.
Note: If you connected another component to the decision table on the decision canvas, you’ll also be able to choose from the following additional options:
- A programmable decision
- A data system
- An analytical model
- Another decision table
- In the Choose Guest Data Key drop-down list, select the guest attribute you want to use as the input source in the decision column. You can select from a bunch of different options depending on your needs, from guest language and products to income and last seen date. For this example, we’re going to select 'Guest Nationality.'
- The name of the column should autogenerate based on the input source you selected. This is the readable name of the column, and will not show up in your data.
-
From the Choose Type drop-down list, select the data type for the input. For this example, we're going to select string but there are other data types to choose from including:
- String: a text value.
- Integer: a number value.
- Long: an integer that is longer than the size of the standard integer type. This is useful for large numbers.
- Boolean: a binary value that can either be true or false.
- Double: represents an integer with decimal values. This is useful for monetary values.
-
Date: represents a date value format.
-
Click Add.
-
Repeat these steps to create an input column for 'American.'
-
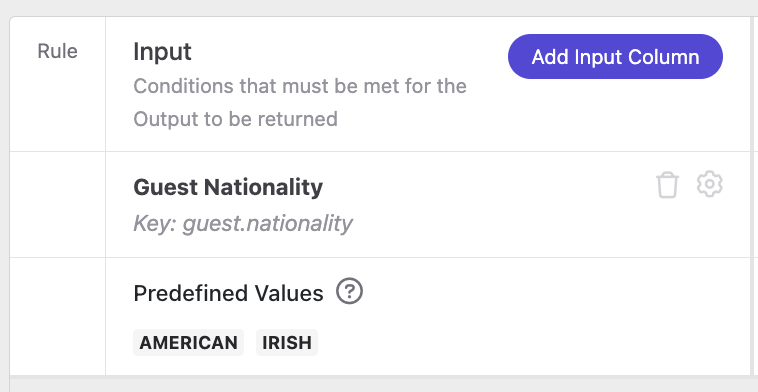
Add Predefined Values. Predefined values help you speed up the addition of repetitive values and eliminate typing errors for string values. To add predefined values, click on Add Predefined Values and enter values. I’m going to enter both nationalities (American and Irish).

Add an Output Column
An output column contains the output of a decision table. Typically, this result is an offer or content that the decision model variant delivers back to the experiment.
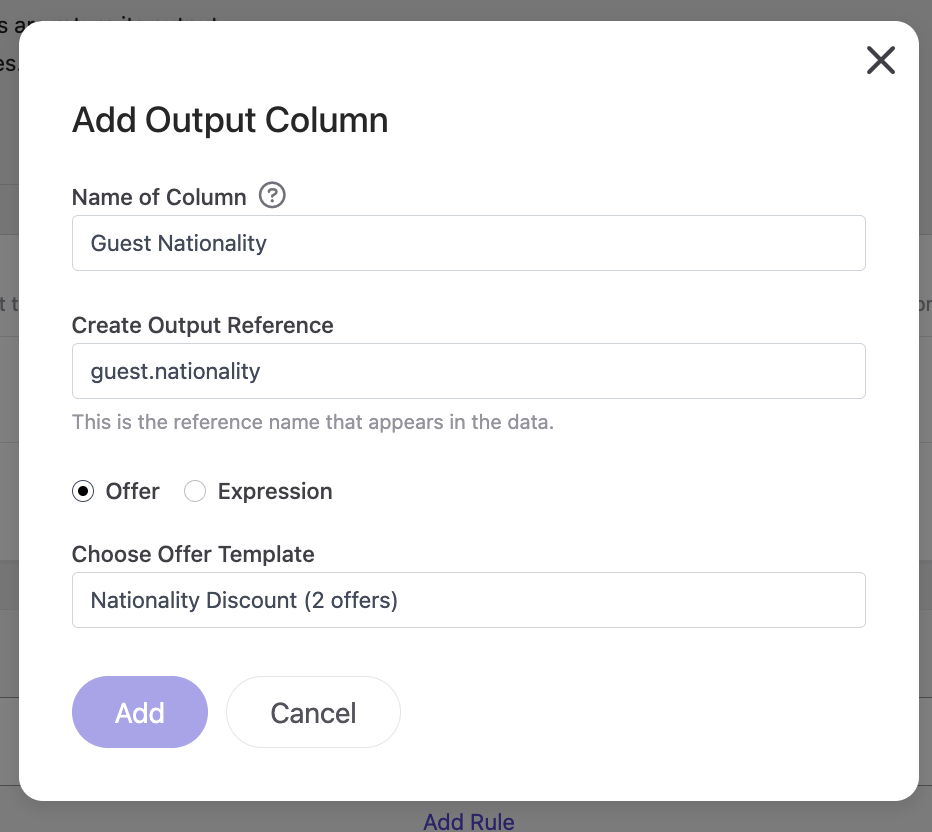
- On the Decision Table tab, next to the Output table header, click Add Output Column.
-
Name the output column. This name will appear as a column header. I’m going to call mine, ‘Guest Nationality.' I’ll also use this as the output reference in the Create Output Reference field, but I’ll change it to ‘guest.nationality’ as this is the reference name that appears in the data.
-
Select the Offer radio button. Then, from the Choose Offer Template field, type the name of the offer template we created (Nationality Discount), and click Add.
Add Rules
The last thing we’re going to do in our decision table is add rules. When you make a new rule for a decision table, you need to add an input (condition) and corresponding output (result). The kind of condition you can put in depends on what type you chose while setting up the input column.
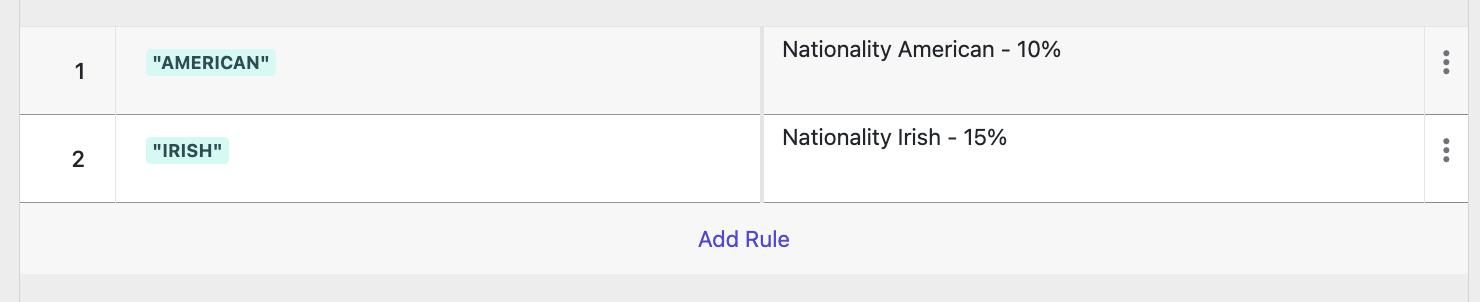
- Click Add Rule. A new row will appear in the table.
- For our first rule, we’re going to offer Americans a 10% discount. To do so, click on the first cell of the first row. From the String pop-up, select 'American' from the predefined values. Make sure that the drop-down menu is set to “Match one of…”.
- Under the output column for the same row, click on the cell and select the offer for Americans.
-
Repeat for Irish guests. The final table should look like:
-
Click Save.
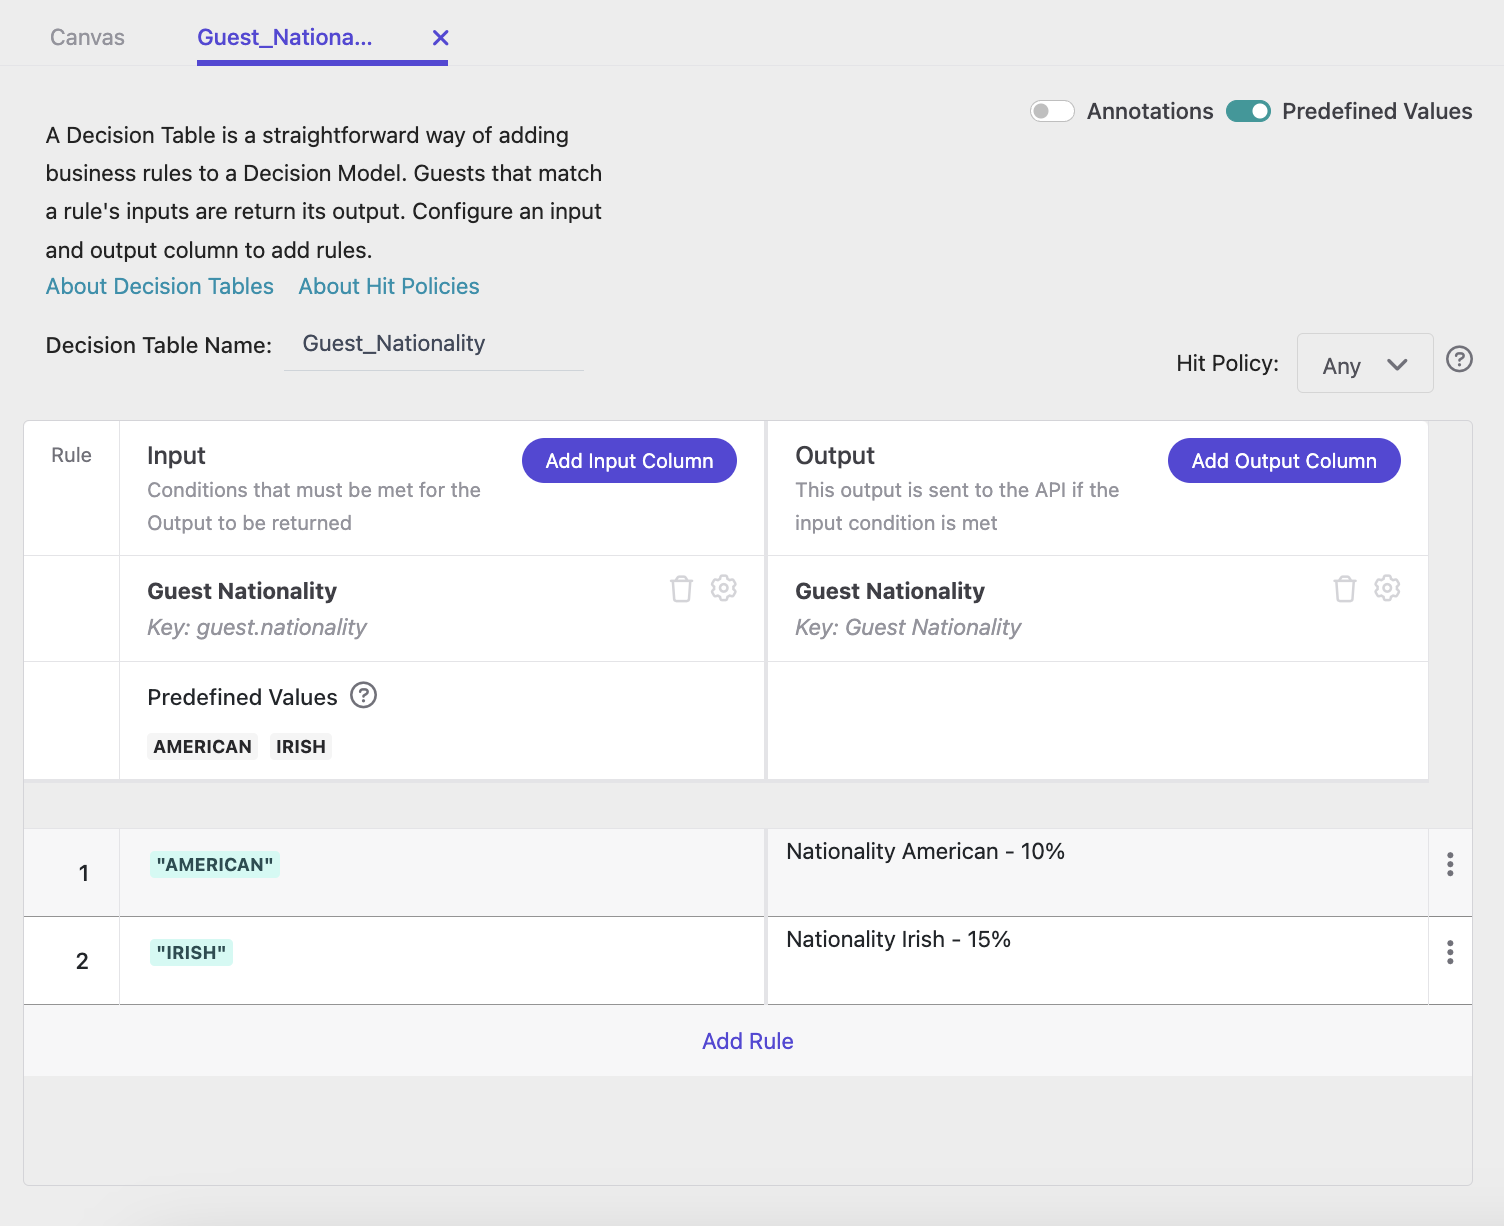
Completed Decision Table
Your completed decision table should look like:
Test the Canvas
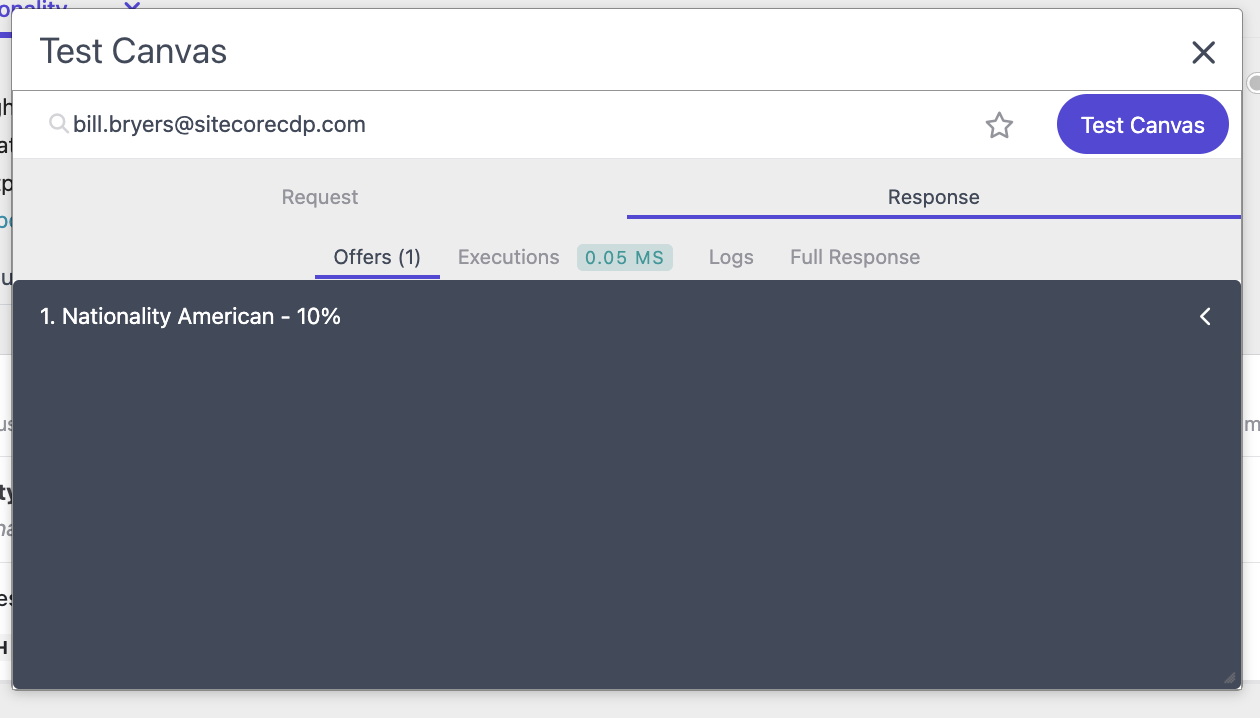
To make sure you've set everything up correctly, be sure to test your canvas.
- Select the Test Canvas button from the top banner.
- From the test canvas pop-up, search for a contact in your CDP by clicking on the search field. Select the contact, then click Test Canvas.
- Click on the Response tab. If your decision model has been set up correctly, your contact will receive an offer.
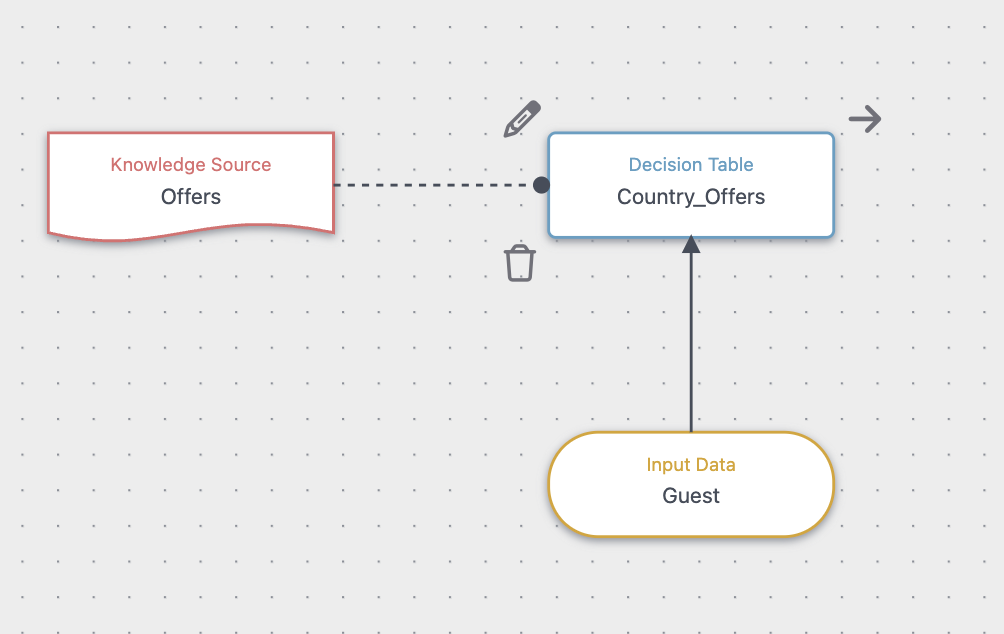
Step 4: Add Knowledge Source & Input Data to Canvas
- Navigate back to the decision model and click and drag the Offers component onto the canvas. Then, connect it to the decision model.
-
Click and drag the Guest input component and place it at the bottom of the canvas. The canvas should look like this:
Next Steps
Congrats! You've built your first offer in Sitecore CDP & Personalize. From here, you'll need to create another variant before moving the decision models into Test, then Production, which I'll cover in a future blog.
Decision Model Best Practices
To get the most out of your decision models, follow these tips:
- IMPORTANT: Build your decision model from the bottom up. Your ultimate decision—the key conclusion that your model variant will make—should be placed at the topmost position on your canvas.
- Keep the structure of your decision model variant consistent. This makes it user-friendly and allows anyone to quickly grasp the primary decision by just looking at the top of the decision canvas.
- Don’t use too many components in your decision model to ensure optimal performance.
👋 Hey Sitecore Enthusiasts!
Sign up to our bi-weekly newsletter for a bite-sized curation of valuable insight from the Sitecore community.
What’s in it for you?
- Stay up-to-date with the latest Sitecore news
- New to Sitecore? Learn tips and tricks to help you navigate this powerful tool
- Sitecore pro? Expand your skill set and discover troubleshooting tips
- Browse open careers and opportunities
- Get a chance to be featured in upcoming editions
- Learn our secret handshake
- And more!


Meet Robyn James
Content Marketing Strategist | Sitecore Strategy MVP
📚⛰️🎨
Robyn brings over ten years of experience crafting impactful content marketing and communications solutions for a number of high-profile brands. With diverse sector experience—including healthcare, energy, tourism, hospitality, and telecommunications—she has a deep knowledge set and the ability to easily adapt to differing industry needs.
Robyn is adept at blending data-driven research with a pragmatic approach to creativity, delivering results that inform audiences, change perceptions, or inspire action. In her spare time, she enjoys digital painting, reading, and being a pet mom to her fluffy brood of three.