Creating a Custom Rendering Contents Resolver in Sitecore
While working through some content modeling and creating the corresponding templates in Sitecore, I quickly noticed that Sitecore allows a lot of custom creativity when it comes to structuring data. Whether it is a simple template with a few fields or a more complex structure that contains children and even grandchildren of various types, it really does not limit what you can do. However, when it comes to getting those items into your view, the out of the box rendering contents resolvers do not always give you what you need.
Sitecore comes with a few different rendering contents resolvers (RCR) options out of the box which in most cases, can cover everything you would need. You can choose:
- Context Item Children Resolver: resolves/serializes the children of the context item
- Context Item Resolver: resolves/serializes the context item
- Datasource Item Children Resolver: resolves/serializes the children of the rendering’s datasource item
- Datasource Resolver: resolves/serializes the rendering’s datasource item
- Folder Filter Resolver: resolves items of Folder template type. The Template ID is specified in the Item Selector Query field of the resolver item in Sitecore.
- Sitecore Forms Resolver: resolver specific to form items.
The above RCRs can, most of the time, cover anything you are looking to accomplish, but let’s take a look at the example stated in the introduction paragraph. Let’s say you have an item that has fields, children and grandchildren. Which resolver would you choose? The Datasource resolver would give you the items data fields but no children and choosing the Datasource Item Children Resolver would give you an array of all the children but not the original item’s data. What you are looking for is a resolver that resolves both the Datasource Item and its children and grandchildren, etc.
That leaves you with one option — creating your own custom RCR.
Creating a Custom Content Resolver
In this short walkthrough, you will be shown how to:
- Create the RCR class in your Project’s Solution
- Create the Sitecore RCR Item
- Update the JSON Rendering item to use the new resolver
Creating the Rendering Contents Resolver Class
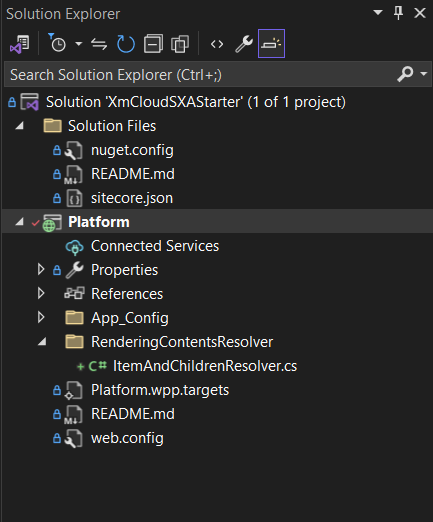
First we will need to create the folder structure in your project solution. To do this:
- Load up your solution and inside your project, if it does not already exist, create a new folder and name it RenderingContentsResolvers
- Then right click the new folder and select Add and then New Item
- Name your class — for this example I went with ItemAndChildrenResolver.cs
Writing the Resolver Class
At the top of your file, we will need to import the following:
using Newtonsoft.Json.Linq;
using Sitecore.Data.Items;
using Sitecore.Diagnostics;
using Sitecore.LayoutService.Configuration;
using Sitecore.LayoutService.ItemRendering.ContentsResolvers;
using Sitecore.Mvc.Presentation;
using System.Collections.Generic;
using System.Linq;
Followed by the namespace and class for the resolver itself
Note: Ensure your namespace has the correct spelling and matches the project setup we did previously.
using Newtonsoft.Json.Linq;
using Sitecore.Data.Items;
using Sitecore.Diagnostics;
using Sitecore.LayoutService.Configuration;
using Sitecore.LayoutService.ItemRendering.ContentsResolvers;
using Sitecore.Mvc.Presentation;
using System.Collections.Generic;
using System.Linq;

namespace XmCloudSXAStarter.RenderingContentResolvers
{
    public class ItemAndChildrenResolver : RenderingContentsResolver
    {
        public override object ResolveContents(Rendering rendering, IRenderingConfiguration renderingConfig)
        {

        }
    }
}
In this example we are creating a RCR that gets the initial datasource item, then recursively calls a GetChildren method until no more child items are found and then finally returns the full object with each items children added as an array of childItems.
Here is the full file:
using Newtonsoft.Json.Linq;
using Sitecore.Data.Items;
using Sitecore.Diagnostics;
using Sitecore.LayoutService.Configuration;
using Sitecore.LayoutService.ItemRendering.ContentsResolvers;
using Sitecore.Mvc.Presentation;
using System.Collections.Generic;
using System.Linq;

namespace XmCloudSXAStarter.RenderingContentResolvers
{
    public class ItemAndChildrenResolver : RenderingContentsResolver
    {
        public override object ResolveContents(Rendering rendering, IRenderingConfiguration renderingConfig)
        {
            //check if the parameters are not null
            Assert.ArgumentNotNull(rendering, nameof(rendering));
            Assert.ArgumentNotNull(renderingConfig, nameof(renderingConfig));

            //get the datasource item
            Item datasourceItem = this.GetContextItem(rendering, renderingConfig);

            //return null object if the datasourceItem is null
            if (datasourceItem == null)
            {
                return null;
            }

            //initialize the JSON object to be returned with the datasourceItem details
            JObject jobject = ProcessItem(datasourceItem, rendering, renderingConfig);

            //get the children of the datasourceItem
            IEnumerable<Item> items = GetItems(datasourceItem);
            List<Item> itemList = items != null ? items.ToList() : null;

            JArray children = GetChildren(itemList, rendering, renderingConfig);

            if (children != null)
            {
                jobject["childItems"] = children;
            }

            return jobject;
        }

        private JArray GetChildren(List<Item> itemList, Rendering rendering, IRenderingConfiguration renderingConfig)
        {
            //return the JSON object if children do not exist
            if (itemList == null || itemList.Count == 0)
            {
                return null;
            }

            JArray children = ProcessItems(itemList, rendering, renderingConfig);

            //then parse the list to get those children
            int index = 0;
            foreach (Item item in itemList)
            {
                children[index]["templateId"] = item.TemplateID.ToString();

                IEnumerable<Item> items = GetItems(item);
                List<Item> childList = items != null ? items.ToList() : null;

                JArray childLinks = GetChildren(childList, rendering, renderingConfig);

                if (childLinks != null)
                {
                    children[index]["childItems"] = childLinks;
                }
                index++;
            }
            return children;
        }
    }
}
Publishing the Rendering Contents Resolver
To do this simple:
- Right click your project in the Explorer Menu and select “Publish”
- Once the tab loads, click the “Publish” button
- If it worked, you should see a green success bar
Creating & Editing the Rendering Contents Resolver Item in Sitecore
As of now, you should have a RCR class deployed and ready to go. So let’s make the corresponding Sitecore item so we can actually use it. To do this:
Creating the Item
- Log into your Sitecore XM Cloud instance and head over to the Content Editor
- Navigate yourself to sitecore / System / Modules / Layout Service / Rendering Contents Resolver
- From here you can create a new Rendering Contents Resolver by right clicking the folder and choosing “Insert → Rendering Contents Resolver”
- Name your resolver. Note: I recommend you name the resolver the same or close to what you named your class to avoid later confusion.
Editing the Item’s Values
Once created, its now time to fill in the values.
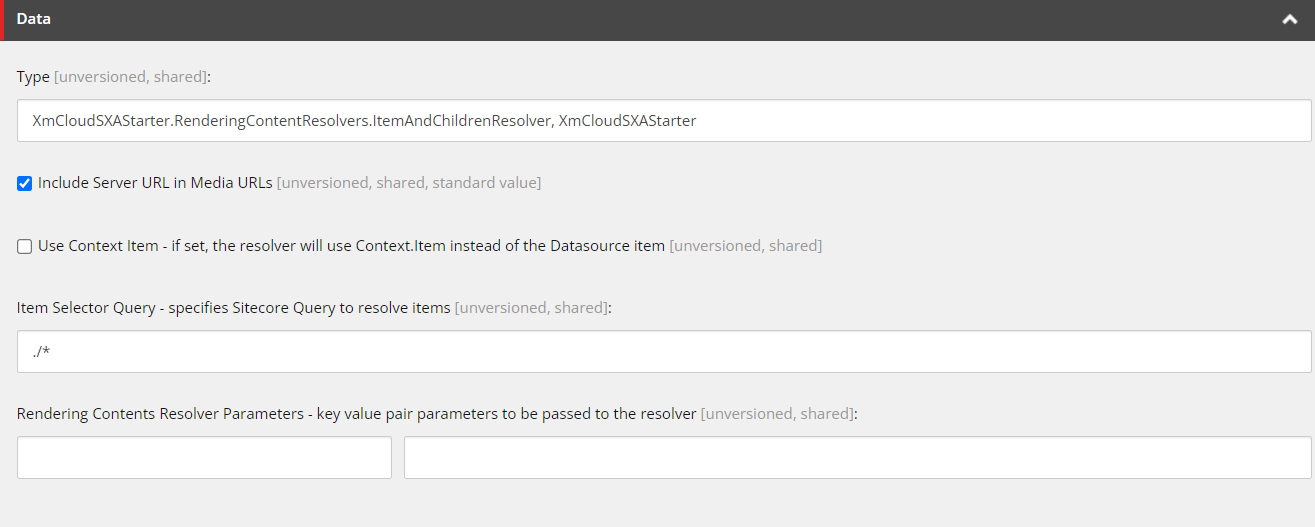
- Type: This is where you will fill in the namespace and class name values so the resolver knows where in your project to find the appropriate class.
- The format is: { namespace }.{ class name }, {Solution name}
- For our example that will be:
XmCloudSXAStarter.RenderingContentResolvers.ItemAndChildrenResolver, XmCloudSXAStarter
- Include Server URL in Media URLs: This is checked by default, leave it checked.
- Use Context Item: Check this if you would like your resolver to resolve the Context Item instead of the Datasource Item. For our example, leave it unchecked.
- Item Selector Query: This is where you will specify where in the content tree you want your resolver to select from. For this example, it is simply
./*as we only want the datasource we’ve selected in the rendering. -
Rendering Contents Resolver Parameters: Here is where you can add key value pairs to be passed to the resolver. In our case, we can leave this blank.
The final resolver should look similar to this:
Saving Your Changes
- Click the save button in the top ribbon
Updating the Rendering Item to Use the New RCR
The final step in the process is simple yet arguably the most important. It is changing the settings of the rendering item to actually use the new Rendering Contents Resolver Item you created in the previous step. To do so:
- Navigate to the rendering item you want to add the new Rendering Contents Resolver to.
- Scroll down through the rendering settings until you find Layout Service settings.
-
Under the Rendering Contents Resolver dropdown, select your newly created RCR item
-
Save your changes.

That’s All Folks
There you have it, a complete step by step guide that walks you through creating, configuring and deploying your very own custom Rendering Contents Resolver. In this example we created a very generic “Component and all its descendants” resolver but keep in mind these custom resolvers can be as complex and specific as needed. Hopefully this blog has helped you get one step closer to finishing your custom solution. Stay tuned for more upcoming blogs in this Sitecore Development 101 series.

Meet Jeremy Murphy
Sitecore Developer
🤣🌎🎱
Jeremy Murphy is a self-driven full-stack developer with over six years of software development experience. He has been Sitecore certified for several years and also has certifications in Web Accessibility. He is fluent in front-end frameworks such as React and in developing scalable custom web APIs that deliver on customer experience. Outside of work, he is passionate about health and fitness and spends a lot of his time outdoors, either camping in the Maritimes or travelling the world.