Intro to Taxonomy, Schema, and Pages in Sitecore Content Hub
Configuring asset details in Sitecore Content Hub can feel overwhelming, especially if you're new to the platform. In this easy-to-follow guide, we'll break down a few essential building blocks in Content Hub—in particular, taxonomies, schema extension, and pages—and then show you how they all work together in a step-by-step example that will guide you through how to extend asset details to better organize your assets.
Taxonomy Relations in Sitecore Content Hub
What is a Taxonomy in Sitecore Content Hub?
In Content Hub, taxonomy serves as the organizing framework for your content. It categorizes your various assets—like images, videos, and documents—into specific groups, making it easier for users to find what they need. The primary aim is to streamline the user experience, like how a library or search engine organizes its content for easy navigation. In Sitecore, taxonomies are particularly handy when setting up search filters, configuring conditional fields, or adding security.
With taxonomies, you can sort your digital assets however you'd like, such as by asset type, business department, or subject matter. And, as Content Hub taxonomies are hierarchical by nature, you can streamline how your assets are organized. For example, "Brand Assets" can be used as a parent taxonomy for child items like "Logo", "Letterhead", etc.
Taxonomy vs. Option Lists
Content Hub also offers the ability to create option lists. An option list is a list of possible values defined for a property. While taxonomies offer a hierarchical, flexible way to categorize complex content, option lists provide a simpler, flat structure for categorization, ideal for straightforward content that doesn't require multiple layers of organization. Confused as to which one you should use?
Use taxonomy relations if:
- You're dealing with a long list: Taxonomies work best when you've got a lengthy list of values to manage—though, try to keep lists as simple as possible to keep things manageable.
- You need to restrict assets or apply security: Unlike option lists, taxonomies can handle security properties. So, if you need to enforce rules, such as limiting access to particular assets based on certain criteria, taxonomies are your go-to.
- Inheritance matters: Option lists can appear as facets in search pages but can't inherit values from your overarching data model. Taxonomies, on the other hand, play nicely with your data model family tree. For example, if you've set an option list in the M.ProductFamily, you can't make it a facet filter on the Products search page without converting it to a taxonomy.
- You've got extra info: Need to include additional data like descriptions? Taxonomies are more flexible since they're based on schema definitions. Option lists, however, are pretty straightforward and won't hold more than the basic value.
Use option lists if:
- Your list is short and sweet: Option lists are your best friend if you're working with only a few items for a controlled vocabulary list. They're more efficient than taxonomies for shorter lists, so don't even think about using taxonomies here (for example, yes/no options).
- Display is minimal: If the data you're working with only needs to be visible on the entity's detail page (and not, for example, available as a search facet), then an option list is your simplest route. No need to get fancy with taxonomies for this one.
Schema Explained
In Sitecore Content Hub, the configurable data model serves as a structured guide for your database. This guide, called a schema, organizes your data into different categories, such as assets, products, or projects. Each category has its own set of specific characteristics known as properties. These categories are not standalone; they connect to each other through relations, creating a network of interlinked data.
A schema is like a blueprint that defines how your content is structured. It tells the system what kinds of information, or "fields," each piece of content should have. When you're "configuring" or "extending" a schema, you're essentially adding, removing, or adjusting these fields to better suit your specific needs. The schema is fully customizable. You can edit or create new categories, define sorting methods like taxonomies, establish option lists, and establish relationships between categories. So, if your content requires a new type of information, such as a 'Publish Date,' you can extend the schema to include that field, making it easier to manage and organize your content.
Example: How to Configure Asset Details in Content Hub
In this example, we’re going to extend the schema of M.Asset by configuring both a taxonomy and an option list to categorize our assets by Barbie type. We want to define our assets by type, and for Barbie specifically, we want to further categorize by career.
Giddy up.
Step One: Creating Taxonomy in Sitecore Content Hub
First, we will create a taxonomy list to categorize our Barbies by doll type (Allan, Barbie, Ken, Midge, Skipper).
-
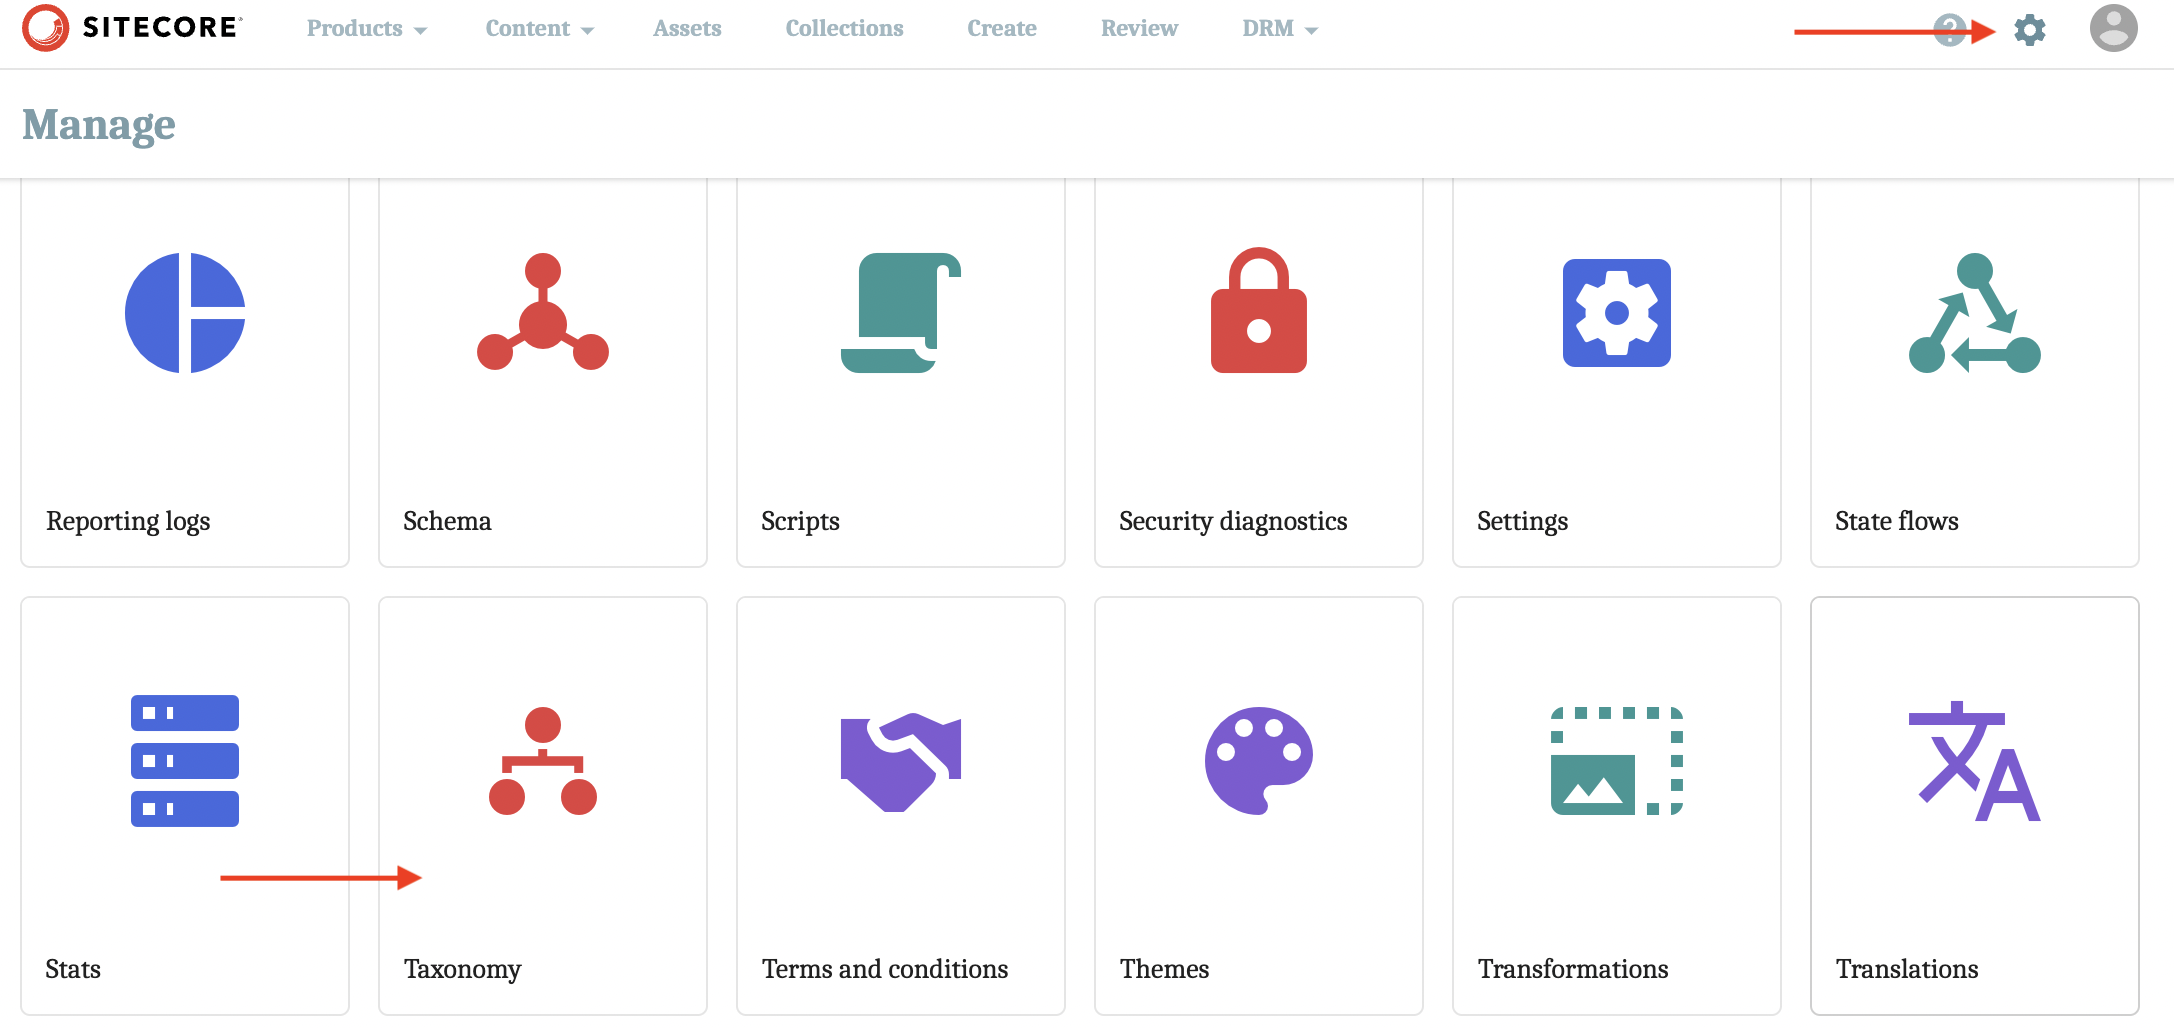
Navigate to the Taxonomy manager by clicking Manage (the gear icon at the top right), then Taxonomy.
-
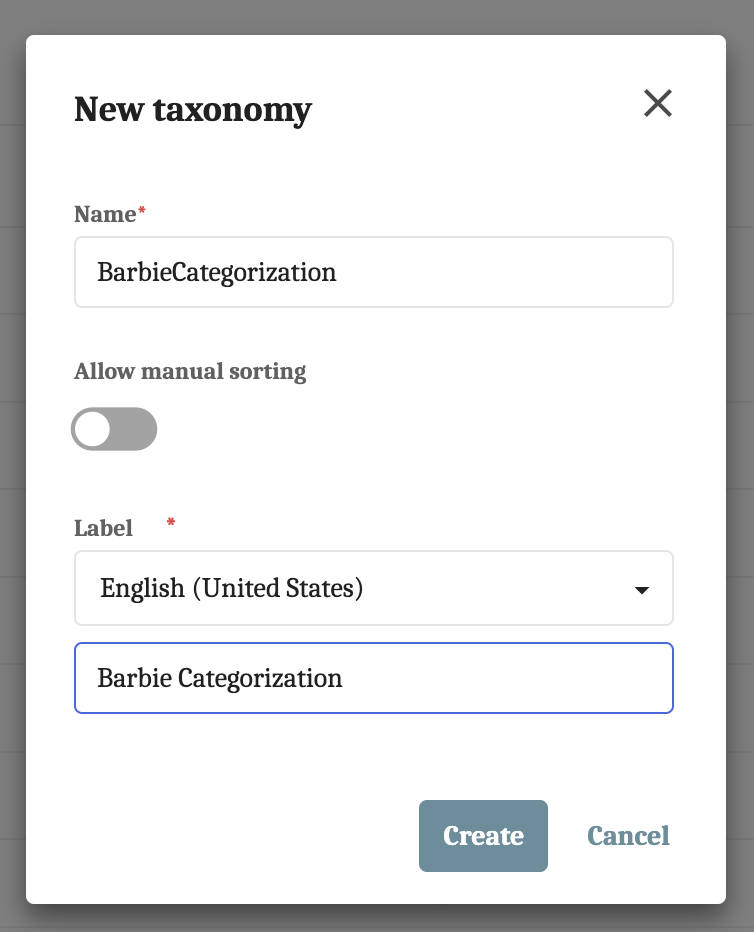
Add a new taxonomy by clicking on New taxonomy. Then, name and label the taxonomy, and click Create.
-
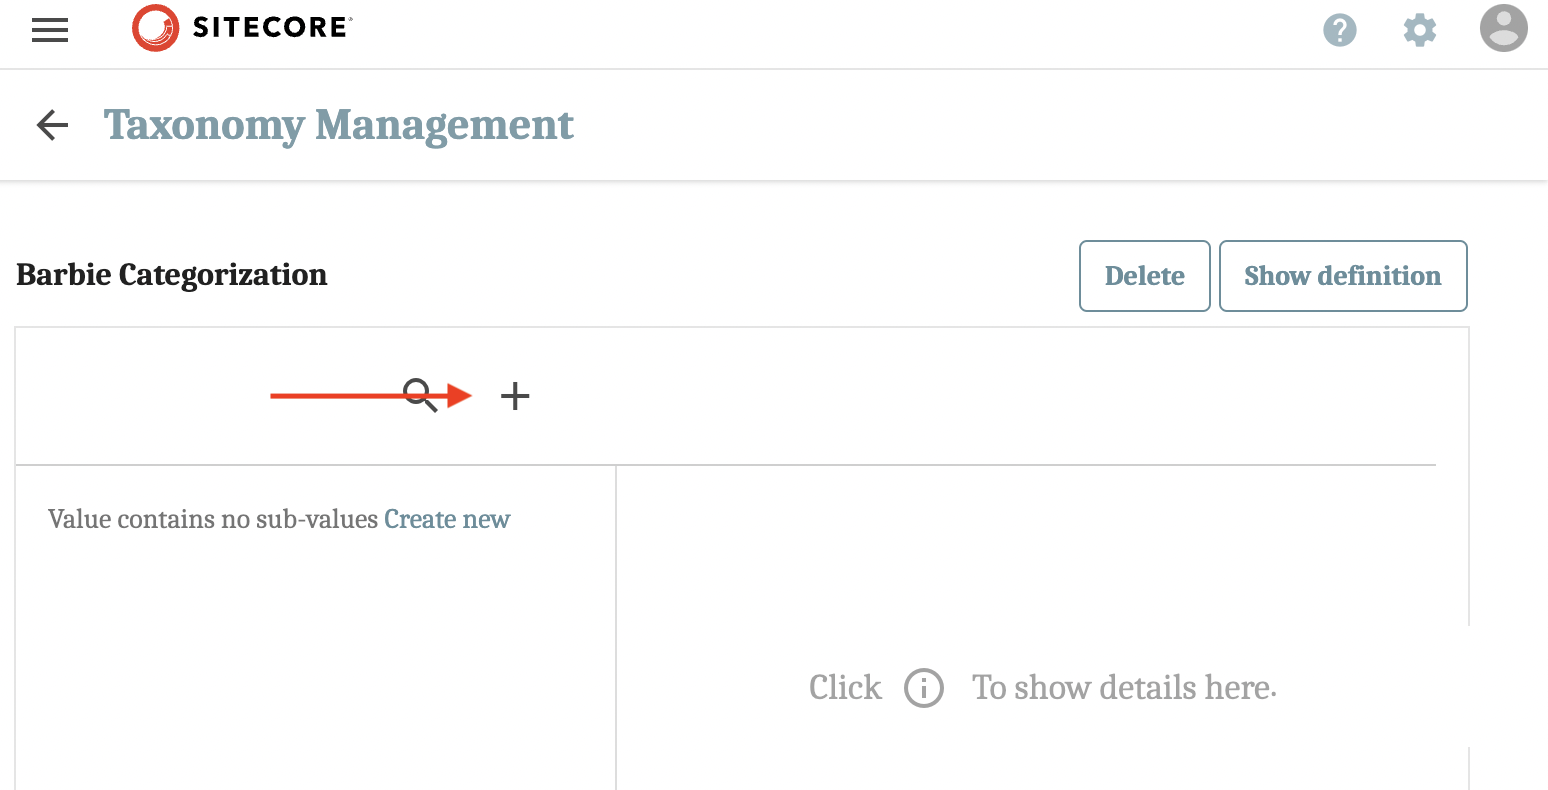
Next, I’m going to add values. Simply click on the + sign to start.
-
Fill in the Name and Label fields. The Identifier will dynamically render. You can also add a description or an icon to visualize the taxonomy (I mostly use the Name and Label fields).

Step Two: Creating An Option List in Content Hub
Next, we'll create an option list so that we can further organize Barbie dolls by career type.
-
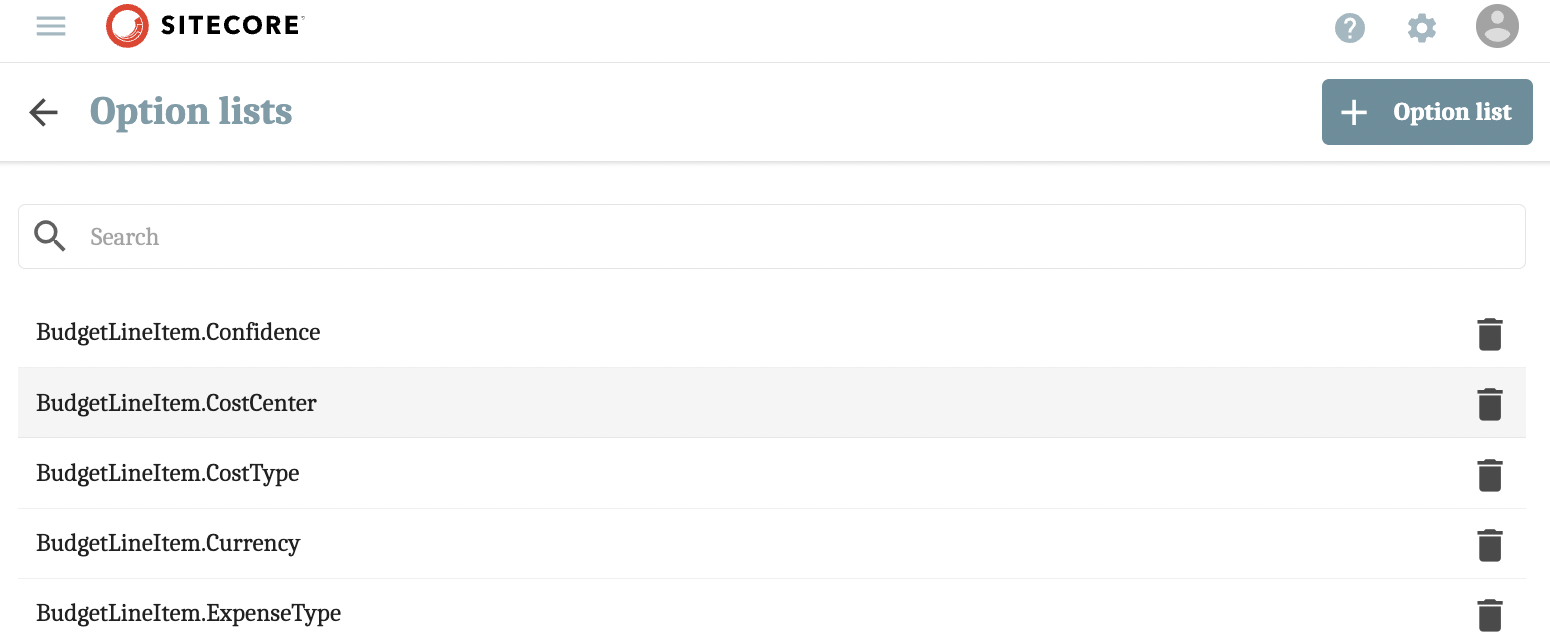
Navigate to the Option Lists manager from the Manage screen. Then, click on the + Option List button from the Option Lists page to create a new list.
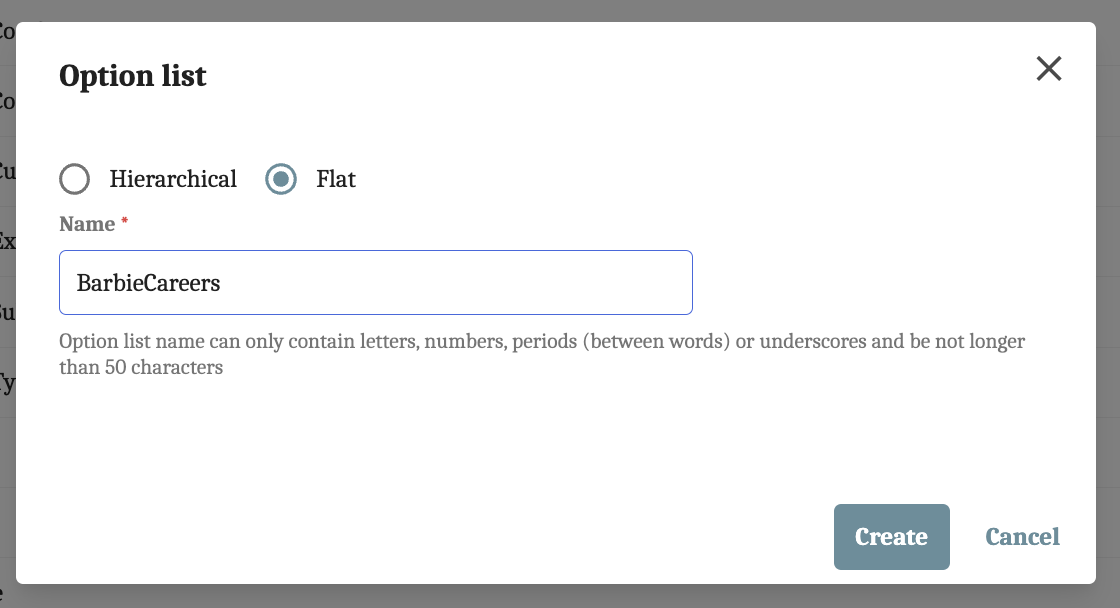
-
Next, select Flat (flat ensures all items or elements we add exist at the same level; there is no hierarchy or layered arrangement) from the two radio buttons and name the list. Click the Create button when complete.
-
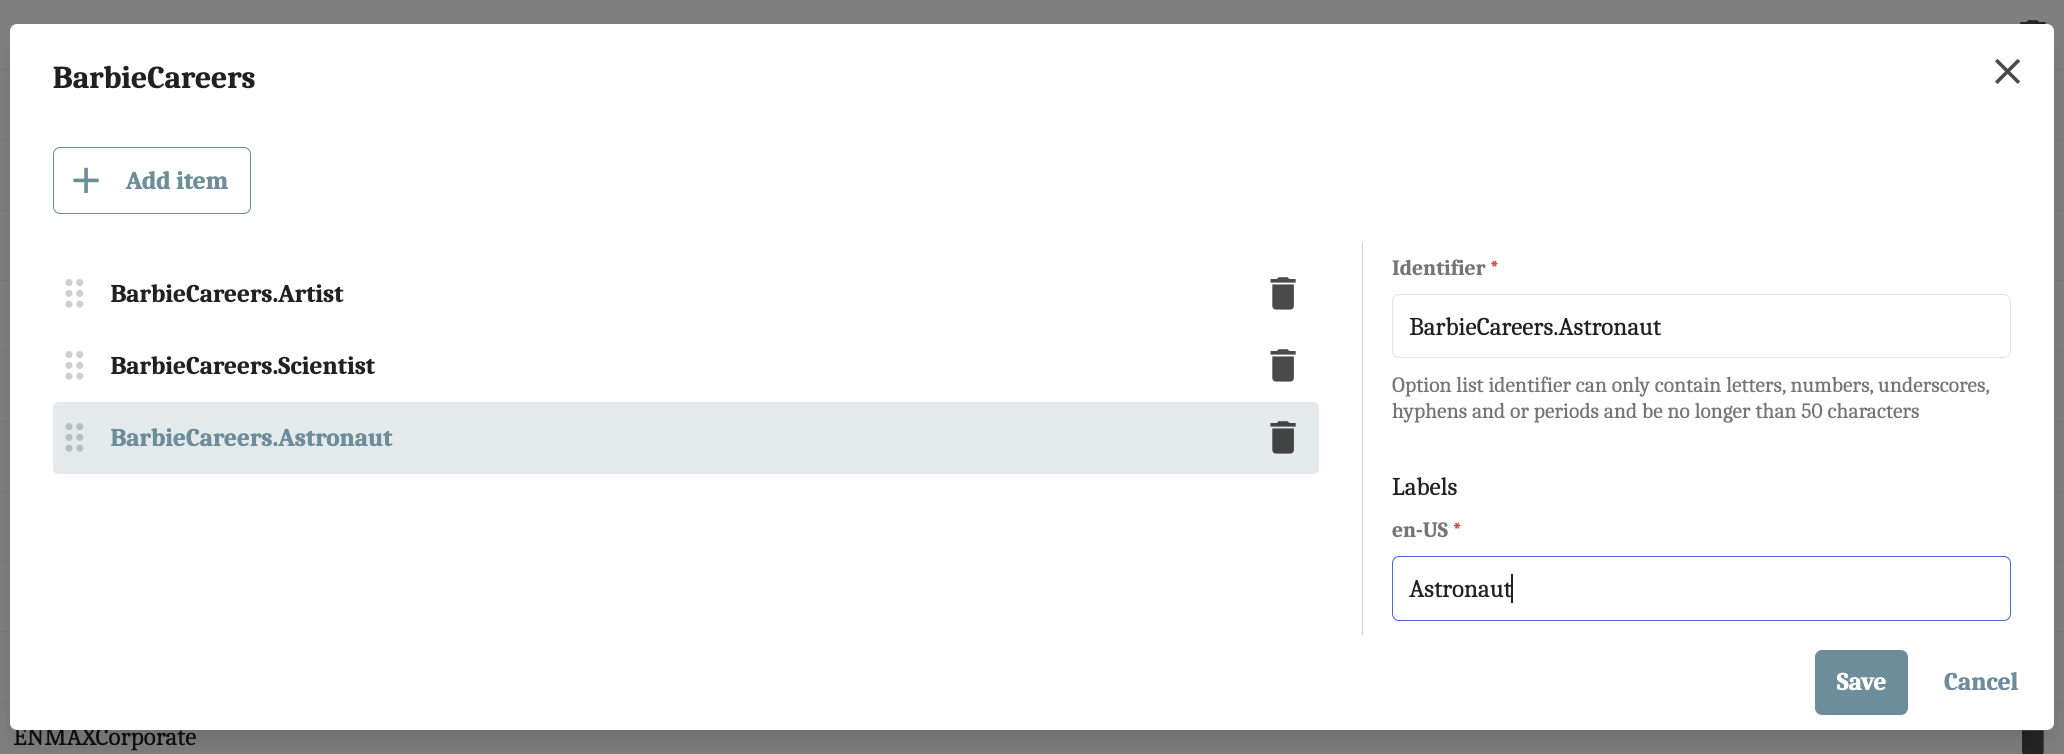
Click on the option list you just created ("BarbieCareers" in our instance 💅). Then, click the + Add item button and add values by filling in the Labels field. When you’re finished adding values, click Save.
Step Three: Extending M.Asset Schema in Content Hub
For our taxonomy to appear on Asset Details pages/ to put our work into use, we must extend the schema for M.Asset.
-
Navigate to the Schema manager from the Manage page. Then, select M.Asset from the Schema page.
-
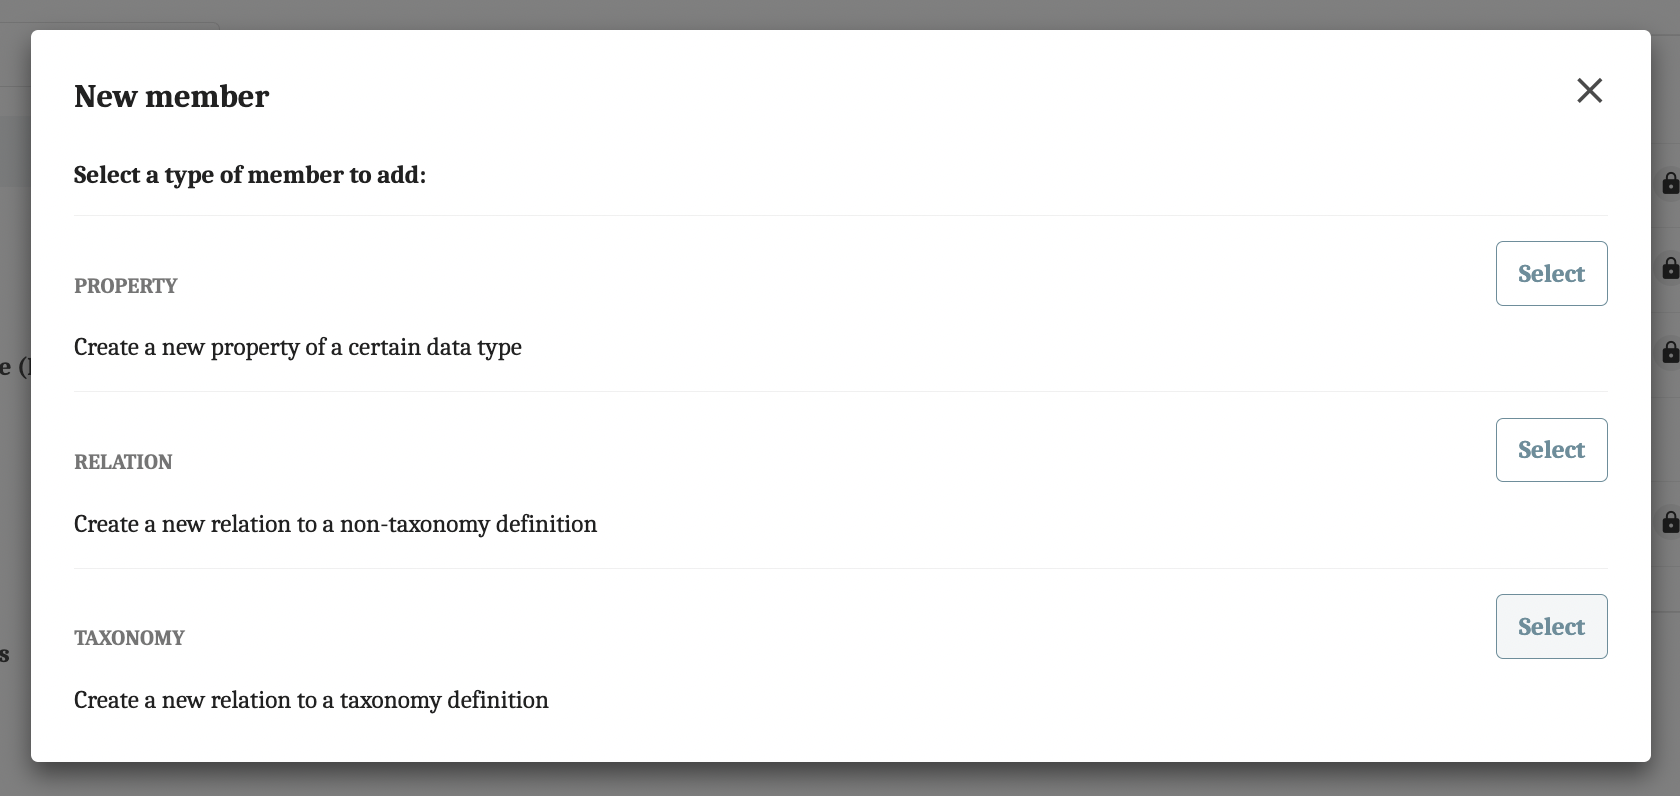
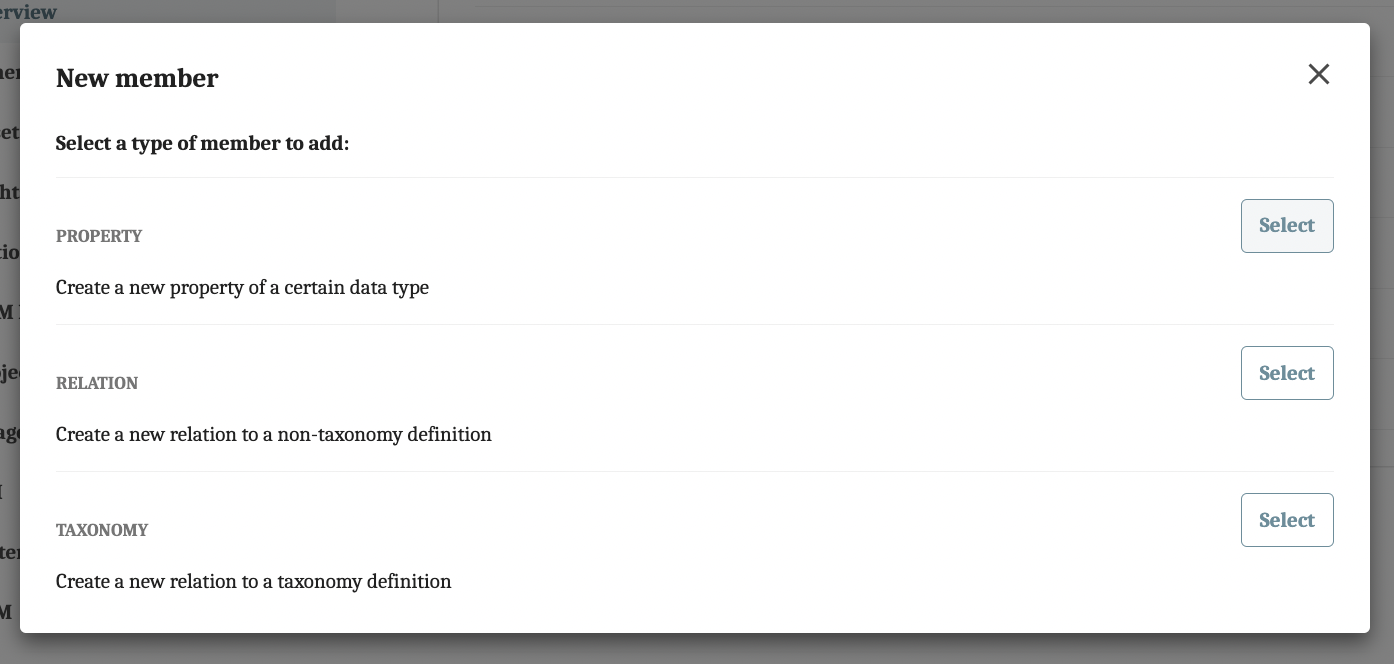
Select Overview from the panel on the left-hand side, then click New member.
-
Select Taxonomy to create a new relation to a taxonomy definition.
-
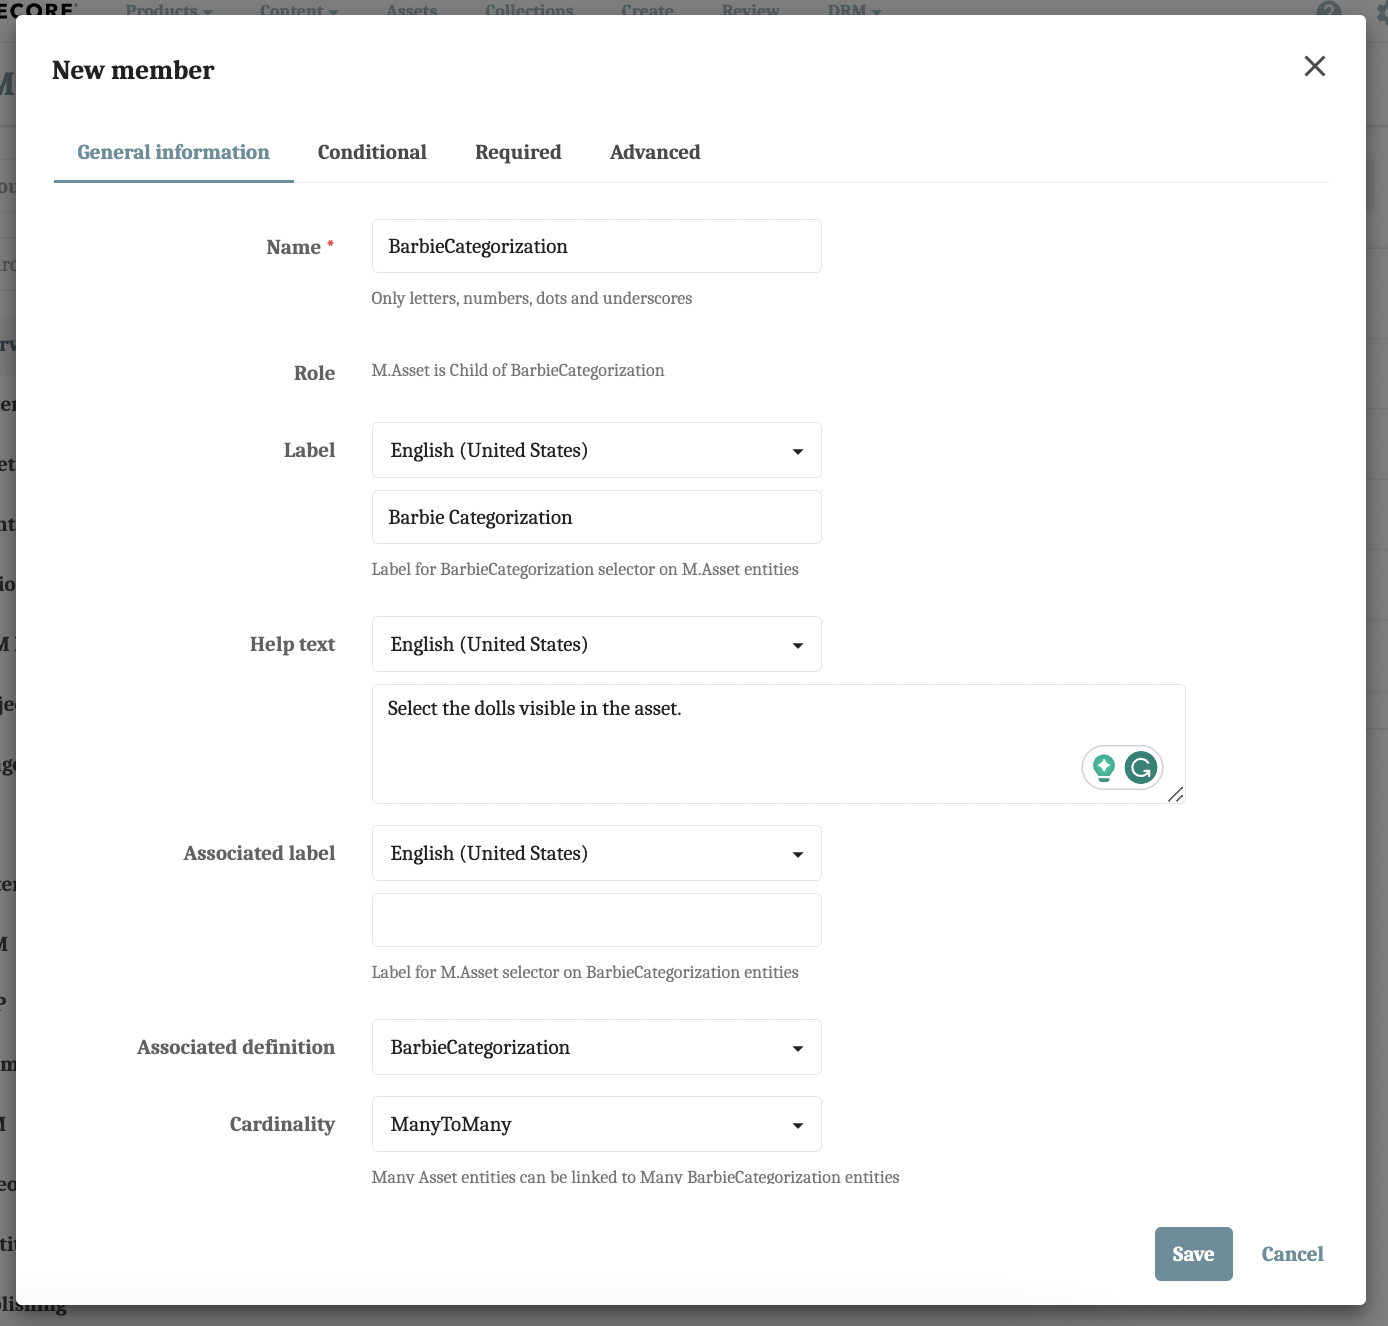
From the General Information tab on the New member pop-up modal:
- Fill in the name and label of the taxonomy.
- Add help text if you need to provide users additional information on how to currently fill in the field.
- Select “BarbieCategorization” from the Associated definition dropdown menu.
- Set the Cardinality as ManyToMany so that multiple assets can be linked to multiple Barbie categorization entities.
-
Click Save.
-
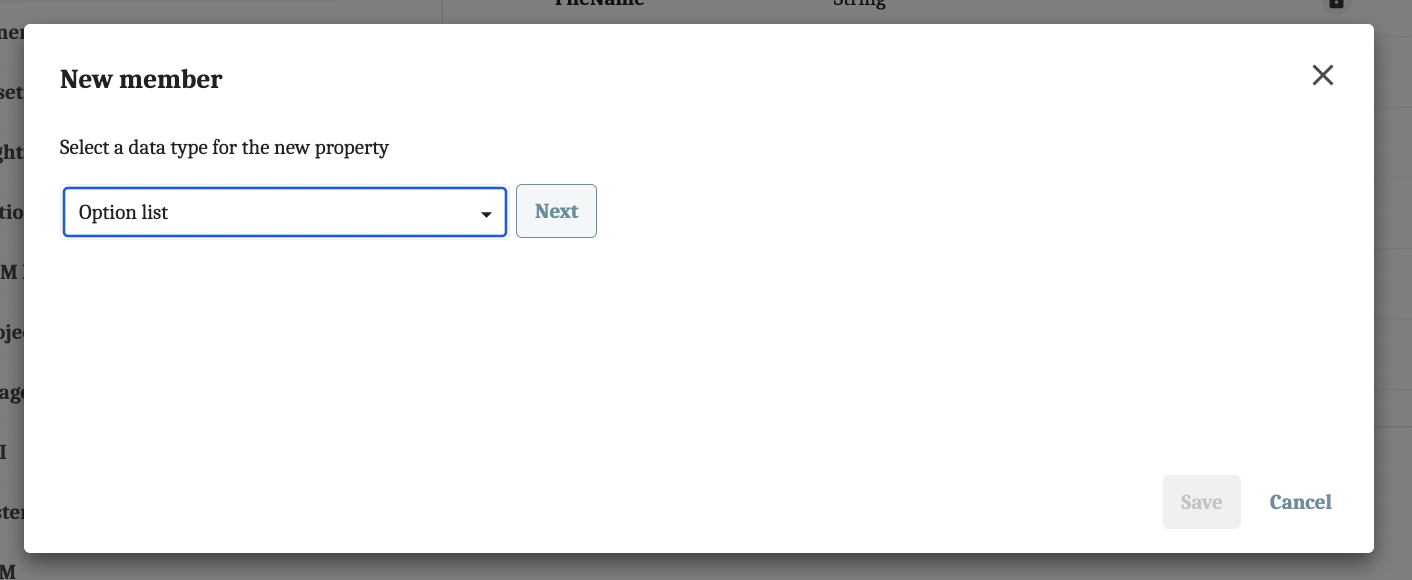
Next, we’re going to add the option list we created and make it so that it’s only visible when “Barbie” is selected from the taxonomy relation. Select New member from the M.Asset page, then select Property.
-
Select Option list from the dropdown menu, then click Next.
-
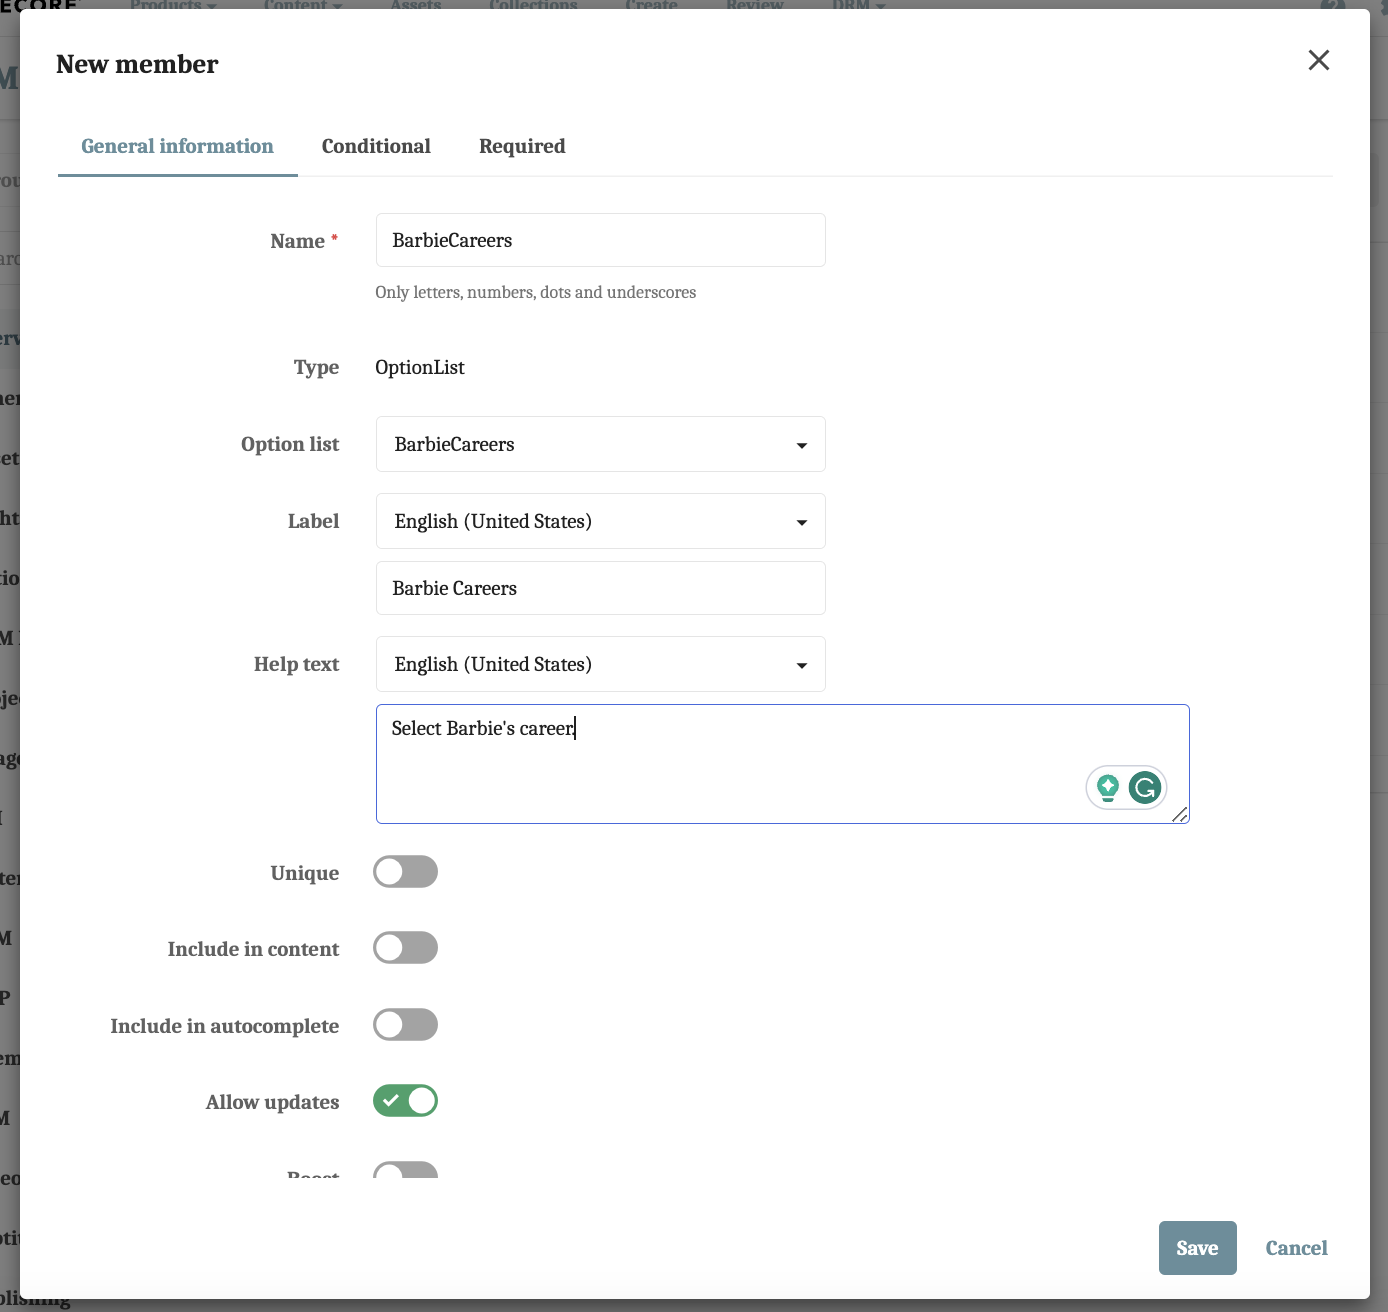
Name the member, select “BarbieCareers” from the Option list dropdown, label the list, and add help text.
-
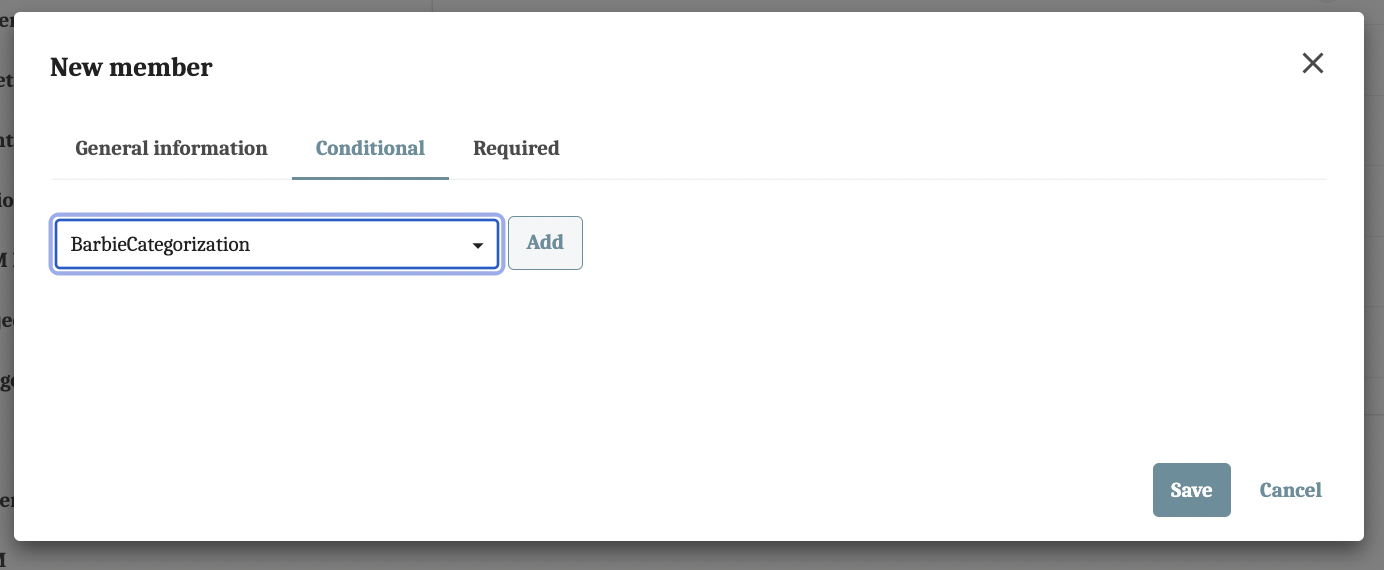
Click on the Conditional tab to make this list conditional on whether or not the “Barbie” taxonomy was selected. Then, select “Barbie Categorization” (the taxonomy we created) from the dropdown list. Press Add.
-
Click the + Add button, select “Barbie” from the pop-up modal, and click Save.
-
Click Save from the New member modal.
- Click the Apply changes button at the top-right.


Step Four: Configuring the Asset Details Page
A quick note on pages. Each "screen" you see in Content Hub is considered a page. For example, when you view an asset, you are looking at an "Asset Details" page. When you click on "Assets" from the main menu, you are looking at the "Assets" page.
In Sitecore Content Hub, the Pages section offers a comprehensive list of all available pages and a variety of management tools, such as:
- A Search tool allows you to find specific pages, including their sub-pages.
- Arrow icons next to a page name signify the presence of child pages.
- Breadcrumbs at the top of the right pane display the complete path of the currently selected page, helping you keep track of your location within the site.
-
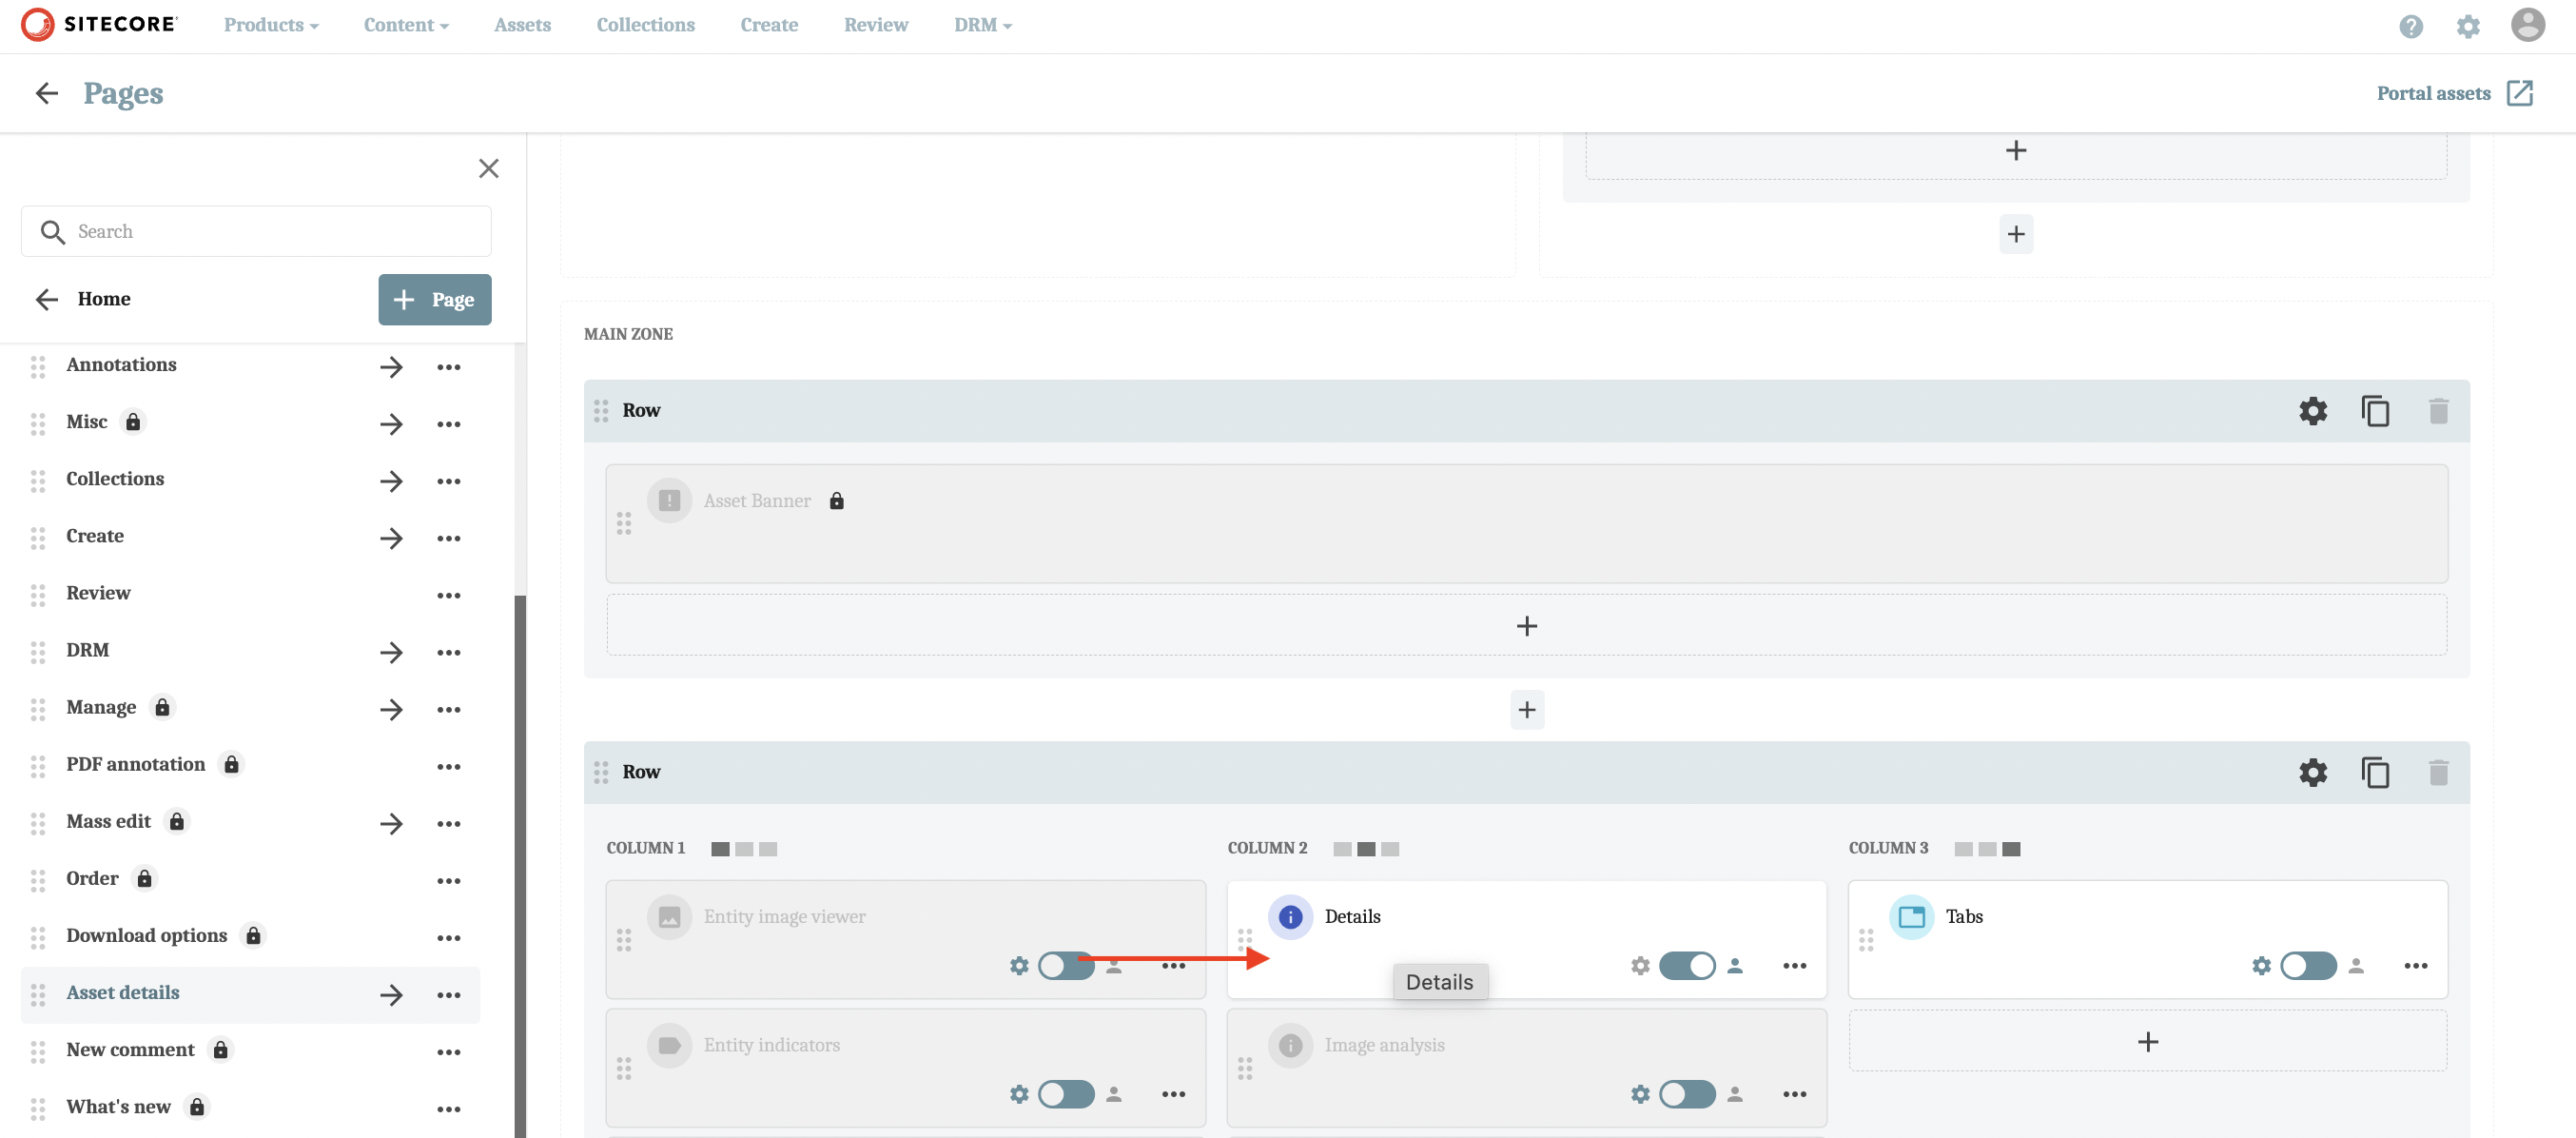
Our taxonomy relation should have automatically rendered on the Asset details page, but I want to show you how to turn the visibility of members on/off from the Asset details portal page. First, navigate to the Pages manager from the Manage page. Then, select Asset details from the menu on the left.
-
Scroll down a bit and select the Details component from Column 2 of the second row under the main zone.
-
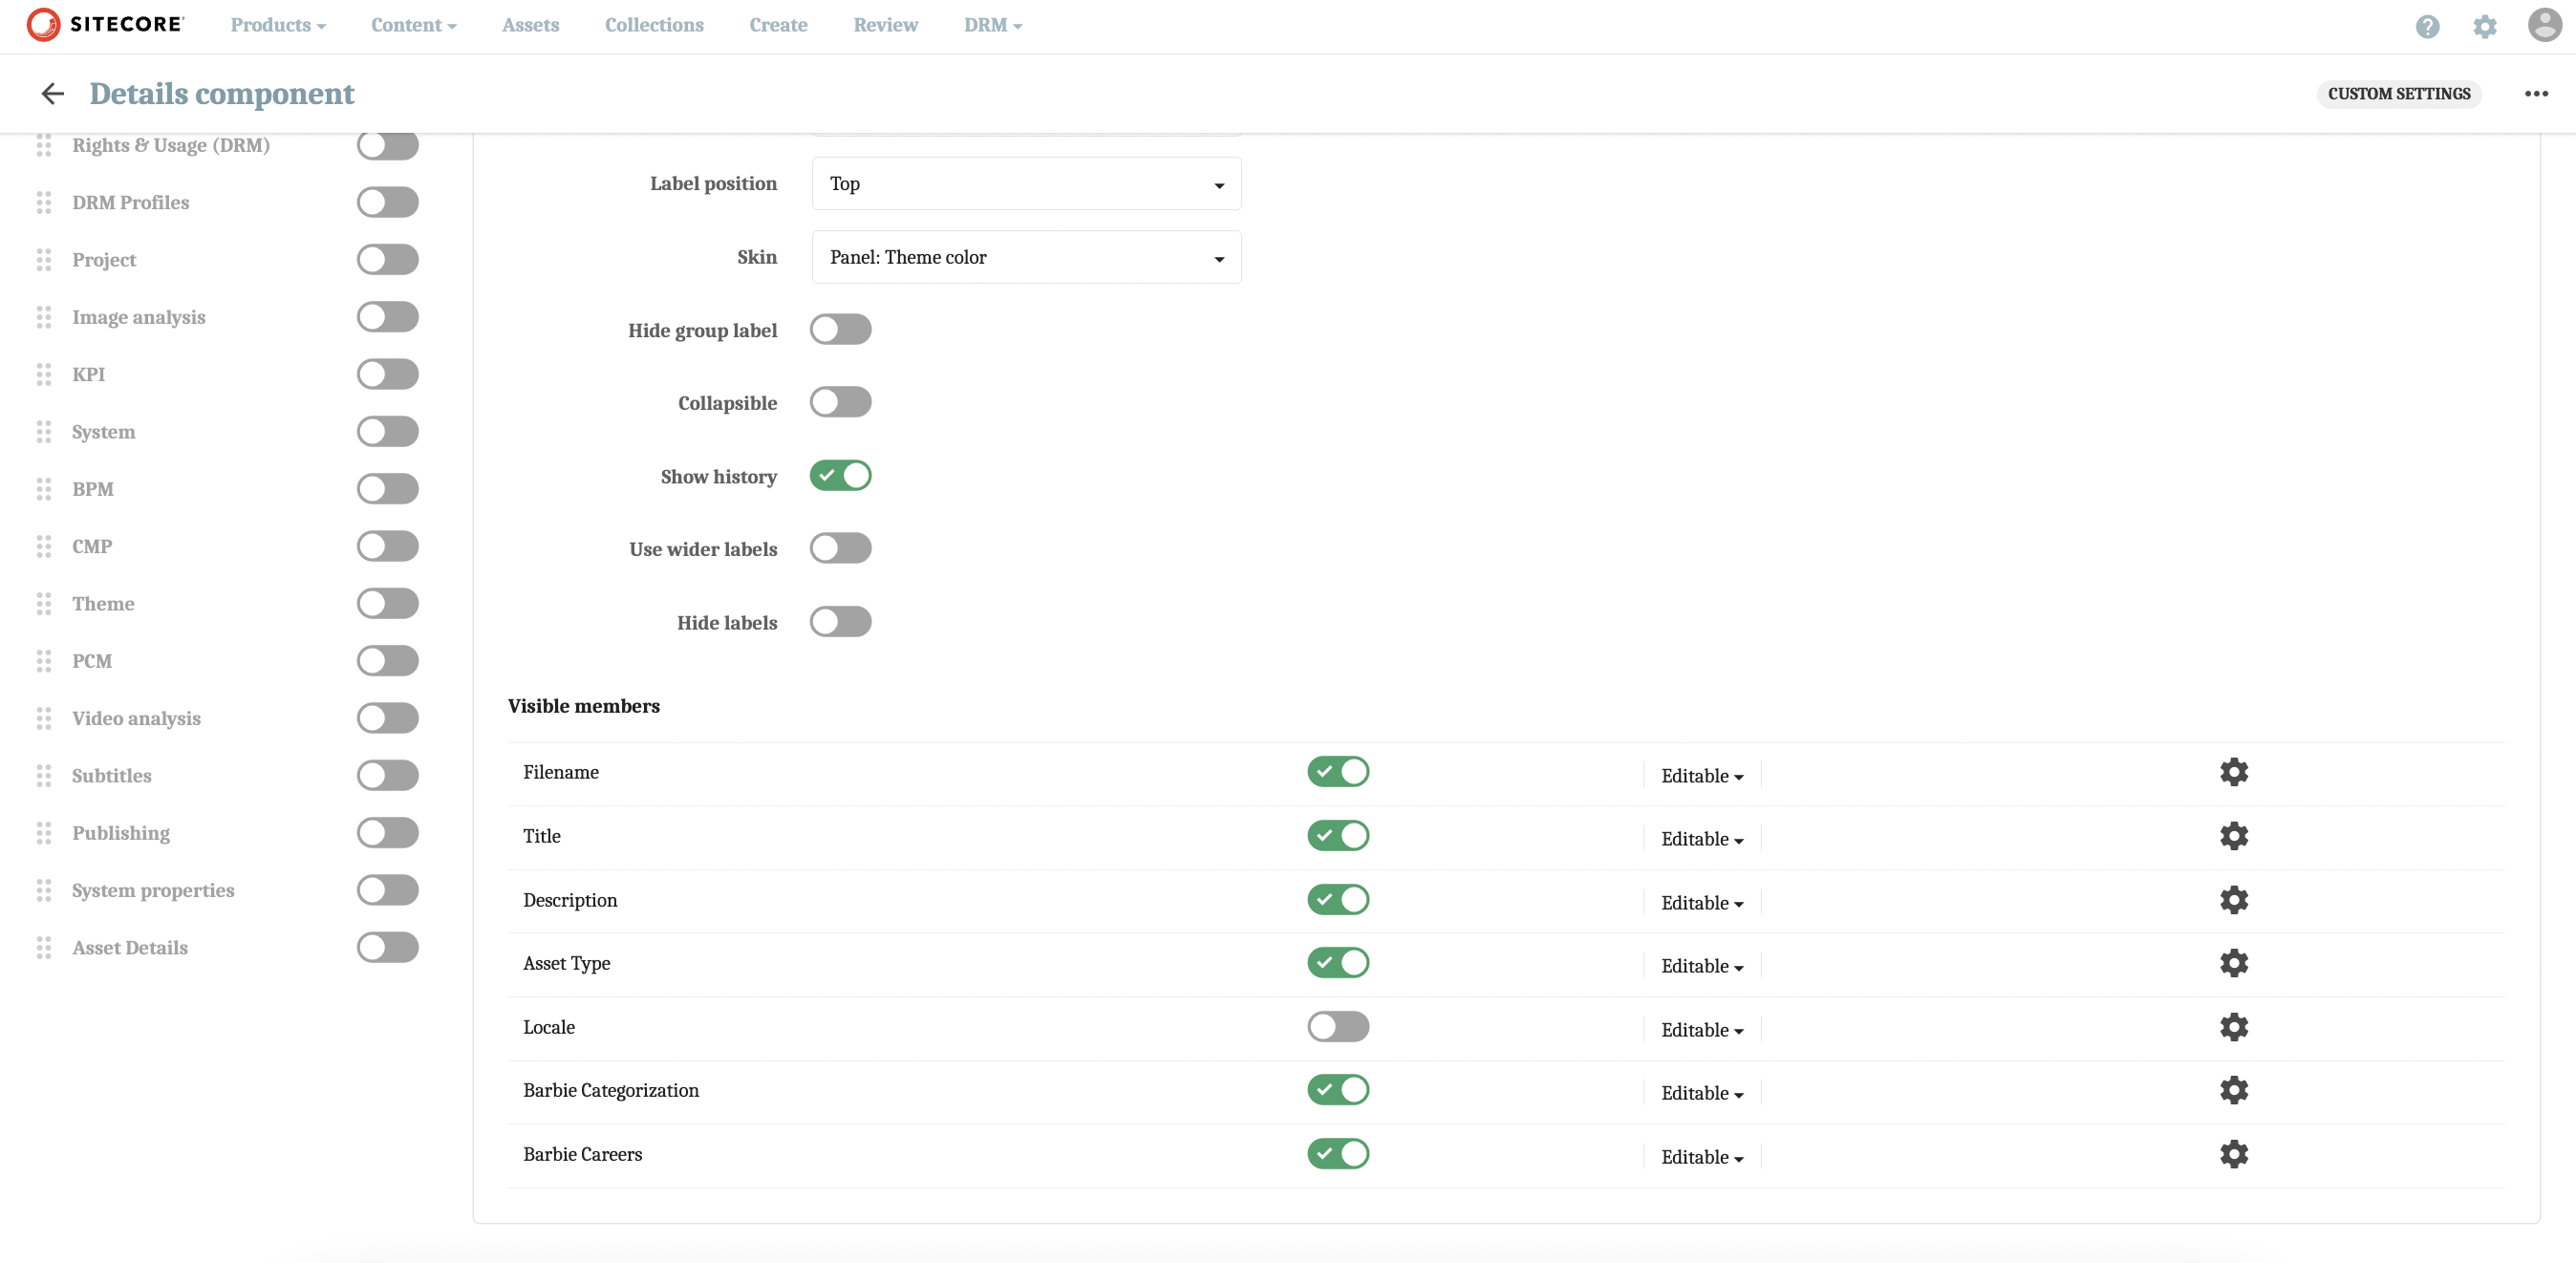
From this page (the Details component page), scroll down and make sure the “Barbie Categorization” and “Barbie Careers” are toggled on.
-
Click Save.

Note: There are two asset details pages: one for video and one for all other assets. Be sure to make changes to both pages so that asset details pages are consistent and relevant across all asset types.
Note: There are two asset details pages: one for video and one for all other assets. Be sure to make changes to both pages so that asset details pages are consistent and relevant across all asset types.
Checking Your Work
-
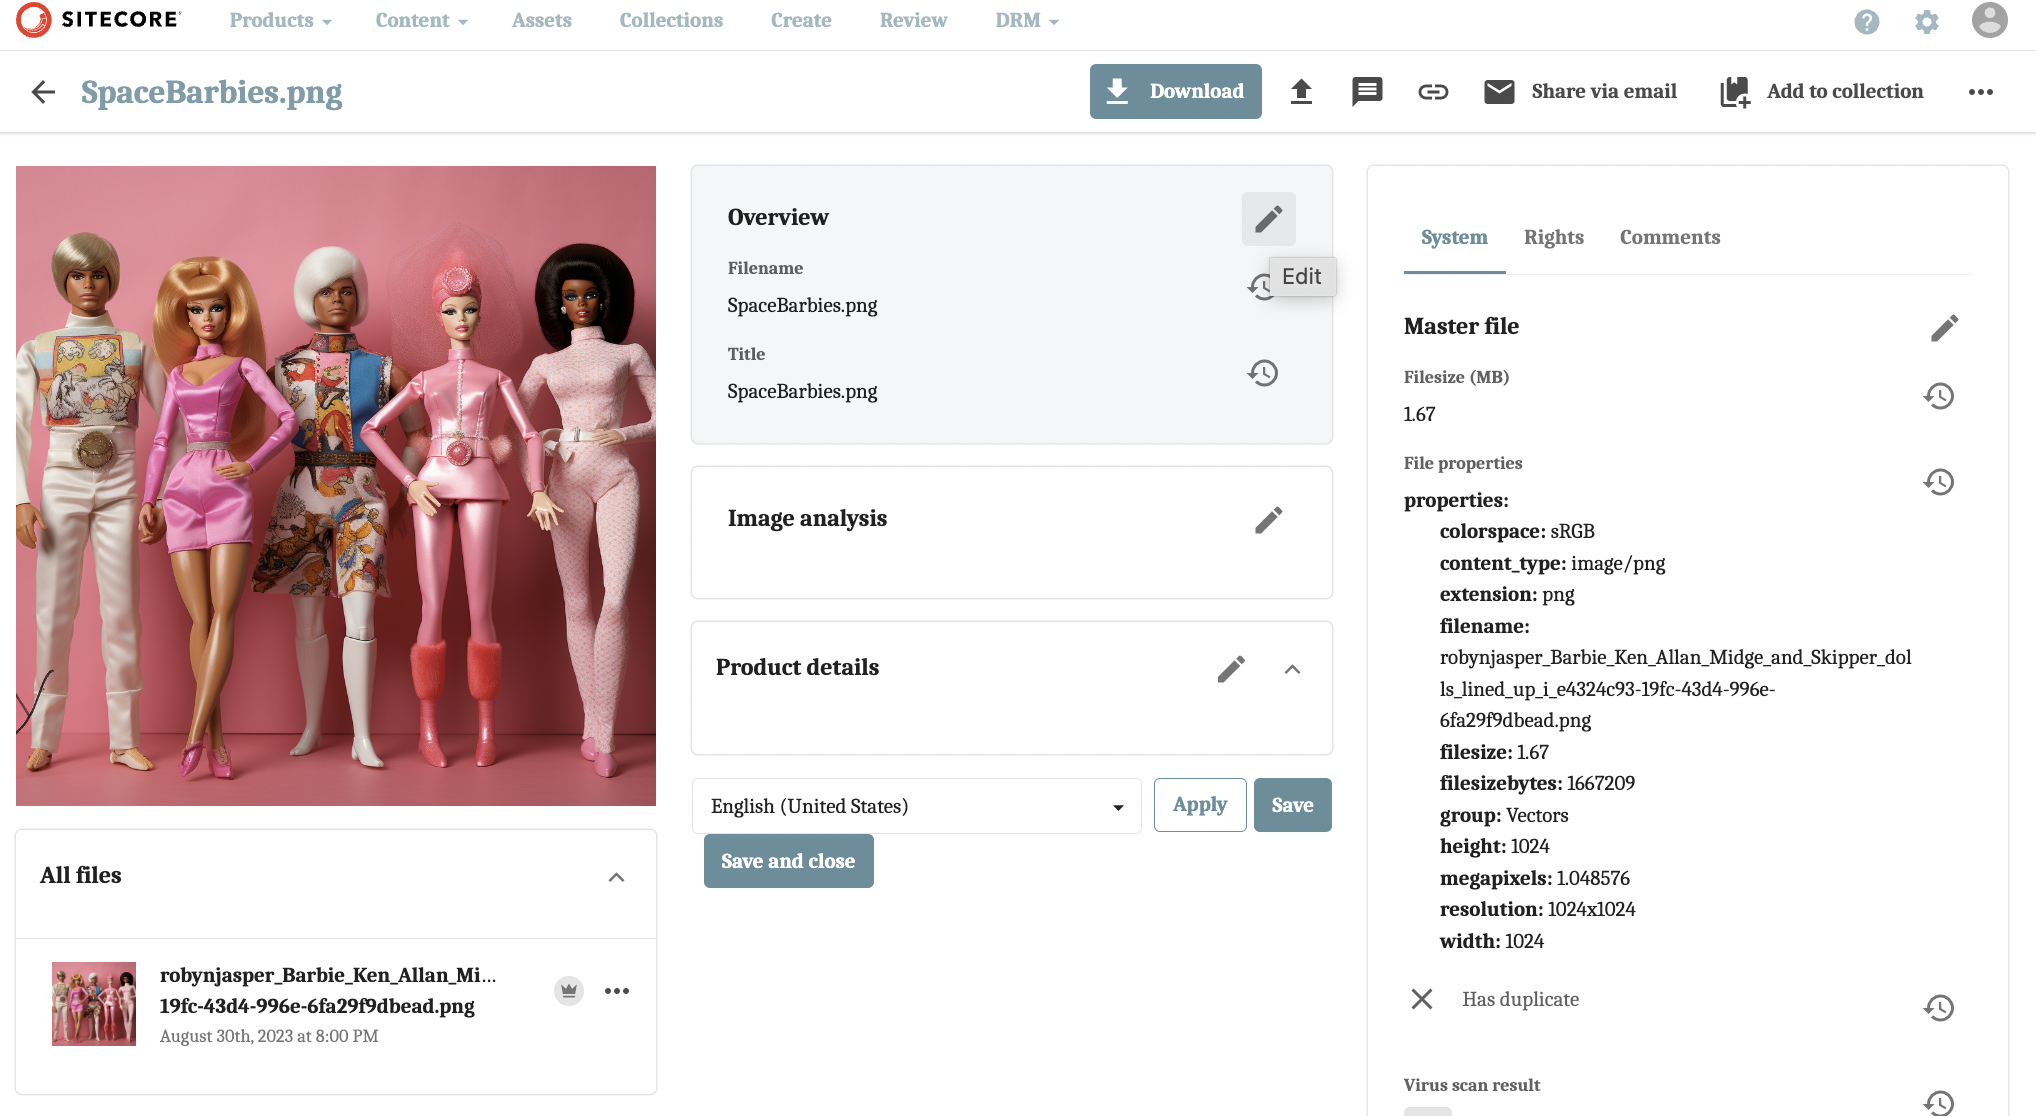
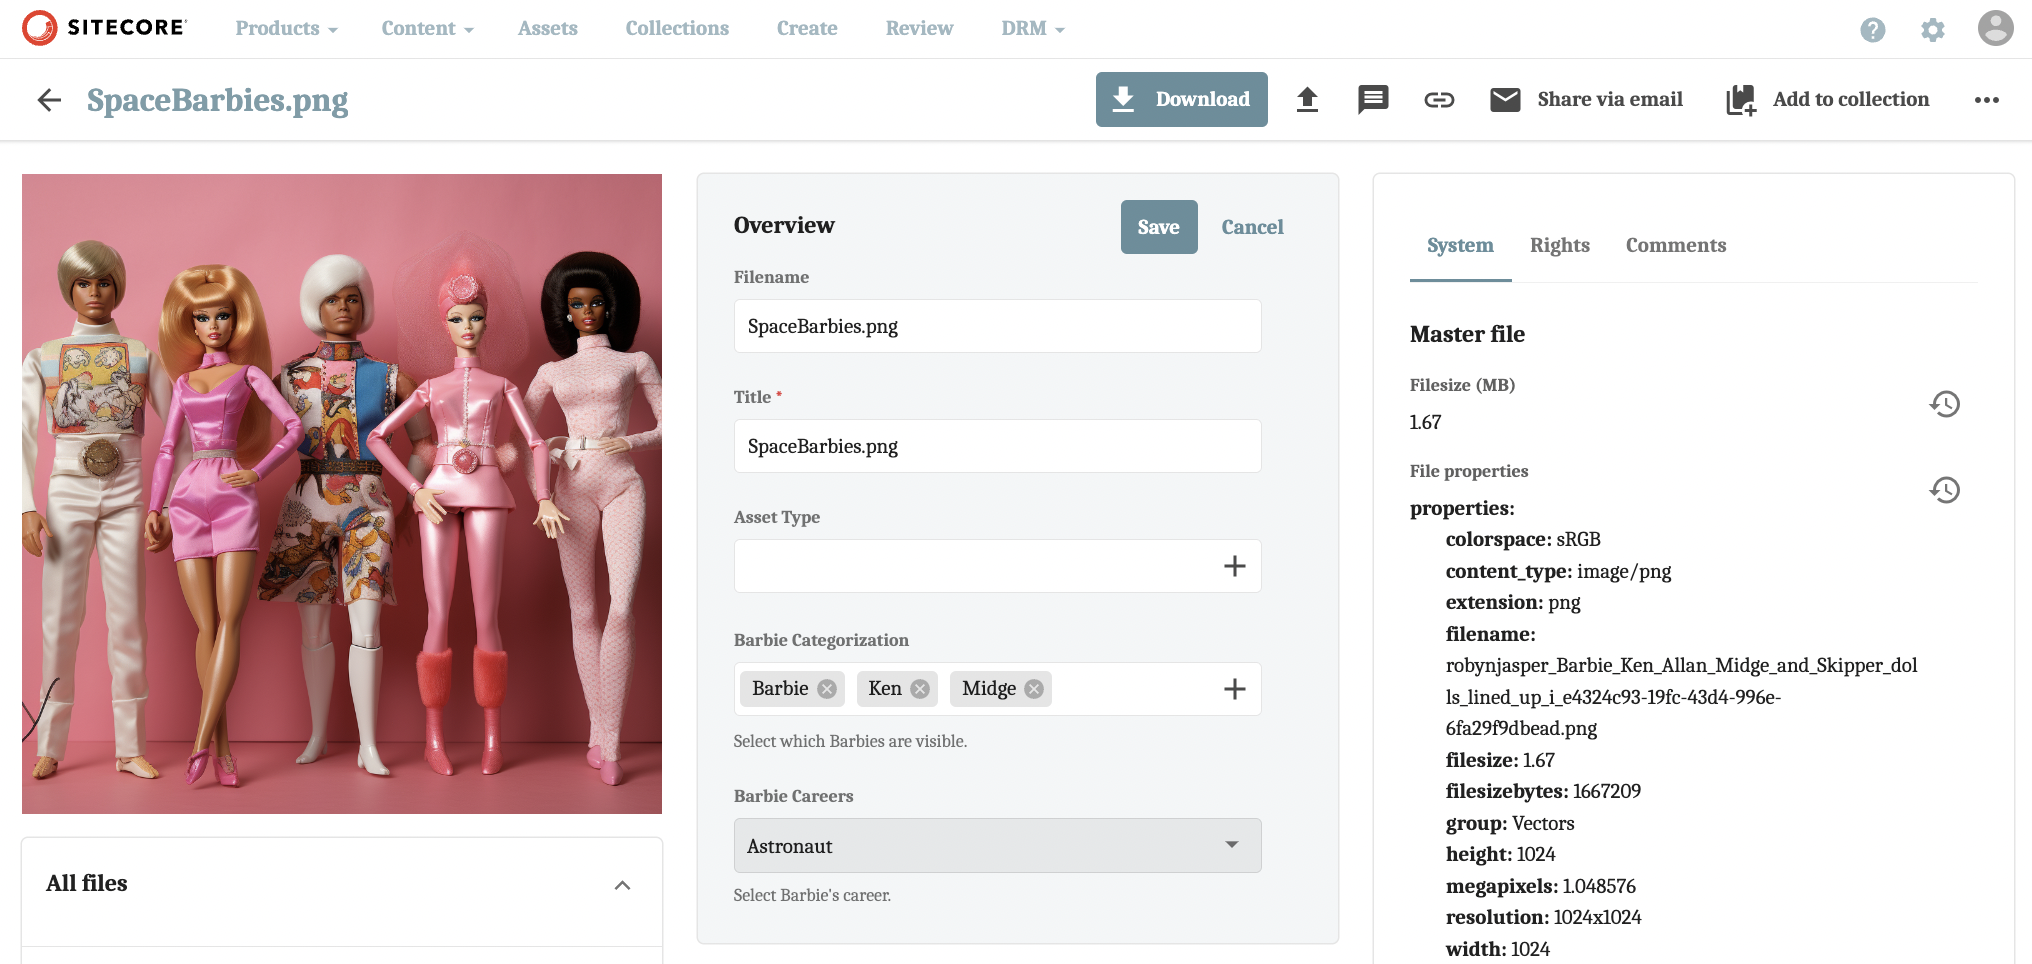
Now, all that’s left to do is to start categorizing your assets. Navigate to any asset, then click on the pencil in the Overview panel.
-
Next, click on the + button to add values. If everything was set up correctly, “Barbie Careers” should only display when “Barbie” is selected from the “Barbie Categorization” field. Click Save.
That’s it! If you have any questions, check out the official Sitecore Content Hub documentation or message me at [email protected]; I’d be happy to help.
Related Links

Meet Robyn James
Content Marketing Strategist | Sitecore Strategy MVP
📚⛰️🎨
Robyn brings over ten years of experience crafting impactful content marketing and communications solutions for a number of high-profile brands. With diverse sector experience—including healthcare, energy, tourism, hospitality, and telecommunications—she has a deep knowledge set and the ability to easily adapt to differing industry needs.
Robyn is adept at blending data-driven research with a pragmatic approach to creativity, delivering results that inform audiences, change perceptions, or inspire action. In her spare time, she enjoys digital painting, reading, and being a pet mom to her fluffy brood of three.