Streamlining UI Variations in Component Development With React Context
When creating components, it's common to encounter multiple UI variations that essentially utilize the same template. While one straightforward solution involves creating different renderings while utilizing the same template, this approach can lead to an expanded list of renderings. Consequently, for each rendering, there's a need to include it in the appropriate placeholder and Restricted Controls, adding to the management overhead. Another solution is handling it in the frontend, this is different from creating variants because we only want it to observe the container the component is placed on. We can use React Context to relay information to child components in order for them to change the UI based on specific parent components.
Let's explore into an example that can illustrate this concept. You are required to create a component that is called a Document Card, this card basically contains the following things in it’s template:
- A link to the PDF or document
- The title of the document
- The date it was published or last updated
A pretty straightforward component with a simple set of fields it requires. The problem is what UI we want to render with this information. The example requires to use a shared folder of item for two different instances of our website. Another requirement is the need to use placeholders to add each Document Card.
We want the Document Card to be in a table which can be sorted, filtered, etc. Let’s name this container rendering as Document Table.
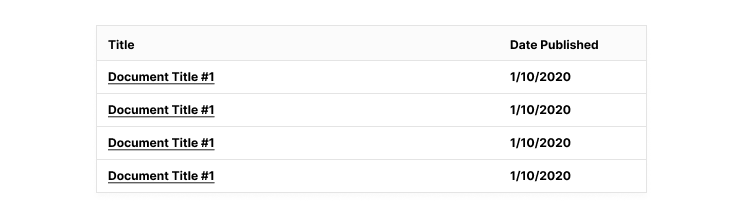
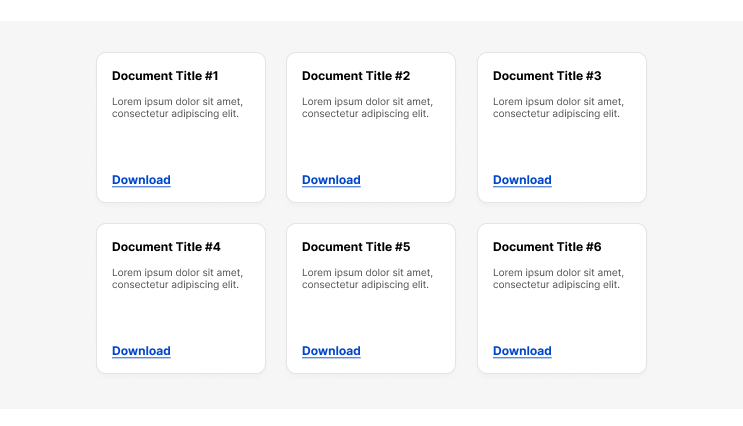
The Document Card are rendered into a simple container with each card rendered with it’s information on the card itself. Let’s name this container rendering as Document List.
Using React Context on Container Renderings
We don’t need to put too much detail on the component, I’ll focus more on using the Sitecore Placeholder setup and including the React Context logic. Let’s start off with creating the context setup. I’ll leave it up to you how you organize your context code, you can even put it inside the component file itself.
import { createContext } from 'react';

export interface ContainerContextInterface {
  containerName: string;
}

export const ContainerContext = createContext<ContainerContextInterface>({
  containerName: '',
});
We basically create a piece of data which will help inform child components what parent component is using them. Now that we have our context structure, we can start coding one of the containers, let’s start with the Document Table.
import { Placeholder } from "@sitecore-jss/sitecore-jss-nextjs";
import { ComponentWithContextProps } from "lib/component-props";
import { ContainerContext } from "src/context";

export const Default = ({ params }: ComponentWithContextProps): JSX.Element => {
  const phKey = `documents-${params.DynamicPlaceholderId}`;
  const name = "document-table";

  return (
    <div>
      <ContainerContext.Provider value={{ containerName: name }}>
        <Placeholder name={phKey} rendering={rendering} />
      </ContainerContext.Provider>
    </div>
  );
};
We have the basic requirement needed to satisfy the handling child components. Here are the following things to note from the code.
- Prepare the name which will trigger what context the child component (Document Card) will react to.
- This solution requires the need of adding child components using Placeholders.
Without taking too much attention on the component itself, we apply the same strategy on the Document Listing. We change the name variable’s value to document-listing . Let’s continue with creating the Document Card file.
const DocumentCard = ({ fields }: DocumentCardProps) => {
  const classes = ["document-card"];
  const { containerName } = useContext(ContainerContext);

  if (containerName) {
    if (containerName === 'document-table') {
      return <DocumentCardRow fields={fields} sitecoreContext={sitecoreContext} />;
    }
  }

  return (
    <div className={classes.join(' ')}>
      {/* ... */}
    </div>
  );
};

export default DocumentCard;
The child component can handle this information in different ways. You could just add in a different class depending on the value of containerName or if the difference of the design is far, you could just put the separate structure on a different file or component itself. You might wonder why we only add a condition for document-table, based on the requirements we only use this component in either of the two container components. So we have decided that the document-listing design for the Document Card will be the default UI.
There are a couple of different ways of handling this problem, you could end up just structuring it in XM Cloud using multiple variants, different renderings, etc. I hope you got something out of this and it could help you on your development.

Meet John Flores
Front-End Developer
🪴🐩📷
John is a Front-End Developer who is passionate about design and development. Outside of work, John has wide range of hobbies, from his plant collection, being a dog daddy, and a foodie.