How to Optimize Your React Forms
If you’ve only ever created quick contact forms with 3 to 4 fields, then you've probably never thought about an efficient way to manage your forms in React.js or Next.js. While there is no right or wrong way to do it, this article is going to cover my personal approach to ensuring we have clean, readable, and manageable code for forms of all sizes!
Issues with Brute Forcing React Forms
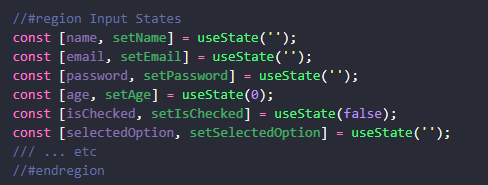
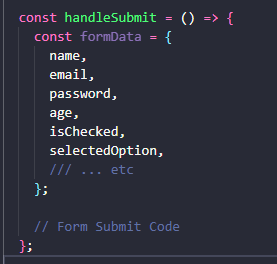
If you’ve made forms in the past, you've probably done it using the classic brute force method of creating a unique state for each input and having an onChange function focused on updating the unique state. You would then create an object in your handleSubmit function to pass to the server or save into your database.
There are a few problems with code like this:
- Larger forms quickly become hard to manage with unique states for each input.
- The code becomes egregiously hard to read.
- Adding new inputs requires you to add new code to multiple places.
- It's easy to miss something when updating an already existing input.
While there isn't anything inherently wrong with the code above, the goal of this article is to help you optimize some of these problems by using Custom Hooks.
Creating a Custom Hook To Manage State Via useContext
A custom hook is a reusable JavaScript function that encapsulates logic and stateful behaviour. We will use it to promote code reusability in our forms by allowing us to share complex submission data between different components. Custom hooks are beneficial when duplicating logic across components or when you want to extract and share stateful or side-effectful behaviour, enhancing code organization and readability. This will allow us to easily use our Custom Hook for all the forms on our site.
Custom hooks are conventionally named with a "use" prefix, like useCustomHookName. It's considered best practice to house them in a dedicated "hooks" folder. To begin, let's create our initial custom hook and name it useFormContext. The naming convention is straightforward: the "use" prefix indicates it's a hook, "Form" signifies the scope, and "Context" clearly denotes the utilization of the useContext state within our custom hook. Once we have the file created, we can designate our custom type.
type FormContextType = {
  formData: { [key: string]: string };
  setFormData: React.Dispatch<React.SetStateAction<{ [key: string]: string }>>;
};
Next, our goal is to utilize useContext to establish the context wrapper that will envelop our forms. This approach enables us to store all pertinent form data directly within our Custom Hook. We can use the createContext function and initialize it with a default value, which we can set to undefined for now. This default value is used when a component consumes the context but is not wrapped in a corresponding Context.Provider.
const FormContext = createContext<*FormContextType* | *undefined*>(undefined);
The next step is creating some error handling for our custom hook, and initializing our useContext instance. The useFormContext hook will begin by calling the built-in useContext hook with the FormContext we just created as its argument. The useContext hook will return the current value of FormContext, which we and store in a context variable. Then we can check if context is defined. If context is using the default value we set of undefined, it means that useFormContext is being called outside of a FormProvider component.
export const useFormContext = () => {
  const context = useContext(FormContext);
  if (!context) {
        //This is the development error you will see.
    throw new Error('useFormContext must be used within a FormProvider');
  }
  return context;
};
The next step is to create the FormProvider function that we referenced in the code block above. We will use FormProvider to provide a context for our form data. We will do this by referencing the FormContext that we created using the createContext function.
Its important to note that the FormProvider component is a functional component that accepts children as a prop. These children are the components that will be rendered within the FormProvider.
type FormProviderProps = {
  children: ReactNode;
};

/**
 * Provides a context for form data.
 * @param children The child components to render.
 */
export const FormProvider: React.FC<FormProviderProps> = ({ children }) => {
  const [formData, setFormData] = useState<{ [key: string]: string }>({});

  return (
    <FormContext.Provider value={{ formData, setFormData }}>
      {children}
    </FormContext.Provider>
  );
};
You will use the FormProvider we just create to wrap around your form. Its important to remember to wrap your entire form in a FormProvider, otherwise you will see the error we coded above inside the useFormContext.
//dont forget to wrap your return with a FormProvider
return (
    <FormProvider>
            <form>
          {/* Inputs go here */}
            </form>
    </FormProvider>
  );
Adding handleSubmit to Our React Form
The next crucial aspect of forms that we have yet to cover is data submission. To streamline this process, we will create a handleSubmission function within our FormProvider.
Handling form submission involves two key components:
- Managing the user's "Submit Form" input.
- Transmitting the submitted data to the server for further processing.
To manage our users Form Submission, we can add our handleSubmission to our FormContextType.
type FormContextType = {
  formData: { [key: string]: string };
  setFormData: React.Dispatch<React.SetStateAction<{ [key: string]: string }>>;
  handleSubmit: (e: React.FormEvent<HTMLFormElement>) => void;
};
Once we have updated our Type, we can create the handleSubmission function in our FormProvider.
export const FormProvider: React.FC<FormProviderProps> = ({ children }) => {
  const [formData, setFormData] = useState<{ [key: string]: string }>({});

    //We are receiving "e" from the submission button.
  //This should be automatic if you put onSubmit={handleSubmit} on your <form> tag
  const handleSubmit = async (e: React.FormEvent<HTMLFormElement>) => {
    e.preventDefault(); //This will prevent the page from refreshing

    try {
      await submitFormData(formData);
    } catch (error) {
      console.error('Error submitting form data:', error);
    }
  };

  //Make sure you add handleSubmit as a value to the Context Provider
  return (
    <FormContext.Provider value={{ formData, setFormData, handleSubmit }}>
      {children}
    </FormContext.Provider>
  );
};
It is crucial to submit your form data to a designated endpoint on your server before determining how to manage the received data. This approach is essential to prevent the exposure of any private environment variables to the client side. Although handling direct data submission on the client is possible with the right expertise, it is generally safer and considered a best practice to always route the data to a secure endpoint before proceeding to submit it to the database or access any SMTP details for sending emails.
To handle our server code, we can use Next.js API Routes. To start, you want to create a new file inside your API folder called SubmitFormData.ts.
export default async function handler(req, res) {
  try {
    const { formData } = req.body;

        //Handle your form submission here!
        //... Send Email
        //... Store Submission into Database

    return res.status(200).json(true);
  } catch (error) {
        //This console.error will only show on any server side logging you have configured
    console.error('Error submitting form data:', error);
    return res.status(500).json(JSON.stringify(error));
  }
}
Once we have our endpoint created, we want to write an async function to submit the data. We can call it submitFormData. It will take formData as incoming props.
const submitFormData = async (formData: { [key: string]: string })
  : Promise<Response> => {

  //This url should point to the SubmitFormData.ts we just created
  const url = '/api/forms/SubmitFormData';

  try {
    const response = await fetch(url, {
      method: 'POST',
      headers: {
        'Content-Type': 'application/json',
      },
      body: JSON.stringify({
        formData,
      }),
    });

    const data = await response.json();
    return JSON.parse(data);

  } catch (error) {
    console.error('Error inside submitFormData:', error);
    return error;
  }
};
Creating isLoading and isSubmitted React useStates
The hard work is pretty much done. Now, all we need to do is add some icing to our “pre-built cake”. Adding an isLoading and isSubmitted state to our code will provide the user with important visual feedback on whether the form is submitting correctly. Inside our FormProvider function, we can create the two new useState items, and pass them to the FormContext.Provider.
export const FormProvider: React.FC<FormProviderProps> = ({ children }) => {
  const [formData, setFormData] = useState<{ [key: string]: string }>({});
  const [isSubmitted, setIsSubmitted] = useState(false);
  const [isLoading, setIsLoading] = useState(false);

  const handleSubmit = async (e: React.FormEvent<HTMLFormElement>) => {
   //... handleSubmit code
  };

  //IMPORTANT: Dont forget to pass them to the Form Provider
  return (
    <FormContext.Provider value={{ formData, setFormData, handleSubmit, isSubmitted, isLoading }}>
      {children}
    </FormContext.Provider>
  );
};
Next, we want to handle how our state is updated inside our handleSubmit function. We can toggle setIsLoading to true at the start of the submit, then add a finally block to the end of our try-catch statement. We can also toggle setIsSubmitted to true after completing our form submission.
const handleSubmit = async (e: React.FormEvent<HTMLFormElement>) => {
    e.preventDefault();
    setIsLoading(true);

    try {
      await submitFormData(formData);
      setIsSubmitted(true);
    } catch (error) {
      console.error('Error submitting form data:', error);
    } finally {
            //This code will always run.
      setIsLoading(false);
    }
  };
Accessing Your Custom Hook and Final Code
Congratulations, you’ve now built out a fully functioning custom form hook. The last thing you need to do is link it up to your page. Here's a super simple example showing you how to access and update your form state.
Updating formData
//This is the simplest way to update your form data.
const { formData, setFormData } = useFormContext();

//Add handleInputChange to your inputs onChange
const handleInputChange = (value: string, inputName: string) => {
  setFormData((prevData) => ({
    ...prevData,
    [inputName]: value,
  }));
}
Handling Submission and Loading
const { handleSubmit, isSubmitted, isLoading } = useFormContext();

if (isSubmitted) {
    return(
        <div className="">
            {/*... your success message goes here! */}
        <div>
    )
} else {
    return(
        <form className="" onSubmit={handleSubmit}>
            {/*... all your inputs go here! */}

            {/* isLoading Example */}
            {isLoading ? (
                <div className="">Submitting form, please wait.</div>
            ) : (
                <button className="" type="submit">Submit Form</button>
            )}
        </form>
    )
}
Custom Hook Final Code:
import React, { createContext, useContext, useState, ReactNode } from 'react';

const FormContext = createContext<FormContextType | undefined>(undefined);

export const useFormContext = () => {
  const context = useContext(FormContext);
  if (!context) {
    throw new Error('useFormContext must be used within a FormProvider');
  }
  return context;
};

/**
 * Provides a context for form data and submission handling.
 * @param children The child components to render.
 */
export const FormProvider: React.FC<FormProviderProps> = ({ children }) => {
  const [formData, setFormData] = useState<{ [key: string]: string }>({});
  const [isSubmitted, setIsSubmitted] = useState(false);
  const [isLoading, setIsLoading] = useState(false);

  const handleSubmit = async (e: React.FormEvent<HTMLFormElement>) => {
    e.preventDefault();
    setIsLoading(true);

    try {
      await submitFormData(formData);
      setIsSubmitted(true);
    } catch (error) {
      console.error('Error submitting form data:', error);
    } finally {
      setIsLoading(false);
    }
  };

  return (
    <FormContext.Provider value={{ formData, setFormData, handleSubmit, isSubmitted, isLoading }}>
      {children}
    </FormContext.Provider>
  );
};

const submitFormData = async (formData: { [key: string]: string }): Promise<Response> => {
  const url = '/api/graphQL/forms/SubmitFormData';

  try {
    const response = await fetch(url, {
      method: 'POST',
      headers: {
        'Content-Type': 'application/json',
      },
      body: JSON.stringify({
        formData,
      }),
    });

    const data = await response.json();
    return JSON.parse(data);
  } catch (error) {
    console.error('Error submitting form data:', error);
    return error;
  }
};

// #region types
type FormContextType = {
  formData: { [key: string]: string };
  setFormData: React.Dispatch<React.SetStateAction<{ [key: string]: string }>>;
  handleSubmit: (e: React.FormEvent<HTMLFormElement>) => void;
  isSubmitted: boolean;
  isLoading: boolean;
};

type FormProviderProps = {
  children: ReactNode;
};
// #endregion

Meet Tyler Holmes
Full Stack Developer
🇬🇧🧑💻🏸
Tyler is an experienced Full Stack Developer who has worked on a plethora of unique projects. He possesses a deep understanding of Technical SEO, C#, and React/Next.js.