Why Would You Want Move From Cloudflare Workers?
Before bulk redirects, many people used Cloudflare workers to do redirects on their sites. You’d put in a big list of source and target URLs for where to redirect to for each one and code up a worker that could read out each key-value pair and send your user there. Maintaining that can be a significant amount of work, and updating it is an awful lot of data entry.
Cloudflare’s bulk redirects are fast, convenient, and easy to use. They’re a no-code solution, and you can move some (or all!) of the load from workers to them. Workers have a usage cost, but the bulk redirects don’t. So you can possibly reduce your Cloudflare spend. Adding a whole bunch of redirects is simple with their CSV upload, and that means you don’t need a developer just to add new redirects.
How Do You Do Switch to Cloudflare Workers?
The basic plan is to get a big file with all the source and target URLs, and import that to the bulk redirect list. For this article, we’re going to assume you know how to set up a bulk redirect list and add a couple of entries. See this article if you need a refresher, though.
Unfortunately, the Worker KV store doesn’t come with a handy export function. Not only that, there’s no way to list out all of the key value pairs by API; you have to get them one at a time.
Since there aren’t great tools within Cloudflare, this article lays out a list of tools and how-tos using mostly things you already have or are easy to get. The tools you need are Wrangler from Cloudflare, Powershell, and Postman. You can replace Powershell with your scripting tool of choice if you are on Linux or Mac, of course. The other two will run fine and can be used as is.
Getting the Values From the KV Store
You’ll need node.js if you don’t have it, but it’s pretty simple to install. I used version 18.13.0 for this article.
First off, get Wrangler from here and install it. Wrangler is a command line tool for managing workers and their keystore. It makes managing this project way easier than sending pure API calls.
Next, set up a wrangler.toml file. This is just a plain text file and lives in the same directory where you installed Wrangler.
name="kv-migrate"
account_id="<your-account-id-here>"
You can get your account id from the main url by logging in to Cloudflare’s dashboard.
https://dashboard.cloudflare.com/<account-id-here>
Now that Wrangler is ready to go, we need a list of the keys in the KV store. This article assumes that all of the keys are being used to redirect. If you have a bunch of different kinds of keys, you can edit the resulting JSON file to remove those.
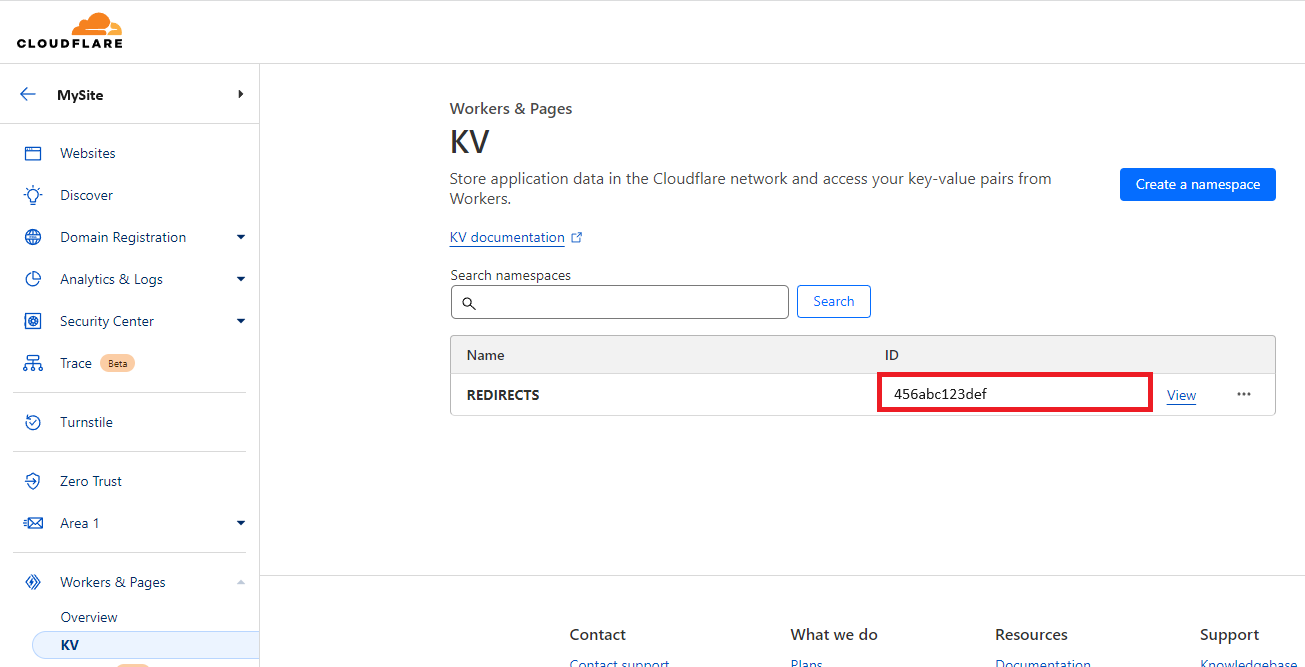
Get the namespace ID from Cloudflare.
Run this command from your command line, where you installed Wrangler:
node wrangler kv:key list --namespace-id=<namespace-id-here> > keys.json
That gives us a list of all the keys, but not their values. Now, we need a bigger script for this.
Cloudflare limits API calls to 1200 per five minutes, but for me, this script ran slow enough that I never hit that. If you do, you can add a sleep statement to the script to slow it down or run it for smaller chunks of keys.
function createEntry
{
    param
    (
      [Parameter(Mandatory=$true, Position=0)]
      [string] $key,
      [Parameter(Mandatory=$true, Position=1)]
      [string] $val
    )

    $jsonEntry =  @"
{
  "redirect": {
    "source_url":"$key",
    "target_url":"$val"
  }
}
"@

    return $jsonEntry | ConvertFrom-Json
}

$allKeys = Get-Content -Raw -Path keys.json | ConvertFrom-Json

$keyArray = @()
$startIndex = 0;
$endIndex = 2000;
<#
change startIndex and endIndex to do different parts of the key list.
This example is set up for 2000 keys at a time
Use $endIndex = $allKeys.Length for the last chunk.
#>

Write-Host $allKeys.Length
for($i=$startIndex; $i -lt $allKeys.Length; $i++) {
  $source = $allKeys[$i].name
  $target = node wrangler kv:key get $source --namespace-id=<namespace-id-here>

  $entry = createEntry $source $target
  $keyArray += $entry

  <# This writes to the screen just so you can tell the script is still running.
     Change the 50 there to be whichever interval is most comfortable. #>
  if($i -gt 0 -And $i % 50 -eq 0)
  {
    Write-Host $i
  }
  <#
  uncomment this section if you hit api limits

  if($i -gt 0 -And $i % 1000 -eq 0)
  {
      Write-Host "API limit wait"
      Start-Sleep -s 300
  }
  #>
}

$keyArray | ConvertTo-Json -depth 100 | Set-Content $endIndex`keylist.json
This gets us a bunch of files named with which part of the key list they are. Even better, they are in a format that Postman can use directly to update the bulk redirect list.
These are assumed to be straight redirects from one location to another using the default 301 code. If you were doing all subdomain redirects or need a different code, you can add that into the JSON entry up above, like:
{
    "redirect": {
      "source_url": "example.net/",
      "target_url": "https://example.net/under-construction.html",
      "status_code": 307,
      "include_subdomains": true
    }
Alternatively, you can edit the JSON file as you see fit if you only need this for some entries. If the format is consistent, you can add arguments to the createEntry function above, too. See here for the list of available options.
Importing the New Values
Once you have the JSON looking the way you want, set up a Bulk Redirect list to hold the new entries. It’s simplest to just do this in the Cloudflare dashboard. See this link for details.
Get the new list ID from the dashboard URL, too, by clicking Bulk Redirects and then edit for the list.
https://dash.cloudflare.com/<account-id>/bulk-redirects/redirect-list/<list-id>/edit-redirects
Next, you set up a POST request in Postman to this URL:
https://api.cloudflare.com/client/v4/accounts/<account-id>/rules/lists/<list-id>/items
Set a Content Type header to application/json, and set up your authorization. Postman has a nice feature where it has a Cloudflare quick authorize, or you can use this link.
Set the content type in the body to raw, and then paste the first JSON file into the body and submit the request. This will send a batch operation and give you back a status flag. You can set up another Postman request to check the status, but I found it quick enough that it wasn’t needed.
The return values are thorough and quite clear for troubleshooting.
After the first request works, just copy in each remaining JSON file and repeat the submission.
If you need more than 10,000 redirects, you’ll need to talk to your Cloudflare representative to increase the account limits.
Cleanup
Once you have moved over all the key value pairs you want, it’s time to delete them from the KV store. Unfortunately, there’s no bulk delete from the Cloudflare dashboard. Don’t just delete the keystore unless you have no more need of the worker! It will stop working. This article was very helpful for doing that, and you can use the keys.json file as the purge.json file they have.
That’s All!
There’s nothing else to do. You can go in and look at your new redirects test them out, but there’s no more work to be done. New redirects can be added via the dashboard or importing the CSV; there’s no more need for these scripts.

Meet Ryan Allan
Senior Developer
⚙️💻👪
Ryan is a seasoned Senior Developer at Fishtank and is Sitecore Developer Certified. In a nutshell, he describes his role as "building extremely fancy websites". Ryan has a degree in Mechanical Engineering and previously worked on power plants and compressors, and now builds websites for the same company as a client! Outside of work, his interests are science + physics and spending time with his kids.