The Importance of Image Optimization
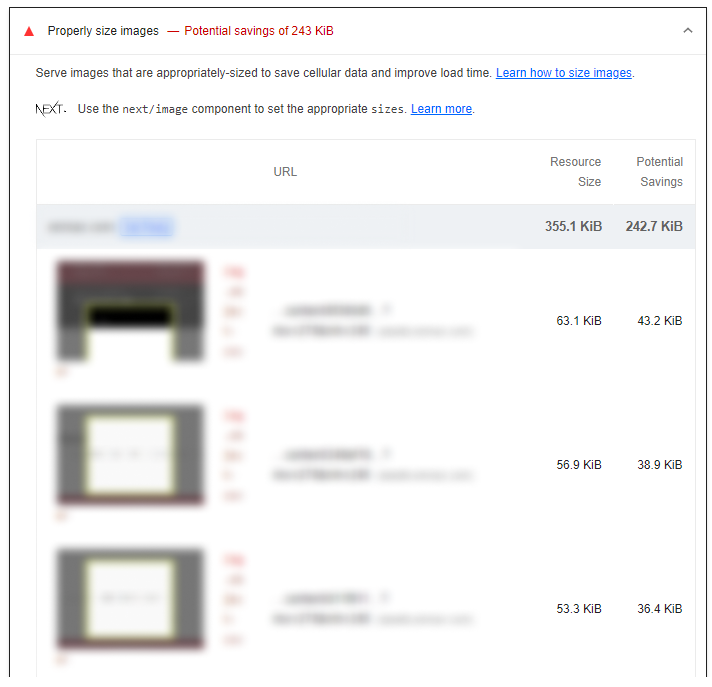
Images play an important role in web designs aside from making the website attractive. It helps distinguish the website by reinforcing the brand identity. It aids in helping users understand more of complex concepts or instructions on our websites. There are tons of purposes images have when added in our websites. The problem happens when we do not optimize the images which can affect the website’s performance. The image below is a good example of how much potential we can actually get if we take the time to optimize the images on our website. By running Chrome’s Lighthouse we can see that from the overall resource size of 355.1KiB, if we setup Nextjs' image optimization we can save as much as 243KiB worth of data, which is around 68% of the total resource size. This can also help improve the Lighthouse score of our website by improving LCP performance.
Using image optimization can have these advantages:
- Smaller file sizes can reduce the time it takes for the page to load.
- Optimized images can be cost-effective, they can consume less bandwidth and reduce storage costs.
Next.js Image Optimization
An Image Component which applies Image Optimization is available out of the box when you are using NextJS by
importing it using next/image .
import Image from "next/image";
The component will require you to add a width and height on the component parameters aside
from the expected src and alt .
<Image
   className="object-cover"
   src="/example-2.jpg"
   alt="Optimized Test Image 2"
   width={500}
   height={500}
/>
Normally we would want to make the width and height dynamic based on certain conditions like browser sizes or image
dimensions. A quick way to solve this is using the fill parameter of the Image component.
You will have to add a class for object-fit to cover and add a container div that must have
position: relative; set in it’s styles as well. A sample code can be seen below.
<div className="relative w-1/2">
     <Image
         className="object-cover"
         src="/example-2.jpg"
         alt="Optimized Test Image 2"
         fill
     />
</div>
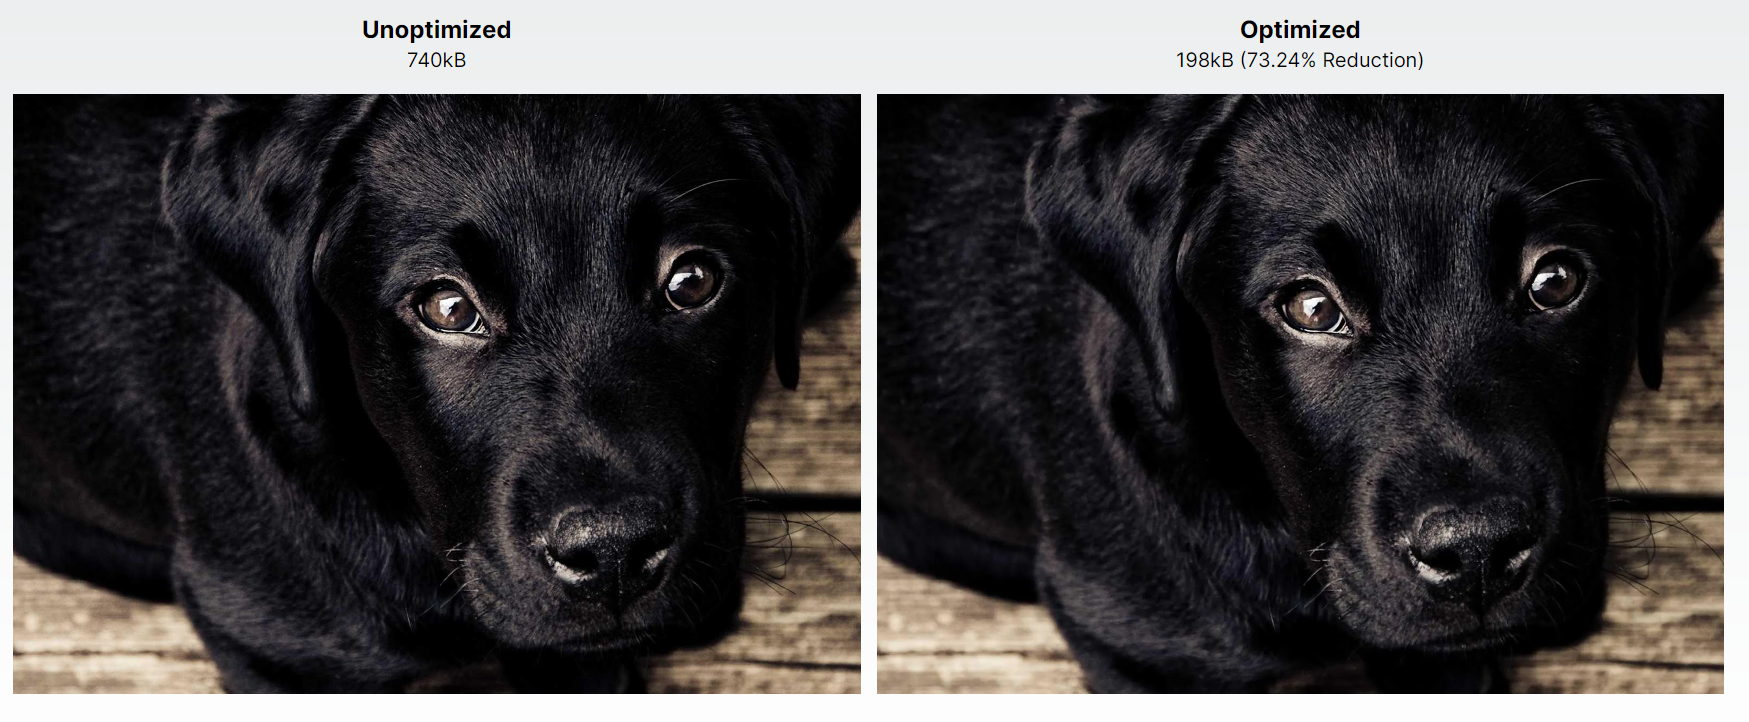
Here is a sample website I hooked up that you can see how much
optimization next/image provides. The size difference between the Image component and the
default img component is huge. Depending on how much optimization has already been applied to an image
the size reduction may not be as large as the examples shown. But taking into account that not all content authors
will be sensitive about the images they use, or they might have forgotten to use image reduction software on the
images. Regardless, as little as 30% reduction will still affect the Lighthouse Score since the analysis will know if
the images can still be reduced and this will be taken into account the final score.
When we open our Devtools in Chrome and check the Network tab, we can see the time needed for them to completely load on the webpage. The larger sized image (3000x4000) have around double the time needed for it to completely load, while the smaller sized image (300x400) varies depending on the page load, there are moments where it can cut the load time by half and other times it loads pretty close to the unoptimized version.


We can clearly see that using this will help improve the performance of our website regardless of the initial size.
It will help make sure the images will always be optimized whether the images are already at their optimum size or
not. Let’s look into Sitecore and how we can incorporate the next/image Image component while we utilize
the JSS Component which will be needed when we use the Editor.
Utilization of the Image Component From JSS OOTB
When we want to add an image on a component we usually import the Image component provided by
@sitecore-jss/sitecore-jss-nextjs . This is also used by the OOTB Image Sitecore component when you
initially get your project up. Here is a quick example of a component that uses the component. Let us assume that this
component uses a Sitecore Template that has an image field.
import { Image, ImageField } from '@sitecore-jss/sitecore-jss-nextjs';
import { ComponentProps } from 'lib/component-props';

type ImageProps = ComponentProps & {
  fields: {
     image: ImageField;
  };
};

export const Default = (props: ImageProps) => {
    return (
        <Image field={props.fields.image} />
    );
};
The component is pretty straightforward, the importance of using the Image component provided is
because it creates an editable component once rendered on the Experience Editor. This will prevent us
from using the next/image Image component since we’ll need to allow the image to be edited when on the
Editor.
There is a workaround on how we can use both. Sitecore has provided a Context object and one of it’s values can
detect whether the component is rendered on an Editor or not. This be accessed by using the
sitecoreContext.pageEditing value. We can then use this to determine what component to use.
import { Image as JSSImage, ImageField, useSitecoreContext } from '@sitecore-jss/sitecore-jss-nextjs';
import { ComponentProps } from 'lib/component-props';
import Image from 'next/image';

type ImageProps = ComponentProps & {
  fields: {
     image: ImageField;
  };
};

export const Default = (props: ImageProps) => {
  const { sitecoreContext } = useSitecoreContext();

  const renderOptimizedImage = () => {
    return (
      <div className="relative">
        <Image
          className="object-cover"
          src={fields?.image?.value?.src ?? ''}
          alt={(fields?.image?.value?.alt as string) ?? ''}
          fill
        />
      </div>
    );
  };

  return sitecoreContext.pageEditing ? (
    <JSSImage field={props.fields.image} />
  ) : (
    renderOptimizedImage()
  );
};
Sitecore’s NextImage Component
Sitecore has developed a JSS NextImage component that utilizes both the Image component from next/image
and the Image component from @sitecore-jss/sitecore-jss-nextjs . This feature is available for versions
20.1.0 or later, for previous versions you’ll have to rely on the initial solution I presented.
NextImage simplifies a lot of the code we had earlier. Since JSS has made it so that it already
detects what to render if it’s using an Editor or not you won’t have to manually render specific code on Page Editing.
You won’t have to also pass in the field data into the Image manually which is great. The props work like the Image
component in next/image so you can still pass in the fill parameter and add in the
object-cover class to get the right results.
import { NextImage , ImageField} from '@sitecore-jss/sitecore-jss-nextjs';
import { ComponentProps } from 'lib/component-props';

type ImageProps = ComponentProps & {
  fields: {
     image: ImageField;
  };
};

export const Default = (props: ImageProps) => {
  return <NextImage field={fields?.image} className="object-cover" fill />;
};
More documentation about NextImage here. An important note when using this, JSS does not support security hashing of media URLs, so make sure to white-list these parameter sets on the server. You’ll find more information about it here. There is a JSS Issue associated with image optimization not running on the URLs which might be fixed with the white-listing step, but just incase that step doesn’t work, please refer here for updates on the issue.

Meet John Flores
Front-End Developer
🪴🐩📷
John is a Front-End Developer who is passionate about design and development. Outside of work, John has wide range of hobbies, from his plant collection, being a dog daddy, and a foodie.