Setting Up Multilingual Routing with Next.js and Sitecore XM Cloud
Next.js, out-of-the-box, offers built-in support for internationalization (commonly referred to as i18n, with "18" representing the number of characters between "i" and the last "n") routing. To begin, we create a list of the languages we want to support in Sitecore. We then create a unique Project in Vercel for each of those languages. These Projects will have Environment Variables populated with each other's domains for language toggling and association. Afterwards, we can pass this list of Sitecore languages to our Next.js application as locales. The Next.js application will use the Environment Variables from Vercel to associate the domains to the appropriate locales. Then, the application will take care of the routing accordingly.
Before We Start
This blog assumes that you have already set up a Sitecore XM Cloud environment and know how to create a Vercel Project associated with it. I had done this before I started down the path of creating the multiple domain solution. I essentially ended up with two duplicate Vercel Projects, one for each unique domain, with some language-specific settings.
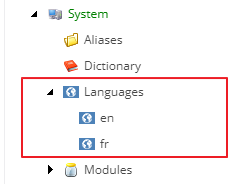
Creating Languages in Sitecore
In order to successfully implement our multiple language and domain solution in Sitecore, it is essential to define the languages that will be required for the project. This includes identifying the specific languages that will be supported within the Sitecore platform and ensuring that the necessary language packs and configurations are in place. By defining the required languages, the project team will be able to effectively manage multilingual content and provide a seamless user experience for visitors across different language preferences.
Creating Language-Specific Vercel Environments
There is no doubt that, when implementing your solution, you will need to create multiple environments for different purposes, such as QA, UAT, and Production. For each environment, we will need to create a Vercel Project that correlates to the languages we have created in Sitecore. We will use our project name, followed by the environment name, and then the language to define the name of our Projects:
project-qa-en
project-qa-fr
We will be associating one unique, language based domain for each of these Projects.
Support Across Multiple Environments in Vercel
To allow for our configuration domain values to be dynamic in our application, driven by the environment you are viewing from, we will be storing the domain names for each Project as Environment Variables in the Vercel Project Settings.

These Environment Variables will be pulled into our application in the next section of this blog.
Configuring your Next.JS Application
We will be utilizing the Domain Routing Locale strategy provided by Next.js. This powerful feature allows you to configure different locales to be served from separate domains. With the implementation of domain routing, you can enhance the user experience by catering to specific regions and languages. By leveraging this strategy, you can create a more personalized and localized web application, ensuring that your content resonates with your target audience. The locale names must match the names of the languages that we have defined above in Sitecore. Also, note that we are using the Environment Variables we defined in Vercel to drive the domain values.
i18n: {
    // These are all the locales you want to support in your application.
    // These should generally match (or at least be a subset of) those in Sitecore.
    locales: ['en', 'fr'],
    // This is the locale that will be used when visiting a non-locale
    // prefixed path e.g. `/styleguide`.
    defaultLocale: jssConfig.defaultLanguage,
    localeDetection: false,
    domains: [
      {
        // Note: subdomains must be included in the domain value to be matched
        // e.g. www.example.com should be used if that is the expected hostname
        domain: process.env.PUBLIC_EN_HOSTNAME,
        defaultLocale: 'en',
      },
      {
        domain: process.env.PUBLIC_FR_HOSTNAME,
        defaultLocale: 'fr',
      },
    ],
  },
Language Provider
We need to update the values of the linkManager element in our solutions web.config file. The best way to do this is to patch it in the config file in the include folder (located in the solution here: App_Config/Include). You will have the below contents in a file that may be named something like Platform.LinkManager.config. (Platform is the base project name of the OOTB code we get from the SXA Starter Kit.) We will be patching the following settings:
languageEmbedding- we don’t need this enabled when we are using the domains to drive the language on our application, hence why we are setting it to neveruseDisplayName- we will use this field in Sitecore to allow us to use translated URLs for our pages. Remember not to use any special characters when populating this field in Sitecore.lowercaseUrls- we will enable this for uniform looking URLs and SEO purposes
<configuration xmlns:patch="http://www.sitecore.net/xmlconfig/">
    <sitecore>
        <linkManager>
            <providers>
                <add name="localizedProvider">
                    <patch:attribute name="lowercaseUrls">true</patch:attribute>
                    <patch:attribute name="useDisplayName">true</patch:attribute>
                    <patch:attribute name="languageEmbedding">never</patch:attribute>
                </add>
            </providers>
        </linkManager>
        <links>
            <urlBuilder>
                <lowercaseUrls>true</lowercaseUrls>
                <encodeNames>true</encodeNames>
                <useDisplayName>true</useDisplayName>
                <languageEmbedding>never</languageEmbedding>
            </urlBuilder>
        </links>
    </sitecore>
</configuration>
Conclusion
If done correctly, when we now navigate to the domains we set up in our application, we should be able to see the published content in the language associated with those domains. In this multidomain blog series, I will also be covering language toggling between the two domains. We use the Link component from the next/link library with the appropriately set locale parameter to navigate between the two domains. However, there needs to be some additional work done to get the correct URLs if we are translating them with the Display Name; otherwise, we will just be hitting 404 pages. We will also cover how to effectively correct the Sitemap for each domain, as they will both be the same on either domain.

Meet Mike Payne
Development Team Lead
🎶🚴♂️⛰
Mike is a Development Team Lead who is also Sitecore 9.0 Platform Associate Developer Certified. He's a BCIS graduate from Mount Royal University and has worked with Sitecore for over seven years. He's a passionate full-stack developer that helps drive solution decisions and assist his team. Mike is big into road cycling, playing guitar, working out, and snowboarding in the winter.