Exploring Field Customization in Sitecore XM Cloud
There are a few areas of Sitecore I have yet to play in, and perhaps the most intimidating of those is that of field customization. I don’t think I’m alone. I think when Sitecore comes with nearly every combination you could need out-of-the-box, the answer typically is, I’ll use what I have. Or, I have all I need.
Hopefully, after this article, you’ll feel like I do and realize customizing your own field, and even that of the Layout Service isn’t that big of a deal. Let alone could add loads of value to your future and existing clients.
The more personal you can make something, the more they are attached to it. If it’s generic and cold, they can lose that attachment. Customizing field experiences is one way of building that relationship.
The Challenge
Before I even start, let me give you a bit of background as to why I went down this path.
I needed a way to use content from one XM Cloud project inside another XM Cloud project. i.e. Share content between sites not just under a shared tenant but shared outside of that tenant in a way that didn’t hamstring content authoring or require unnecessary content authoring.
While that’s relatively simple enough, as long as you have the appropriate access token and knowledge of the item IDs and relevant fields, the last thing I wanted to do was hard-code item IDs as data sources inside of a front-end component.
The Solution
First, let’s discuss what I’m going to be covering as, ultimately, it can be covered in three main sections. Three sections that, independently, might apply to a task you’re trying to complete.
- How to create a custom field that mimics the actions of a Multilist.
- How to query data from Experience Edge to provide data to the Multilist.
- How to customize the layout service to support the new field and update the JSON response with supporting information for each data item selected.
Creating a Custom Multi-list Field
The process of creating a custom multi-list field can be broken up into three parts.
Creating the Custom Field Type in the Core Database
First thing, let’s open up your Sitecore Desktop, switch to the core database and then open up Content Editor. Once you’ve done that, locate Field types it under /system/.
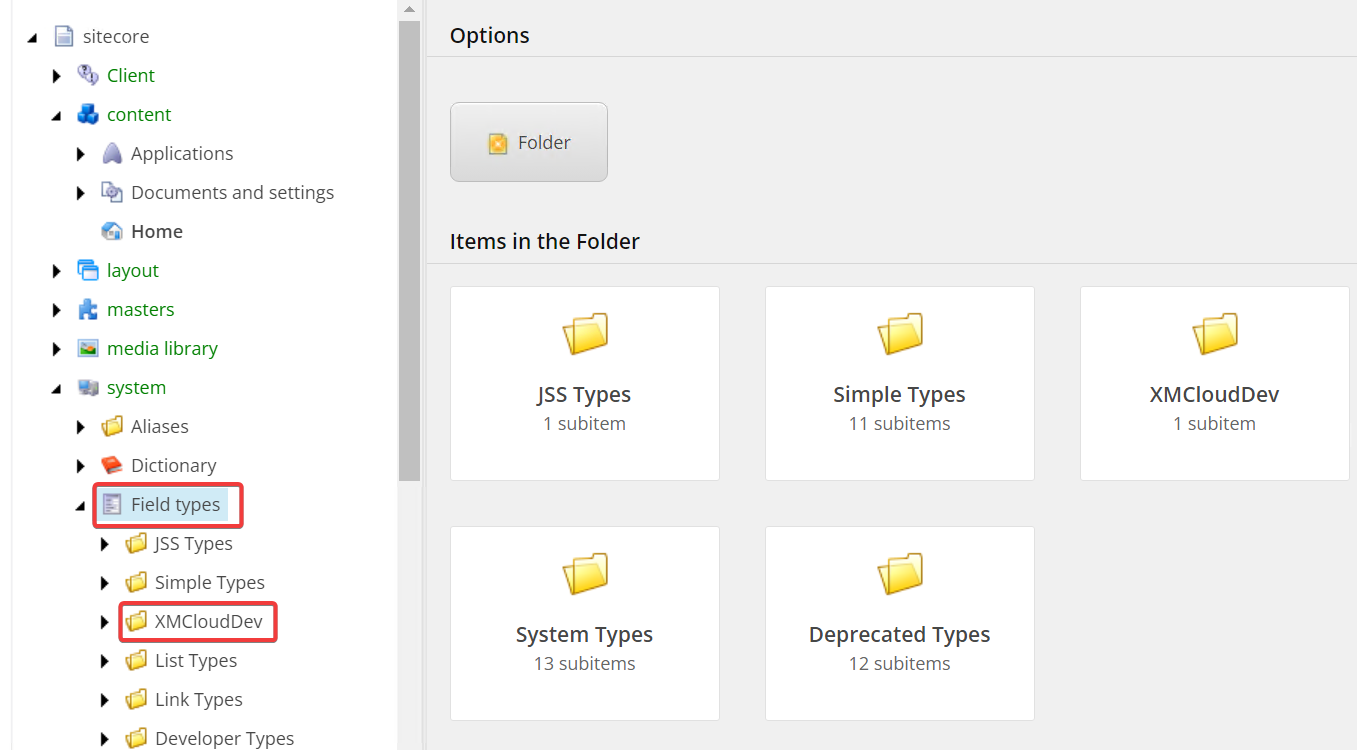
I’ve created my own folder called XMCloudDev , but you can call yours anything you want. I do recommend putting your custom fields in a folder and not mixing them to make it simpler on serialization.
Inside the folder I’ve created an item named RemoteDataMultilist of Template field type. Obviously, you can name yours anything, but I would recommend something meaningful.
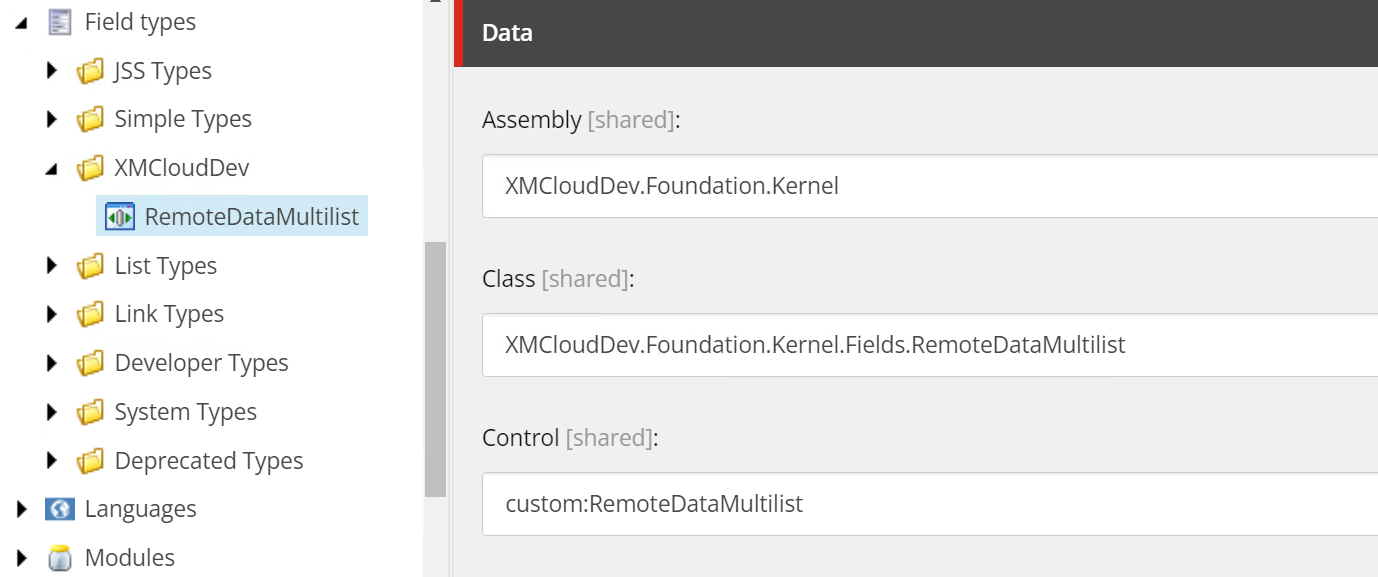
The Assembly should point to the name of the dll where it can be found. The Class will point to the field class itself. And for Control, I used custom:RemoteDataMultilist, both of which are prefixes from the config files we will be creating.
Creating the Custom Field Class
Where you place your custom field classes is totally up to you. I’ve just created a simple Kernel project.
Here is my custom field class called RemoteDataMultilist.cs. The most important thing to note here is that we’re going to inherit from MultilistEx. As such, we really only need to override the DoRender function that displays the field inside Content Editor.
The other thing to note is that because we’re replicating the functionality of a multi-list, we need to utilize similar HTML, CSS, and JavaScript such that it behaves like a Multlist. You could simply copy the HTML from the inspect menu, or you could try to put your own spin on it. Completely up to you. For the sake of this demonstration, I used inline styling but again, I wou
using System;
using System.Linq;
using System.Web.UI;
using System.Collections.Specialized;
using Sitecore;
using Sitecore.Data.Items;
using Sitecore.Shell.Applications.ContentEditor;
using Sitecore.Web.UI.Sheer;
using Sitecore.Text;
using Newtonsoft.Json.Linq;
using XMCloudDev.Foundation.Kernel.Clients;
using System.Threading.Tasks;
using Sitecore.Mvc.Names;

namespace XMCloudDev.Foundation.Kernel.Fields
{
    public class RemoteDataMultilist : MultilistEx
    {

        protected override void DoRender(HtmlTextWriter output)
        {
            // Load the GUIDs and Names from GraphQL here
            NameValueCollection leftListBox = GetAvailableItemsFromGraphQLAsync();
            var rightListBox = new ListString(Value);
            this.ServerProperties["ID"] = this.ID;
            // Output the HTML for the two list boxes here
            output.Write("<div class='scContentControlMultilistContainer'>");
            output.Write("<input id=\"" + this.ID + "_Value\" type=\"hidden\" value=\"" + Value + "\" />");
            output.Write("<table id=\"" + this.ID + "\" class=\"scContentControlMultilist\">");
            output.Write("<tr><td class=\"scContentControlMultilistCaption\" width=\"50%\">All</td><td width=\"20\"><img src=\"/sitecore/images/blank.gif\" width=\"20\" height=\"1\" class=\"scSpacer\" alt=\"\" border=\"0\"></td><td class=\"scContentControlMultilistCaption\" width=\"50%\">Selected</td><td width=\"20\"><img src=\"/sitecore/images/blank.gif\" width=\"20\" height=\"1\" class=\"scSpacer\" alt=\"\" border=\"0\"></td></tr>");
            output.Write("<tr>");

            // Left ListBox (all available items)
            output.Write("<td>");
            output.Write("<select id=\"" + this.ID + "_unselected\" class=\"scContentControlMultilistBox\"  multiple=\"multiple\" size=\"10\" ondblclick=\"javascript:scContent.multilistMoveRight('" +
                this.ID + "')\" onchange=\"javascript:document.getElementById('" + this.ID +
                "_all_help').innerHTML=this.selectedIndex>=0?this.options[this.selectedIndex].innerHTML:''\">");
            foreach (string key in leftListBox.AllKeys)
            {
                output.Write($"<option value='{key}'>{leftListBox[key]}</option>");
            }
            output.Write("</select>");
            output.Write("</td>");
            output.Write("<td valign=\"top\"><img src=\"/-/icon/Office/16x16/navigate_right.png.aspx\" width=\"16\" height=\"16\" class=\"scNavButton\" style=\"margin:2px\" alt=\"\" border=\"0\" onclick=\"javascript:scContent.multilistMoveRight('" + this.ID
                + "')\" tabindex=\"0\" role=\"button\" aria-label=\"Move to selected items\" onkeydown=\"javascript:if (event.keyCode === 13 || event.keyCode === 32) { scContent.multilistMoveRight('" + this.ID
                + "'); scForm.browser.clearEvent(event, true, false); return false; }\"><br><img src=\"/-/icon/Office/16x16/navigate_left.png\" width=\"16\" height=\"16\" class=\"scNavButton\" style=\"margin:2px\" alt=\"\" border=\"0\" onclick=\"javascript:scContent.multilistMoveLeft('" + this.ID
                + "')\" tabindex=\"0\" role=\"button\" aria-label=\"Remove from selected items\" onkeydown=\"javascript:if (event.keyCode === 13 || event.keyCode === 32) { scContent.multilistMoveLeft('" + this.ID
                + "'); scForm.browser.clearEvent(event, true, false); return false; }\"></td>");
            output.Write("<td>");
            // Right ListBox (selected items)
            output.Write("<select id=\"" + this.ID + "_selected\" class=\"scContentControlMultilistBox\" multiple=\"multiple\" size=\"10\" ondblclick=\"javascript:scContent.multilistMoveLeft('" + this.ID + "')\" onchange=\"javascript:document.getElementById('" + this.ID +
                "_all_help').innerHTML=this.selectedIndex>=0?this.options[this.selectedIndex].innerHTML:''\">");
            foreach (var item in rightListBox)
            {
                output.Write($"<option value='{item}'>{(leftListBox[item] != null ? leftListBox[item] : item + " does not exist")}</option>");
            }
            output.Write("</select></td>");
            output.Write("<td valign=\"top\"><img src=\"/-/icon/Office/16x16/navigate_up.png\" width=\"16\" height=\"16\" class=\"scNavButton\" style=\"margin:2px\" alt=\"\" border=\"0\" onclick=\"javascript:scContent.multilistMoveUp('" + this.ID
                + "')\" tabindex=\"0\" role=\"button\" aria-label=\"Move up item\" onkeydown=\"javascript:if (event.keyCode === 13 || event.keyCode === 32) { scContent.multilistMoveUp('" + this.ID
                + "'); scForm.browser.clearEvent(event, true, false); return false; }\"><br><img src=\"/-/icon/Office/16x16/navigate_down.png\" width=\"16\" height=\"16\" class=\"scNavButton\" style=\"margin:2px\" alt=\"\" border=\"0\" onclick=\"javascript:scContent.multilistMoveDown('" + this.ID
                + "')\" tabindex=\"0\" role=\"button\" aria-label=\"Move down item\" onkeydown=\"javascript:if (event.keyCode === 13 || event.keyCode === 32) { scContent.multilistMoveDown('" + this.ID
                + "'); scForm.browser.clearEvent(event, true, false); return false; }\"></td>");
            output.Write("</tr>");
            output.Write("<tr><td colspan=4><div class=\"scContentControlMultilistHelp\" id=\"" + this.ID + "_all_help\"></div></td></tr>");
            output.Write("</table>");

        }

        private NameValueCollection GetAvailableItemsFromGraphQLAsync()
        {
            NameValueCollection items = new NameValueCollection();
            var graphQLClient = new GraphQLClient("https://edge.sitecorecloud.io/api/graphql/v1");
            var result = "";
            string myGraphQLQuery = @"
            {
              search(
                where: {
                  AND:[
                    { name: ""_path"", value: ""4c32d0fd-c1c5-4afe-9e11-7b9137424cf6"" },
                    { name: ""_templates"", value: ""ae35df5b-4044-4b78-a4fe-954616c25e3e"" } # If you want to filter by a specific template
                  ]
                }
                first: 100
              ) {
                results {

                    id
                    name
                    # You can include other fields you want to query

                }

              }
            }";

            try
            {
                result = graphQLClient.ExecuteQuery(myGraphQLQuery);
                // Process the result
                Sitecore.Diagnostics.Log.Info("GraphQL query result: " + result, this);
            }
            catch (Exception ex)
            {
                // Handle exception
                Sitecore.Diagnostics.Log.Error("Error executing GraphQL query", ex, this);
            }
            // Pseudo-code for making a GraphQL query
            JObject data = JObject.Parse(result);
            foreach (var item in data["data"]["search"]["results"])
            {
                items.Add(item["id"].ToString(), item["name"].ToString());
            }

            return items;
        }

    }
}
You’ll notice that the _unselected select box requires all available items from the remote source to be displayed, so let’s add a function to perform that lookup.
We’re going to store all the items inside a NameValueCollection. We’re going to set up a GraphQL client as well; code for that will be below. The GraphQL query itself is also below. You’ll need to replace your path ID and your template ID with values that are appropriate for your project.
You may even wish to improve this further by pulling these values from a configuration file or strategically from the source field of the field itself. Again, for the simplicity here, I’m just wanting to show you the formatting of what it looks like.
private NameValueCollection GetAvailableItemsFromGraphQL()
{
    NameValueCollection items = new NameValueCollection();
    var graphQLClient = new GraphQLClient("https://edge.sitecorecloud.io/api/graphql/v1");
    var result = "";
    string myGraphQLQuery = @"
    {
      search(
        where: {
          AND:[
            { name: ""_path"", value: ""4c32d0fd-c1c5-4afe-9e11-7b9137424cf6"" },
            { name: ""_templates"", value: ""ae35df5b-4044-4b78-a4fe-954616c25e3e"" }
          ]
        }
        first: 100
      ) {
        results {
            id
            name
        }
      }
    }";

    try
    {
        result = graphQLClient.ExecuteQuery(myGraphQLQuery);
    }
    catch (Exception ex)
    {
        // Handle exception as appropriate
    }

    // Parse results and add the items into a NameValueCollection.
    JObject data = JObject.Parse(result);
    // We know the structure of the json that would be returned for a successful pull.
    if (data == null || data["data"] == null && data["data"]["search"] == null || data["data"]["search"]["results"] == null) return items;
    foreach (var item in data["data"]["search"]["results"])
    {
        items.Add(item["id"].ToString(), item["name"].ToString());
    }
    return items;
}
Once the result has been returned, we will parse it, ensuring it’s of valid JSON structure and then pull out the item id and item name adding them to the NameValueCollection that we will display in the leftListBox.
Creating a GraphQL Client to Pull Data From Experience Edge
The following code is what I set up to query Experience Edge for the data we want. Once you have this created, you’ll be able to use it for all your custom fields or retrieving data from Edge for other purposes.
using Newtonsoft.Json;
using System.Text;
using System.Net.Http;

namespace XMCloudDev.Foundation.Kernel.Clients
{
    public class GraphQLClient
    {
        private readonly HttpClient _httpClient;
        private readonly string _graphQLEndpoint;
        private readonly string _accessToken = "replace with your Edge access token";

        public GraphQLClient(string graphQLEndpoint)
        {
            _httpClient = new HttpClient();
            _graphQLEndpoint = graphQLEndpoint;
            _httpClient.DefaultRequestHeaders.Add("sc_apikey", _accessToken);
        }

        public string ExecuteQuery(string query)
        {
            var payload = new
            {
                query = query
            };

            var content = new StringContent(JsonConvert.SerializeObject(payload), Encoding.UTF8, "application/json");

            var response = _httpClient.PostAsync(_graphQLEndpoint, content).Result;

            if (response.IsSuccessStatusCode)
            {
                var responseString = response.Content.ReadAsStringAsync().GetAwaiter().GetResult();
                return responseString;
            }
            else
            {
                // Handle error response
                throw new HttpRequestException($"GraphQL query failed with status code: {response.StatusCode}");
            }
        }
    }
}
Creating Patch Files to Enable the Custom Field
We will eventually pull the configuration for the custom field and the layout serialization of said field in a single config file, but for now, I’m just going to show you them separately.
<configuration xmlns:patch="http://www.sitecore.net/xmlconfig/">
  <sitecore>
    <controlSources>
      <source mode="on" namespace="XMCloudDev.Foundation.Kernel.Fields" assembly="XMCloudDev.Foundation.Kernel" prefix="custom" singleInstance="true" />
    </controlSources>
    <fieldTypes>
      <fieldType name="RemoteDataMultilist" type="XMCloudDev.Foundation.Kernel.Fields.RemoteDataMultilist, XMCloudDev.Foundation.Kernel" />
    </fieldTypes>

    ... Layout Service Config will go here.
  </sitecore>
</configuration>
There are two key attributes you should be aware of. The first is the prefix attribute of <source> within <controlSources> as that refers to the first portion of the Control field. The second is the name attribute within fieldType as that refers to the second half of the Control field we mentioned earlier. You could obviously make the prefix value more appropriate to a client project such that it’s clearer, but again, up to you.
The Result
With this all in place, you will have a fully working custom multi-list that pulls a list of items from Edge, allows you to select them, and saves the selected GUIDS in the “Value” field. All of that functionality works out-of-the-box. Thankfully.
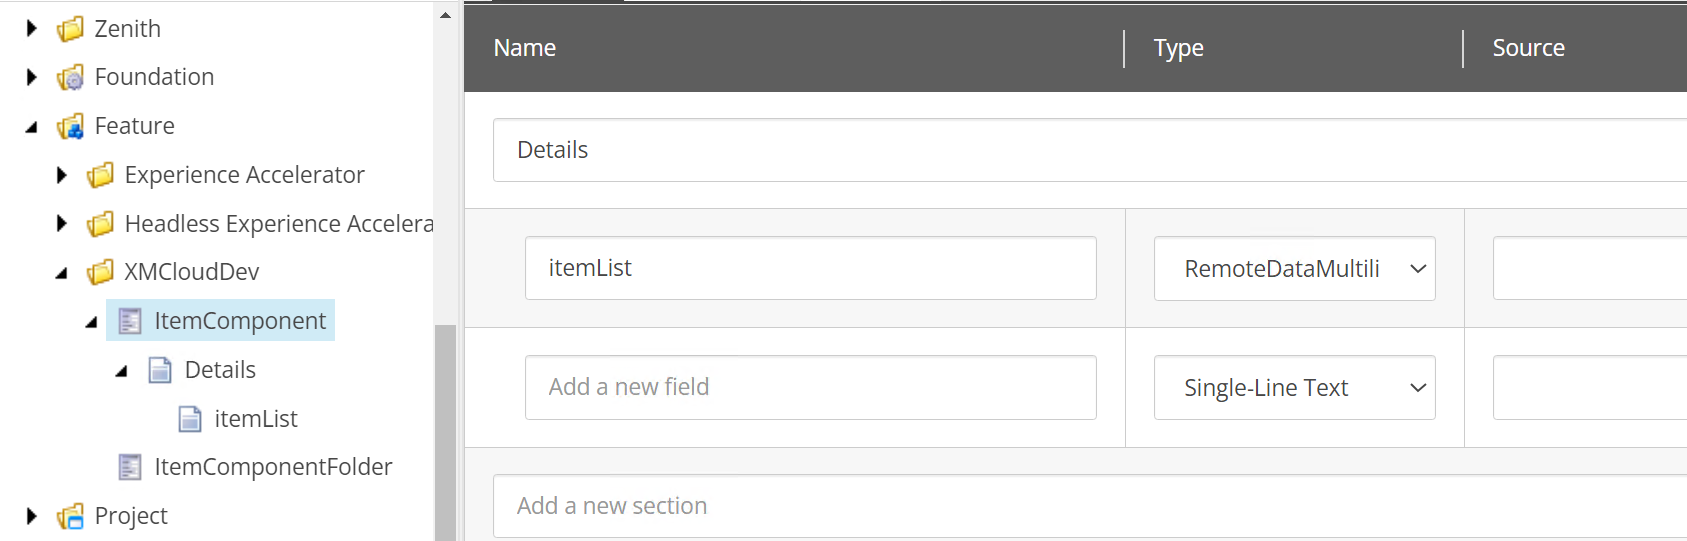
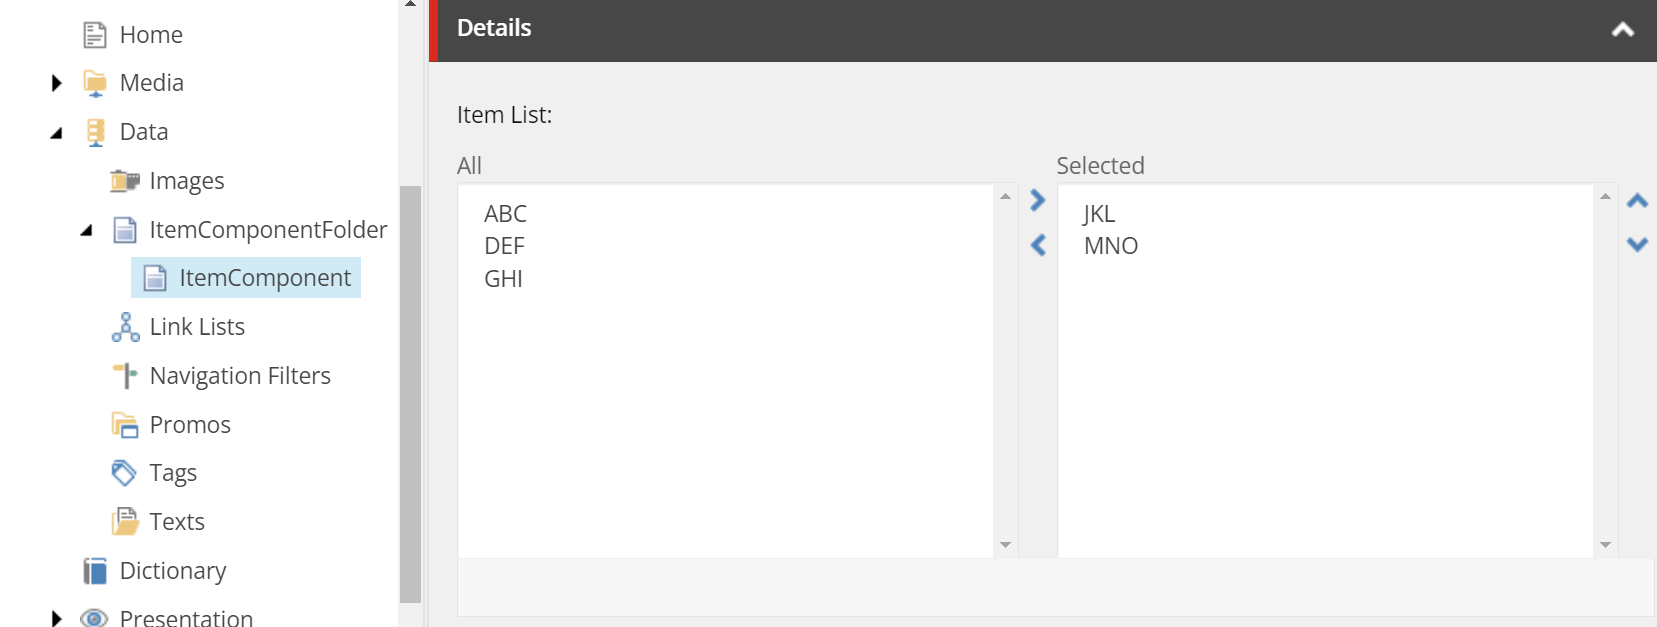
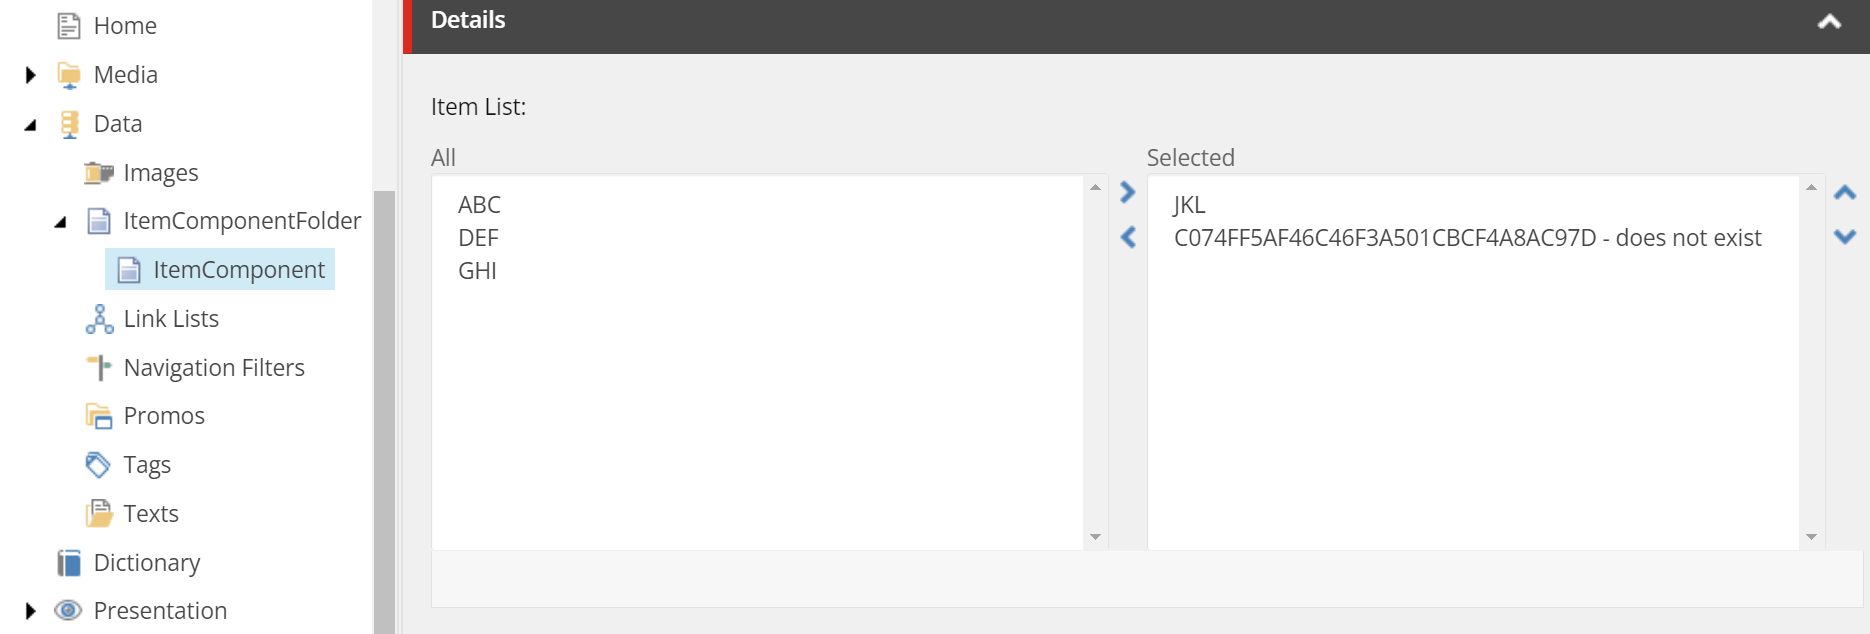
Let’s have a look at the result inside Content Editor.
THE TEMPLATE
DATA ITEM
RAW VIEW

I also included some checks such that if the GUIDS weren’t in the left list box, then they’d show as does not exist. Which you can see here. This might happen say if an item was selected from the list and it no longer exists in Edge. Remember, Edge is what is published and so if an item was deleted or unpublished, it’s not going to update this source. We need to go back in and remove it from the list.
We could stop there. There’s nothing to say that the out-of-the-box layout service isn’t enough to deliver the contents of this data item to the front-end components and those components could theoretically use them to pull the appropriate fields. That would be perfectly reasonable and something that could be done within the getStaticProps function of the component.
But why only go halfway?
Customizing the Layout Service To Provide Details About GUIDs In Our Custom Field
Updating the Layout Service to deal with our new field type involves creating two new functions.
- The Pipeline
- The Serializer
Examining the GetRemoteDataSerializer Pipeline
Let’s look at the pipeline first. It will call the serializer and apply the JSON result for the value of the field.
using Sitecore.LayoutService.Serialization.FieldSerializers;
using Sitecore.LayoutService.Serialization.Pipelines.GetFieldSerializer;
using Sitecore.LayoutService.Serialization;
using XMCloudDev.Foundation.Kernel.Serialization;

namespace XMCloudDev.Foundation.Kernel.Pipelines
{
    public class GetRemoteDataSerializer : BaseGetFieldSerializer
    {
        public GetRemoteDataSerializer(IFieldRenderer fieldRenderer) : base(fieldRenderer)
        {
        }

        protected override void SetResult(GetFieldSerializerPipelineArgs args)
        {
            args.Result = (IFieldSerializer)new RemoteDataMultilistSerializer(this.FieldRenderer);
        }
    }
}
The constructor method public GetRemoteDataSerializer(IFieldRenderer fieldRenderer) : base(fieldRenderer) initializes the new object. It takes an IFieldRenderer as a parameter, which is a Sitecore interface used for rendering fields.
The SetResult method is overridden, which means this class is providing a new implementation that will be called instead of the base class's SetResult method. Inside this method args.Result is set to a new instance of RemoteDataMultiListSerializer, which actually performs the serialization of our custom field.
Examining the RemoteDataMultilistSerializer Method
Now, let’s look at the serializer method itself. This method is where the actual serialization takes place. Serialization is the process of converting an object into a format that can be easily transferred or stored, such as JSON. The method receives a Field and a JsonTextWriter (a writer that can output JSON).
First, we write a JSON object starting with the field's name. It assumes the field value contains GUIDs (unique identifiers) separated by the pipe character (|). These GUIDs represent the items in the multi-list field. It then loops through each GUID, retrieves the related data by making a GraphQL query, and writes this data as a JSON object within a JSON array associated with the field's name.
using Sitecore.LayoutService.Serialization;
using Sitecore.LayoutService.Serialization.FieldSerializers;
using Sitecore.Data.Fields;
using Newtonsoft.Json;
using Sitecore.Data.Items;
using System;
using XMCloudDev.Foundation.Kernel.Clients;
using Newtonsoft.Json.Linq;

namespace XMCloudDev.Foundation.Kernel.Serialization
{
    public class RemoteDataMultilistSerializer : BaseFieldSerializer
    {
        public RemoteDataMultilistSerializer(IFieldRenderer fieldRenderer) : base(fieldRenderer)
        {
        }

        protected override void WriteValue(Field field, JsonTextWriter writer)
        {
            // Access the field's item
            Item item = field?.Item;

            // Now write your custom field JSON structure
            writer.WriteStartObject();

            // Write the field name
            writer.WritePropertyName(field.Name);
            writer.WriteStartArray();

            // Here you would pull the actual GUIDs for your values, for now we'll use a placeholder
            string[] guids = field.Value.Split('|');

            foreach (var guid in guids)
            {
                JObject remoteDataObj = JObject.Parse(GetSerializedItemDetails(guid));
                remoteDataObj.WriteTo(writer);
            }

            writer.WriteEndArray();
            writer.WriteEndObject();
        }

        private string GetSerializedItemDetails(string guid)
        {
            var graphQLClient = new GraphQLClient("https://edge.sitecorecloud.io/api/graphql/v1");
            var result = "";
            var query = $@"{{
                          item(path: ""{guid}"", language: ""en"") {{
                            name
                            template {{
                              name
                            }}
                            fields {{
                              name
                              value
                            }}
                          }}
                        }}";

            try
            {
                result = graphQLClient.ExecuteQuery(query);
                // Process the result
            }
            catch (Exception ex)
            {
                // Handle exception
            }
            return result;
        }
    }
}
Our approach here is more generic and not targeting a specific template. By approaching it this way, this field could theoretically be used against any source and against any template. To ensure we’re returning on the fields we need for the component (or components) we’d have to specify the field names themselves. Not saying you can’t do that, it is just yet another hard coding you may want to avoid.
Instead what will be returned here is an array of objects containing field names and their values.
Serializer and Pipeline Patch File
Before we can run it though, we need to patch it in. So we’re just going to tag the following configuration it into the original configuration, given it’s all related.
<configuration xmlns:patch="http://www.sitecore.net/xmlconfig/">
  <sitecore>
    ... Field Type Setup ...
    <pipelines>
      <group groupName="layoutService">
        <pipelines>
          <getFieldSerializer>
            <processor patch:before="processor[@type='Sitecore.LayoutService.Serialization.Pipelines.GetFieldSerializer.GetDefaultFieldSerializer, Sitecore.LayoutService']" type="XMCloudDev.Foundation.Kernel.Pipelines.GetRemoteDataSerializer, XMCloudDev.Foundation.Kernel" resolve="true">
              <FieldTypes hint="list">
                <fieldType id="1">RemoteDataMultilist</fieldType>
              </FieldTypes>
            </processor>
          </getFieldSerializer>
        </pipelines>
      </group>
    </pipelines>
  </sitecore>
</configuration>
Because our pipeline is set up using dependency injection, don’t forget the resolve="true" on the end of that processor line.
The Result
When we first add the component that references the data to a page inside the headless-main placeholder, we can then view the layout JSON data and verify it is properly serializing the GUIDs.
The URL for which looks like this: `https://xmcloudcm.localhost/sitecore/api/layout/render/jss?item=
"placeholders": {
"headless-header": [],
"headless-main": [
    {
    "uid": "9199e180-be40-4bc8-bba5-78ba8a895b3d",
    "componentName": "ItemListComponent",
    "dataSource": "{AD5EF084-D5AE-4380-A90A-08013BEF11B9}",
    "params": {},
    "fields": {
        "itemList": {
            "value": {
                "itemList": [
                    {
                        "data": {
                            "item": {
                                "name": "JKL",
                                "template": {
                                    "name": "AnItem"
                                },
                                "fields": [
                                    {
                                        "name": "itemAttr",
                                        "value": "JKL"
                                    },
                                    {
                                        "name": "itemDesc",
                                        "value": "a short description"
                                    },
                                    {
                                        "name": "itemType",
                                        "value": "{DB5925B4-CB0A-48F1-ADA7-F5026829B7DD}"
                                    },
In Summary
So, what have we covered here? Well, now you should have the basics on how to build a custom multi-list, one that doesn’t require you to utilize actual items. You should be able to link up any API, not just Sitecore’s Edge service like we did, to gather information that might not be stored within your XM Cloud project. But this is just a multi-list; there’s nothing to say you can’t create other custom fields.
We’ve also covered how to serialize that custom field to enhance the layout service and thus reduce front-end calls.
I’ve certainly thought of a few other uses for how we can take this further and will likely be exploring those ideas and sharing them with you in the near future.

Meet David Austin
Development Team Lead | Sitecore Technology MVP x 3
📷🕹️👪
David is a decorated Development Team Lead with Sitecore Technology MVP and Coveo MVP awards, as well as Sitecore CDP & Personalize Certified. He's worked in IT for 25 years; everything ranging from Developer to Business Analyst to Group Lead helping manage everything from Intranet and Internet sites to facility management and application support. David is a dedicated family man who loves to spend time with his girls. He's also an avid photographer and loves to explore new places.