Harnessing the Power of AI for Sitecore
Integrating successfully with external sources can always be a challenge with Sitecore. Often because the question is typically when to perform the integration. In many cases, that is dependent on the purpose but when we’re creating integrations with XM Cloud we have a bit more flexibility. We can create integrations for fields as we’ve shown before, but also during save as well as publish pipelines. Let’s not forget though, that we can further integrate with external sources within the getStaticProps method of the appropriate component. For the purpose of today’s example, we’re going to focus on the layout service particularly.
Enhancing the Sitecore XM Cloud Layout Service
What is the Layout Service exactly? Well, it is a Sitecore Headless Services endpoint that provides JSON formatted Sitecore content that is then consumed by various components that then render the front-end experience to users.
I don’t just want to do any kind of enhancement today. I want to take advantage of ChatGPT. What I’m planning on is extending the Sitecore Context such that each page that is rendered and receives a JSON formatted Sitecore content object, is extended with additional metadata.
Important Note: What we’re going to do is not FREE. It does cost money, so I just want to make you aware up-front that however cool this is, it’s not for everyone.
Extending Sitecore Context In The Layout Service
Let’s create a class that focuses on extending the Sitecore Context for the Layout Service. In our case we’re creating keywords based upon the Content field found on each Page item.
using Sitecore.Data.Items;
using Sitecore.Diagnostics;
using Sitecore.JavaScriptServices.Configuration;
using Sitecore.LayoutService.ItemRendering.Pipelines.GetLayoutServiceContext;
using XMCloudDev.Foundation.Kernel.Clients;

namespace XMCloudDev.Foundation.Kernel.Pipelines
{
    public class ContextExtension : Sitecore.JavaScriptServices.ViewEngine.LayoutService.Pipelines.
        GetLayoutServiceContext.JssGetLayoutServiceContextProcessor
    {
        public ContextExtension(IConfigurationResolver configurationResolver) : base(configurationResolver)
        {
        }

        protected override void DoProcess(GetLayoutServiceContextArgs args, AppConfiguration application)
        {
            Assert.ArgumentNotNull(args, "args");

            Item tempItem = Sitecore.Context.Item;

            string bodyText = tempItem.Fields["Content"].Value;

                        // Create an Open AI Client
            var openAIClient = new OpenAIClient();

                        // Get new Meta Keywords from ChatGPT
            string keywords = openAIClient.ExtractKeywords(bodyText);

                        // Add those keywords to the Layout Service Sitecore object.
            args.ContextData.Add("smartMetaKeywords", keywords);
        }
    }
}
We also need a configuration patch to make it work. Very similar to how we patched in the field extension previously. This time we need to add a processor inside the getLayoutServiceContext.
<configuration xmlns:patch="http://www.sitecore.net/xmlconfig/">
  <sitecore>
    <pipelines>
      <group groupName="layoutService">
        <pipelines>
          <getLayoutServiceContext>
            <processor type="XMCloudDev.Foundation.Kernel.Pipelines.ContextExtension, XMCloudDev.Foundation.Kernel" resolve="true">
            </processor>
          </getLayoutServiceContext>
        </pipelines>
      </group>
    </pipelines>
  </sitecore>
</configuration>
Lastly we need to create the Open AI Client and the ExtractKeywords method to get ChatGPT. So let’s explore that a bit.
Create OpenAIClient Class
First we’re going to setup the OpenAIClient Class using the HttpClient. The endpoint that you will need to use is https://api.openai.com/v1/chat/completions. You can get the appropriate apikey you’ll need from this page in your OpenAI platform: https://platform.openai.com/api-keys.
using Newtonsoft.Json;
using System.Net.Http;
using System.Net.Http.Headers;
using System.Text;

namespace XMCloudDev.Foundation.Kernel.Clients
{
    public class OpenAIClient
    {
        private readonly HttpClient _httpClient;
        private readonly string _apiKey;
        private const string OpenAIUrl = "https://api.openai.com/v1/chat/completions";

        public OpenAIClient()
        {
            _httpClient = new HttpClient();

            _apiKey = "obtained from OpenAI";

            _httpClient.DefaultRequestHeaders.Authorization = new AuthenticationHeaderValue("Bearer", _apiKey);
         }
        }
}
With that setup, we can now create our ExtractKeywords method. The most important piece of this is the payload itself. We need to send OpenAI’s API an JSON object containing the following structure:
- "model":
- Value: "gpt-3.5-turbo"
- Meaning: This specifies which model of OpenAI's API to use. Here, it's set to "gpt-3.5-turbo".
- "messages":
- Type: Array
- Meaning: This is a list of message objects that represent the conversation history. Each message object includes the role (who is sending the message) and the content (what is being said).
- Individual Messages:
- First Message:
- "role": "system"
- "content": "
Please extract important SEO keywords and add alternatives ensuring that there are a minimum of 10 seo keywords from the following text and provide them in a comma-delimited format:" - Meaning: This message is set by the system (not the user) and is usually used to provide instructions or context to the AI model. Here we are telling it to examine the user’s message and respond accordingly.
- Second Message:
- "role": "user"
- "content": This will be the content from within the Sitecore
Contentfield that grab previously. - Meaning: This is a message from the user initiating the conversation.
- First Message:
Now let’s have a look with it implemented, sending through a POST and then, if IsSuccessStatusCode returns true, grab the resulting message.
public string ExtractKeywords(string text)
{
        // Our payload specifies the ChatGPT model to use (gpt-3.5.turbo - which is the most cost effective).
    var payload = new
    {
        model = "gpt-3.5-turbo",
        messages = new object[] {
                   new { role = "system", content = "Please extract important SEO keywords and add alternatives ensuring that there are a minimum of 10 seo keywords from the following text and provide them in a comma-delimited format:" },
                   new { role = "user", content = text } }
    };

    var json = JsonConvert.SerializeObject(payload);

    var data = new StringContent(json, Encoding.UTF8, "application/json");

    data.Headers.ContentType = new MediaTypeHeaderValue("application/json");

    var response = _httpClient.PostAsync(OpenAIUrl, data).Result;

        if (response.IsSuccessStatusCode)
    {
        var responseContent = response.Content.ReadAsStringAsync().Result;

        var result = JsonConvert.DeserializeObject<dynamic>(responseContent);

        return result.choices[0].message.content.ToString();
    }

    return JsonConvert.SerializeObject(response);
}
Upon receiving the response, we can then extract the message response and return it. If we don’t get the response we want, in our case we’re returning a serialized object of the response so we can examine it.
Here’s the completed class. Obviously this could be separated out into to more functional methods but this is merely an example.
using Newtonsoft.Json;
using System.Net.Http;
using System.Net.Http.Headers;
using System.Text;

namespace XMCloudDev.Foundation.Kernel.Clients
{
    public class OpenAIClient
    {
        private readonly HttpClient _httpClient;
        private readonly string _apiKey;
        private const string OpenAIUrl = "https://api.openai.com/v1/chat/completions";

        public OpenAIClient()
        {
            _httpClient = new HttpClient();

            _apiKey = "obtained from OpenAI";

            _httpClient.DefaultRequestHeaders.Authorization = new AuthenticationHeaderValue("Bearer", _apiKey);
         }

        public string ExtractKeywords(string text)
        {
                        // Our payload specifies the ChatGPT model to use (gpt-3.5.turbo - which is the most cost effective).
            var payload = new
            {
                model = "gpt-3.5-turbo",
                messages = new object[] {
                           new { role = "system", content = "Please extract important SEO keywords and add alternatives ensuring that there are a minimum of 10 seo keywords from the following text and provide them in a comma-delimited format:" },
                           new { role = "user", content = text } }
            };

            var json = JsonConvert.SerializeObject(payload);

            var data = new StringContent(json, Encoding.UTF8, "application/json");

            data.Headers.ContentType = new MediaTypeHeaderValue("application/json");

            var response = _httpClient.PostAsync(OpenAIUrl, data).Result;

                        if (response.IsSuccessStatusCode)
            {
                var responseContent = response.Content.ReadAsStringAsync().Result;

                var result = JsonConvert.DeserializeObject<dynamic>(responseContent);

                return result.choices[0].message.content.ToString();
            }

            return JsonConvert.SerializeObject(response);
        }
    }
}
Response Content
We can see what the value of result looks like here:
{
  "id": "chatcmpl-8Men8JiEygzbpuvzNs2AB8jh3vxfh",
  "object": "chat.completion",
  "created": 1700410710,
  "model": "gpt-3.5-turbo-0613",
  "choices": [
    {
      "index": 0,
      "message": {
        "role": "assistant",
        "content": "scientific measurement, galaxy, cool, SEO, keywords, alternative"
      },
      "finish_reason": "stop"
    }
  ],
  "usage": {
    "prompt_tokens": 51,
    "completion_tokens": 12,
    "total_tokens": 63
  }
}
What’s great is you are also returned some usage analytics so you get an idea on how much the cost can be per call.
Testing
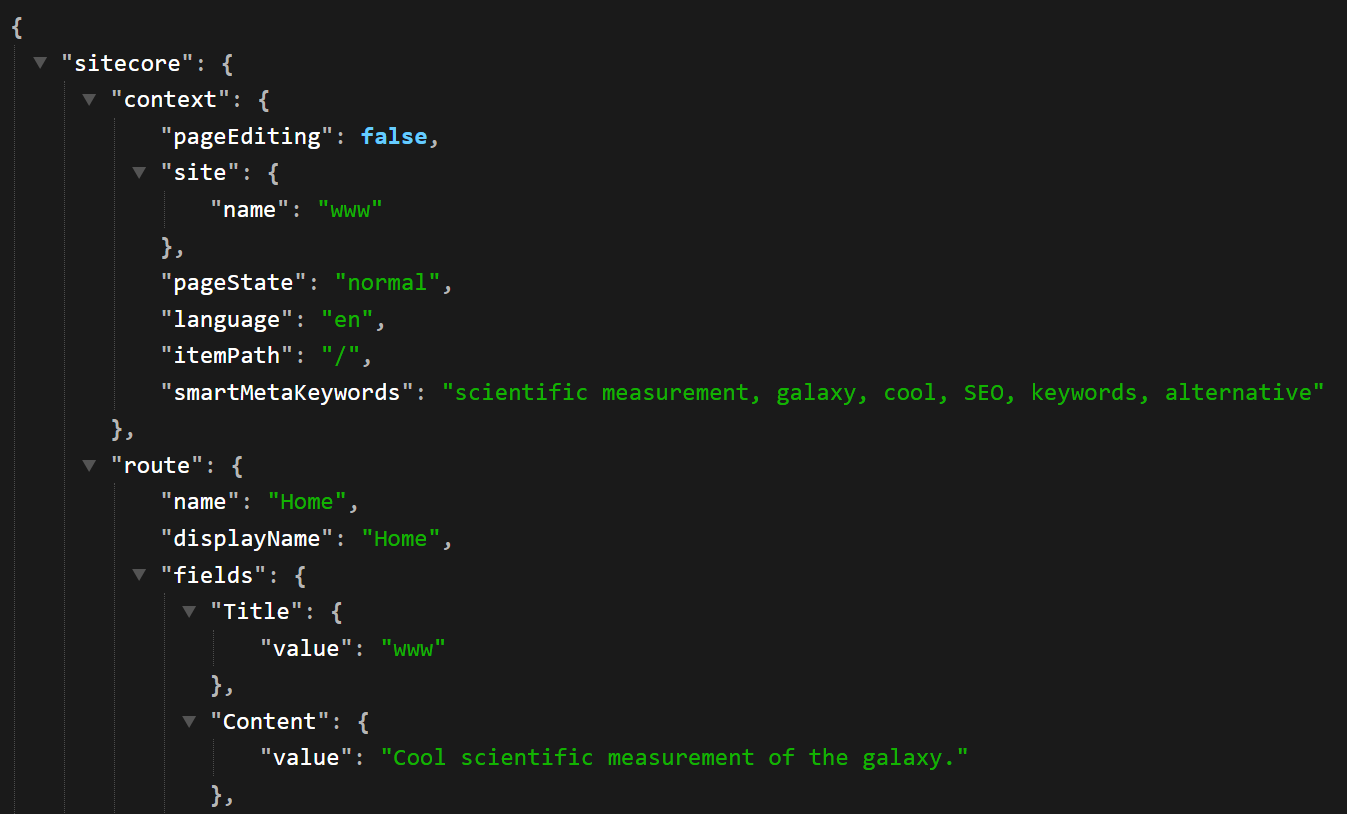
Now we can test this locally using the JSS API. The URL is one you should be familiar with as it can show you what they layout JSON will be for your front-end.
https://xmcloudcm.localhost/sitecore/api/layout/render/jss?item={739276A7-A55C-459E-A261-F42F3459434E}&sc_apikey=
One thing to note is that and you’ll see this below. Each time you run this, there is a chance for the value returned to be different. Locally that happens each time you view it. However, when we’re in XM Cloud, this would only happen when you’re publishing. You can also see that it’s not perfect. We’d probably have to expand upon the system message to ensure it does not return words like SEO, for example.
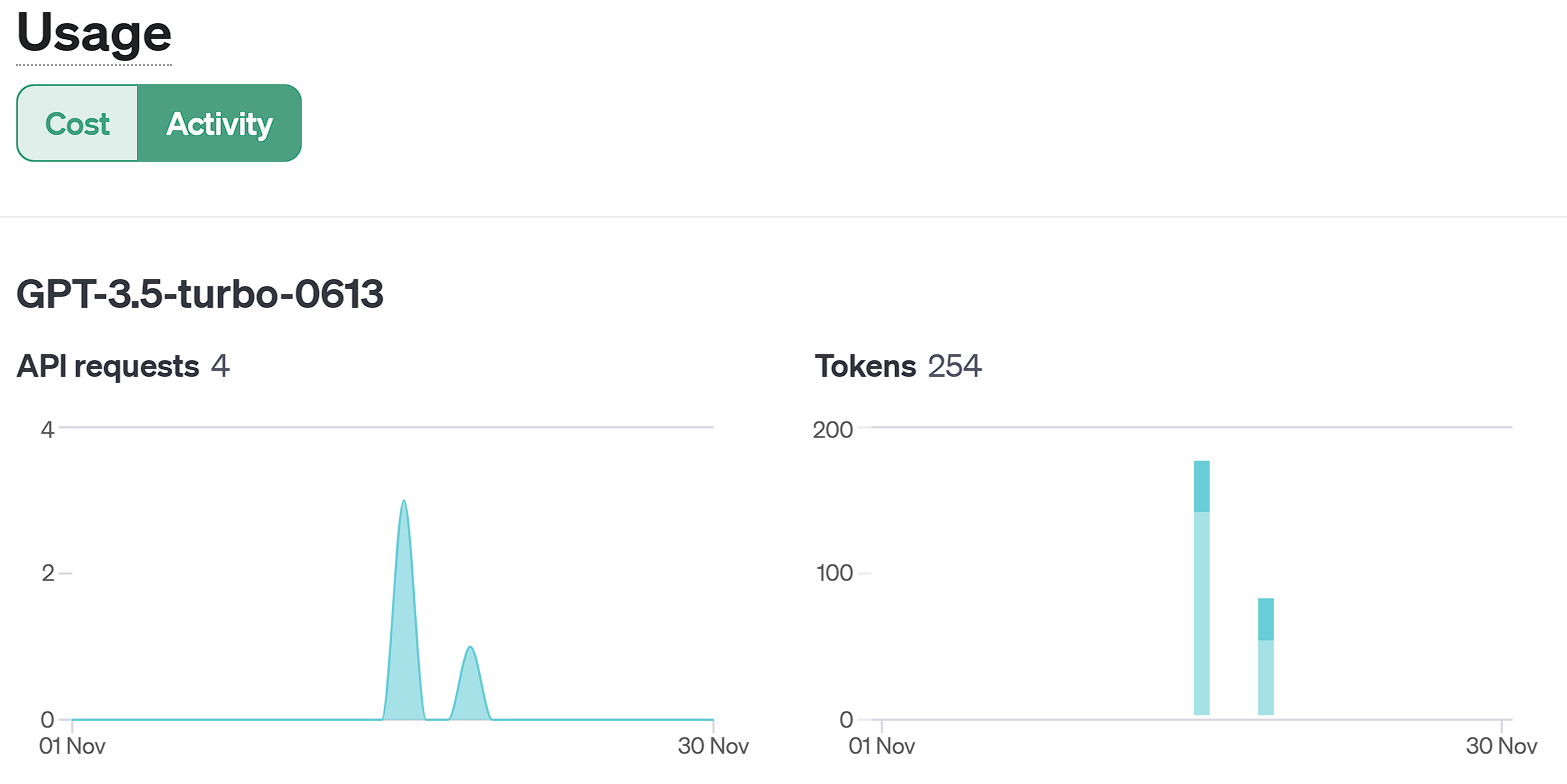
OpenAI Usage
When you’re doing something like this it’s smart to keep an eye on your usage. It’s also important to realize what the above setup actually costs money to use. Not a lot, but it’s not free. The cost for that one call was $0.01 but it adds up. The beauty of XM Cloud though is you’re publishing this object to Edge so it’s only making that API call on publish. Each time the front-end is using that data, it’s cached, it’s not making that call again.
Summary
This has huge potential for enhancing value for clients and something I know we’re going to explore further. I know myself have a TON of ideas on how to use this type of functionality.

Meet David Austin
Development Team Lead | Sitecore Technology MVP x 3
📷🕹️👪
David is a decorated Development Team Lead with Sitecore Technology MVP and Coveo MVP awards, as well as Sitecore CDP & Personalize Certified. He's worked in IT for 25 years; everything ranging from Developer to Business Analyst to Group Lead helping manage everything from Intranet and Internet sites to facility management and application support. David is a dedicated family man who loves to spend time with his girls. He's also an avid photographer and loves to explore new places.