Creating SXA Components in Sitecore XM Cloud
The ideal way of creating components in Sitecore XM Cloud is by creating a Module which can be installed into our Site. We will then be duplicating existing OOTB Headless Renderings into this Module. We do this because this cloning process creates all the required items for our Component. This cloning process means we can streamline Component creation in Sitecore and also ensures nothing is missing. The end result is that we have our Components available to us in the Toolbox in Experience Editor for ease of creating new content.
Creating A New Headless Module
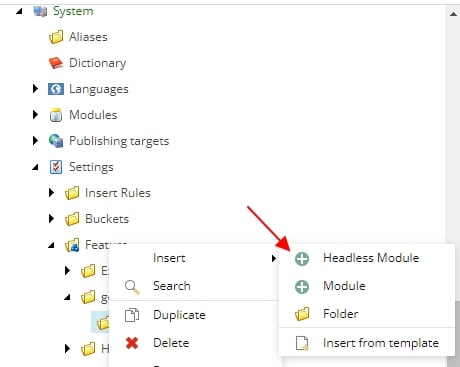
To create a new component in Sitecore 10.3 XM Cloud, we must first create a new Headless Module that we can add our components to. Under System > Settings , right click on Feature and Insert a new Headless Module.
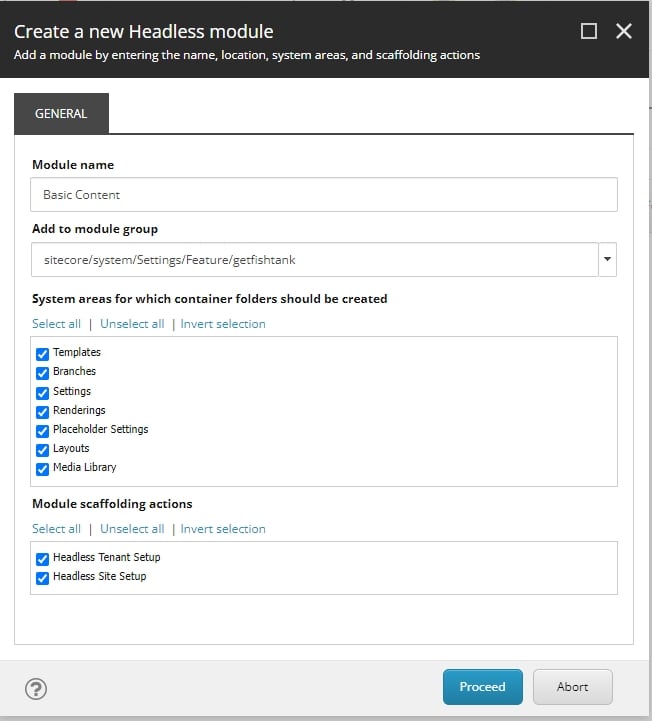
A new popup window will appear. We will choose our Module name and add it to our Feature. You should first create a folder to add all our custom modules to. In this case, we have created a folder called getfishtank under Feature which we will add Basic Content and all of our other newly created modules to.
Creating A New Headless Component
Once the module has been created, we will clone one of the existing OOTB Headless renderings. We do this because cloning a rendering will create all the rendering, templates, variants and branch items for us.
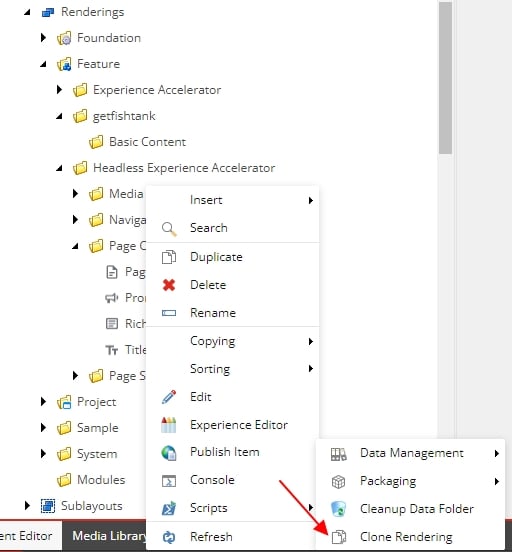
Once we’ve clicked on Clone Rendering (preferably clone something that looks close to what we are creating), we will see a popup window. Here we will choose the name of the new rendering and we will add it to the new module we created above.
When choosing a name for a Sitecore Next.js component, it's important to select a name that is descriptive, meaningful, and follows a consistent naming convention. Ensure that the name is unambiguous and does not clash with existing component names. Include the parent name if it is part of a larger component hierarchy and avoid abbreviations or acronyms.
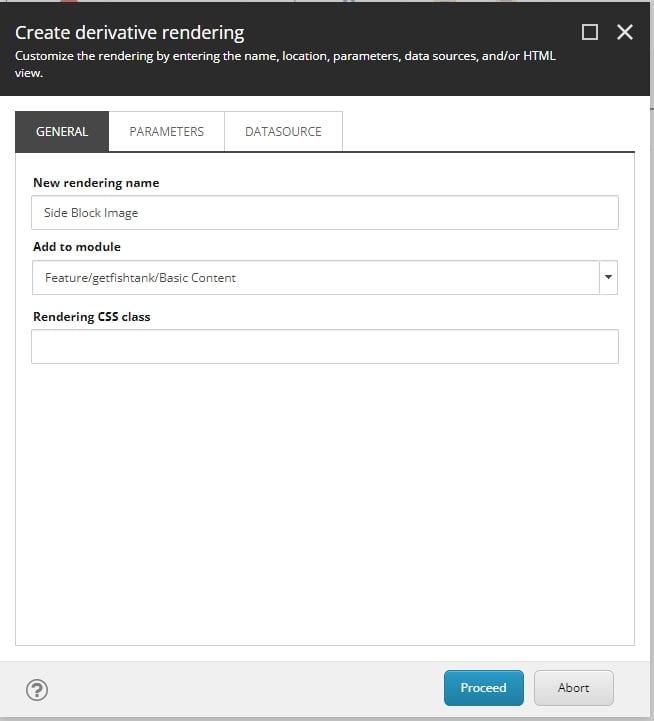
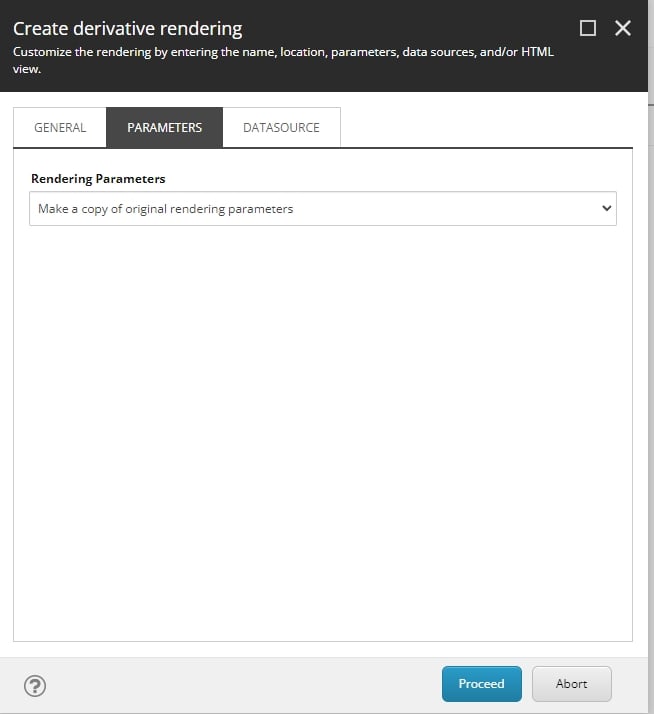
Make sure you select make a new copy of the original rendering parameters so we have a unique set for the new component.
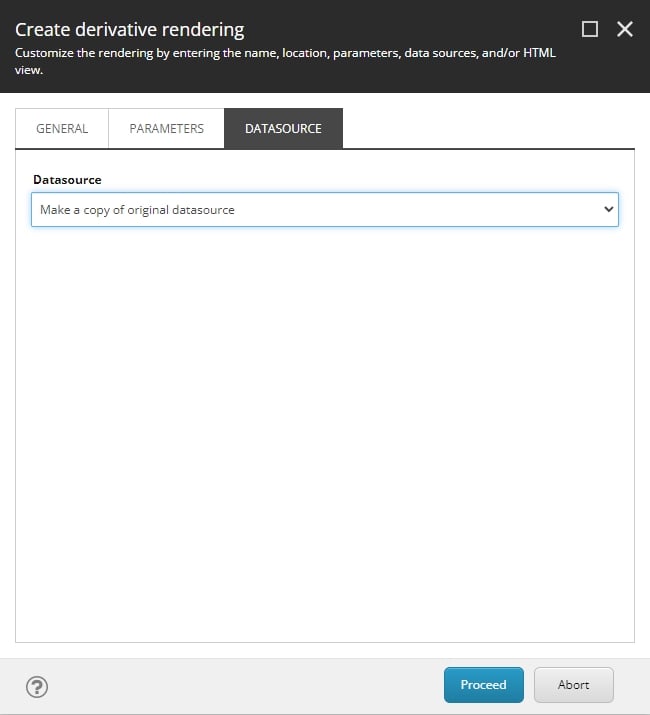
We will also make a copy of the original datasource which will create a new template for the new module and not re-use the rendering’s template we are cloning from.
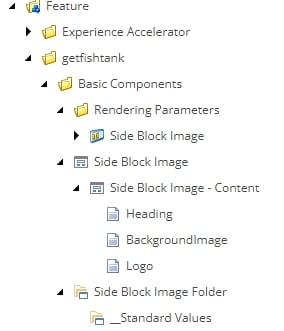
Once this is done, we will go and find the template under Templates/Feature/getfishtank and update the template to include the fields we want to use on our component. You will also need to go into each item and update the title and/or display name fields.
The names of the fields must match what we see in the props section of our typescript file. For readability, change the Display Name field of each field item for the content authors sake.

Depending on what you named your component, you will also need to update the Component Name field on the Rendering item. This field value must match the name of your typescript file in your code solution (i.e. SideBlockImage.tsx).

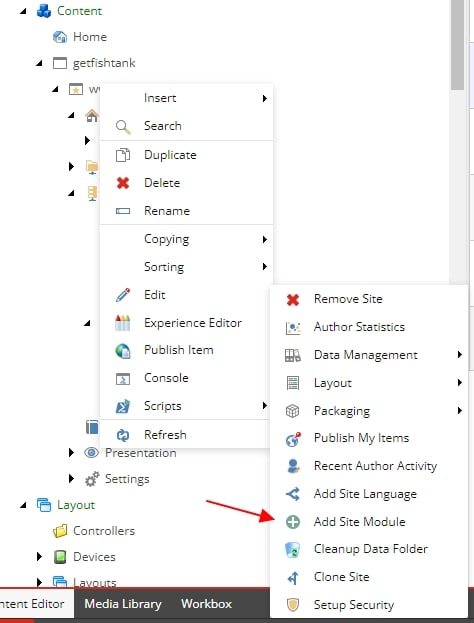
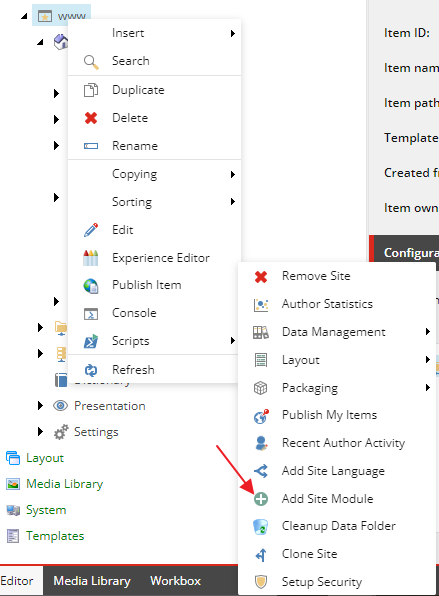
Now that we have updated our template, our module can be added to our site. Use the Add Site Module script as seen in the screenshot. When you click on this, all modules not installed on the site will display in the popup window that displays.
Installing the module will create the items that are defined under this item:
/sitecore/system/Settings/Feature/getfishtank/Basic Content/Basic Content Headless Site Setup
You’ll see the list of items grow as you add more and more components to this module. Once you have installed the module, it will not automatically add new component items to the site as you are creating them. When it is time to add a new component to your site, you can remove the module from the Modules field on the site item and re-install the module by using the Add Site Module script again. It will not create duplicate items for things already installed but it will add any of the new items that are currently missing from the site. There is an explanation of reinstalling modules later in this blog.
Adding Dynamic Styling Classes
In the latest version of Sitecore XM Cloud (10.3), when using a DropLink field on the base template, Sitecore now serializes the object. Thus, it is very easy for us to access the properties of the selected item. In our case for styling, this will likely be a field that contains a css class(es) that we want to apply to the template.
When we use the term ‘base template’, we mean the item Template as opposed to the Rendering Parameter Template. When you use a reference field on the Rendering Parameter Template, what is returned by the layout service is the GUID of the selected item. If you require this to be on the Rendering Parameters, you will need to implement a custom pipeline processor to return the items field. However, we recommend utilizing the item Template for UI related fields.
First define a single shared template in Sitecore that is used by UI related items, for example, background colour, width, top and bottom margins, etc. This shared template could be called Config Item and stored in the Foundation area of our Template tree. It will have one single-line text field called Value that will be populated by a CSS class(es) or other string value properties needed in our solution.
Then in our code solution, define a common interface that allows us to easily re-use this object in our templates. (We have called the single-line text field containing the CSS class “Value” but it can be called anything and then renamed in this example below.)
export interface DropLink {
  fields: {
    Value: {
      value: string;
    };
  };
}
I have included an example of how to use this concept in the code sample below. The DropLink interface was defined in a file called types.tsx and was added to a folder called lib.
Creating SXA Components In Code
TypeScript View File
In Sitecore 10.3 SXA Headless, the filename of the .tsx file must match the Component Name field on the Rendering item in Sitecore. The withDatasourceCheck higher-order component is used to fetch and render the data from the Sitecore content API. The @sitecore-jss/sitecore-jss-nextjs library is used to import and use the appropriate field types such as Field, ImageField, Text, and Image. The props for the component are defined using an interface that includes all the fields needed to render the component. When the component is rendered, the Sitecore context object is used to pass the data from the Sitecore content API to the component.
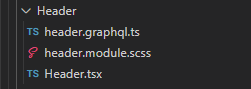
These ‘view’ files live in the rendering folder (src/projectname) of our project under src/components. We recommend creating sub folders under here to logically group components and their associated files. These associated files could include styling and graphql files.
If our typescript view file is set up like below, the fields will be editable in Experience Editor and also render correctly in preview and normal mode.
import {
  Text,
  Field,
  ImageField,
  Image,
  withDatasourceCheck,
} from '@sitecore-jss/sitecore-jss-nextjs';
import { ComponentProps } from 'lib/component-props';
import { DropLink } from 'lib/types';

type SideBlockImageProps = ComponentProps & {
  fields: {
    heading: Field<string>;
    backgroundImage: ImageField;
    logo: ImageField;
        backgroundGradient: DropLink;
  };
};

const SideBlockImage = ({
  fields: { heading, backgroundImage, logo },
}: SideBlockImageProps): JSX.Element => (
    <div
      className={[
        'relative text-white w-full col-span-12 ',
        `${backgroundGradient?.fields.Value?.value}`,
      ].join(' ')}
    >
        <Image media={backgroundImage} />
        <div>
            <Text tag="h2" className="font-black" field={heading} />
            <Image media={logo} width={200} height={44} />
        </div>
    </div>
);

export default withDatasourceCheck()<SideBlockImageProps>(SideBlockImage);
Finished Product
Installing The Module On Your Site
Now that we have created a new Module and added a Component to it, we are ready to install our Module into our Site. We can do this by right clicking on our Site item, highlighting Scripts, then clicking Add Site Module.
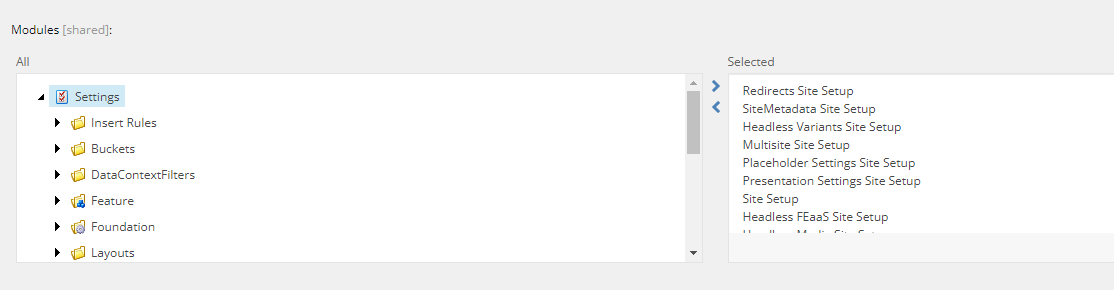
Once this is clicked, you will be able to see an installation wizard popup which will show all the Modules in our solution which have not been added to our Site yet. When we install a module, all the associated rendering variants, available renderings item, and global data folders will be created in the appropriate locations.
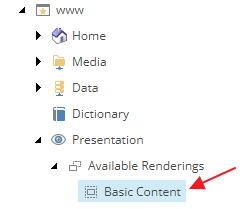
Adding A Component Experience Editor Using The Toolbox
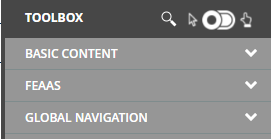
When we are in the Experience Editor on a page, we will be now be able to see our Module under the list of renderings in the Toolbox on the right hand side of the screen.
Reinstalling A Module
We may be reinstalling Modules multiple times as we create new Components for one. This is because the installation process will create all the missing items under the content tree for the new Component. The easiest way to reinstall a module is to remove it from the Modules field of our Site item. This field represents all the installed modules in our Site. Once this is done, the Module will re-appear in the installation wizard mentioned above.
If we are reinstalling a module that has already been previously added to our Site, we need to update the Available Renderings item for that Module. This does not get updated automatically. Otherwise, we will not see our new component in the Toolbox.
Common Errors When Creating Headless Components
Some common errors encountered when writing Headless Sitecore components include:
- Mismatched or misspelled field names in the .tsx file and in Sitecore
- Not importing the correct field types from the
@sitecore-jss/sitecore-jss-nextjslibrary - Incorrectly using the
withDatasourceCheckhigher-order component, which can cause issues with data fetching and rendering - Not properly handling null or undefined field values, which can cause errors or unexpected behavior on the rendering
- Forgetting to update the component name or rendering parameters when cloning a rendering
- Not properly configuring the Sitecore context object in the component, which can cause data fetching issues
- Not properly serializing or deserializing field values, which can cause errors or unexpected behavior
Reusability of Components
In addition to the above errors, it is also important to keep in mind some best practices when writing XM Cloud Sitecore components. For example, it is recommended to create a shared module for commonly used components to reduce code duplication and make it easier to maintain and update components across different projects.
Using a shared library of interfaces and types can also improve reusability and consistency across components. In addition, creating a design system that defines a set of reusable components and styles can help ensure consistency and reduce development time for future projects.
By following these best practices and avoiding common errors, developers can create high-quality, maintainable, and reusable XM Cloud Sitecore components.
👋 Hey Sitecore Enthusiasts!
Sign up to our bi-weekly newsletter for a bite-sized curation of valuable insight from the Sitecore community.
What’s in it for you?
- Stay up-to-date with the latest Sitecore news
- New to Sitecore? Learn tips and tricks to help you navigate this powerful tool
- Sitecore pro? Expand your skill set and discover troubleshooting tips
- Browse open careers and opportunities
- Get a chance to be featured in upcoming editions
- Learn our secret handshake
- And more!


Meet Mike Payne
Development Team Lead
🎶🚴♂️⛰
Mike is a Development Team Lead who is also Sitecore 9.0 Platform Associate Developer Certified. He's a BCIS graduate from Mount Royal University and has worked with Sitecore for over seven years. He's a passionate full-stack developer that helps drive solution decisions and assist his team. Mike is big into road cycling, playing guitar, working out, and snowboarding in the winter.