Build A Local Environment Support Multi-Site / Multi-Renderings Compatible With XM Cloud
If you've read my previous blog about Creating A Local Sitecore XM Installation For XM Cloud, then you likely already have a workable environment. If not, I encourage you to go have a read as you will need a working local Docker instance of XM Cloud before proceeding.
More and more frequently we're asked to set up a multi-site tenant and in the past, this was fairly straightforward. Now with Docker, it might not be as obvious how to achieve this, so I've outlined what you need to do below.
In Sitecore
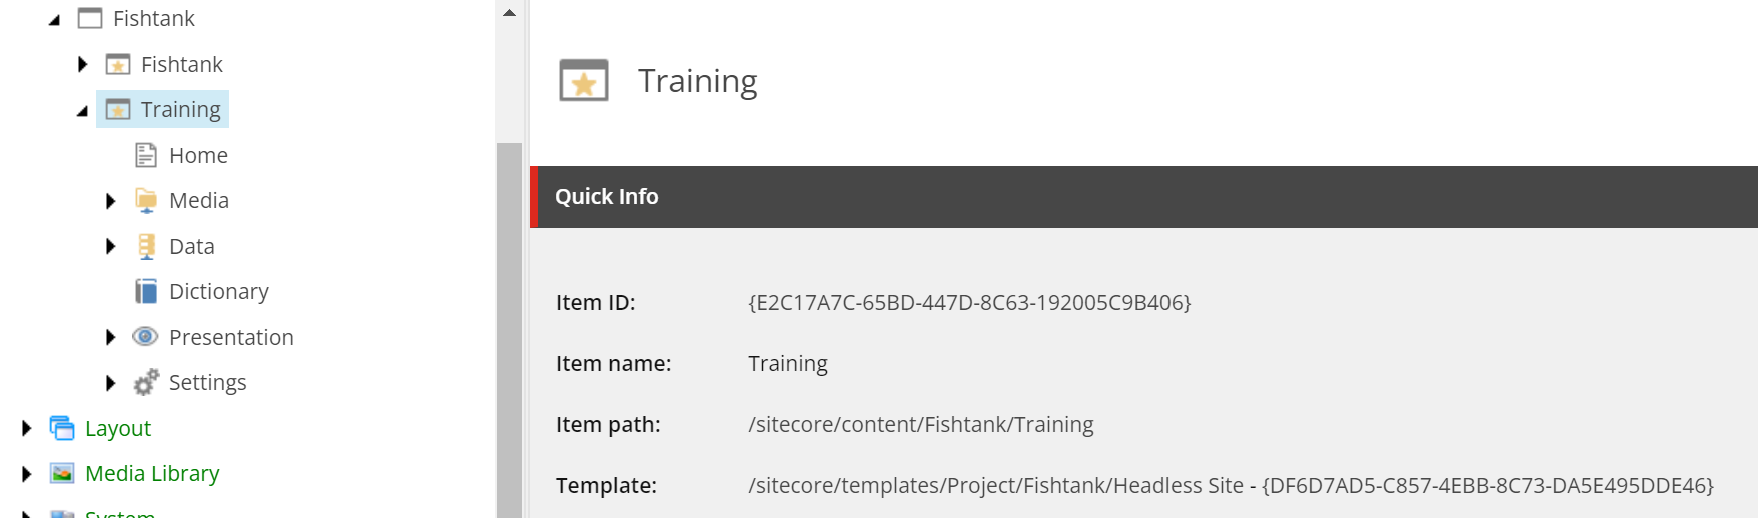
From within Sitecore, under your Headless Tenant, create another site. Let's call it “Training” for the purposes of this article.
Once the automated setup has finished, you'll want to navigate to /sitecore/System/Settings/Services/Rendering Hosts and create a new rendering host for this new site. I recommend creating one with a similar name.
You will then update the values. The default you'll remember uses the http://rendering:3000, host. We're going to change that to http://training:3000. Be sure to update the Application name to match that of the future rendering application (i.e. the folder name).
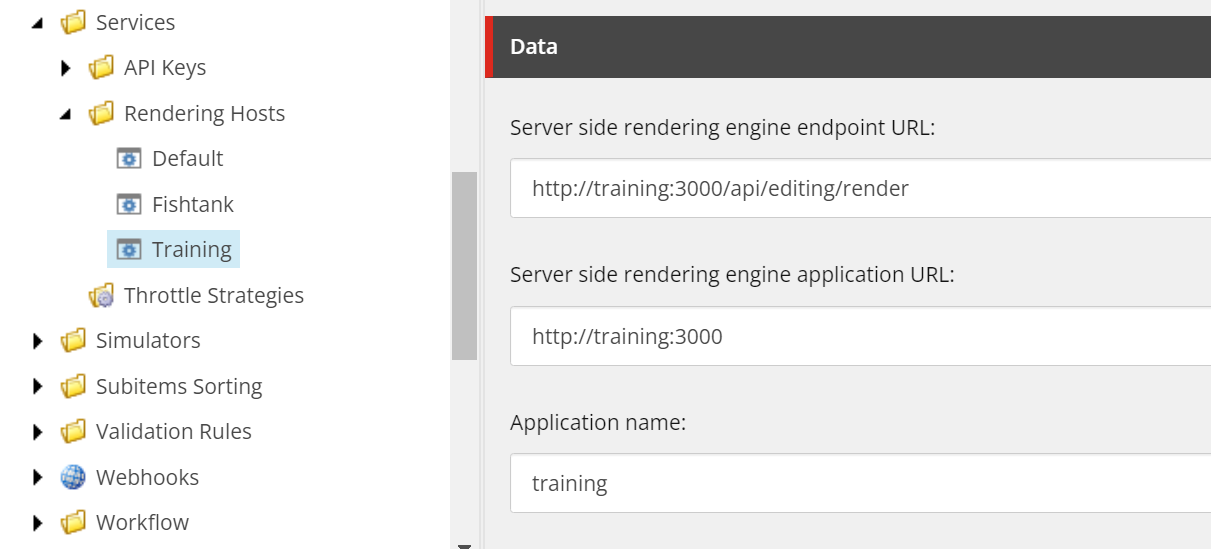
The name of the host will need to match the name of the Docker instance we set up later. Once that is set up, let's navigate back to our new site and go into the /Settings/Site Globals/Training item and update the appropriate host names.
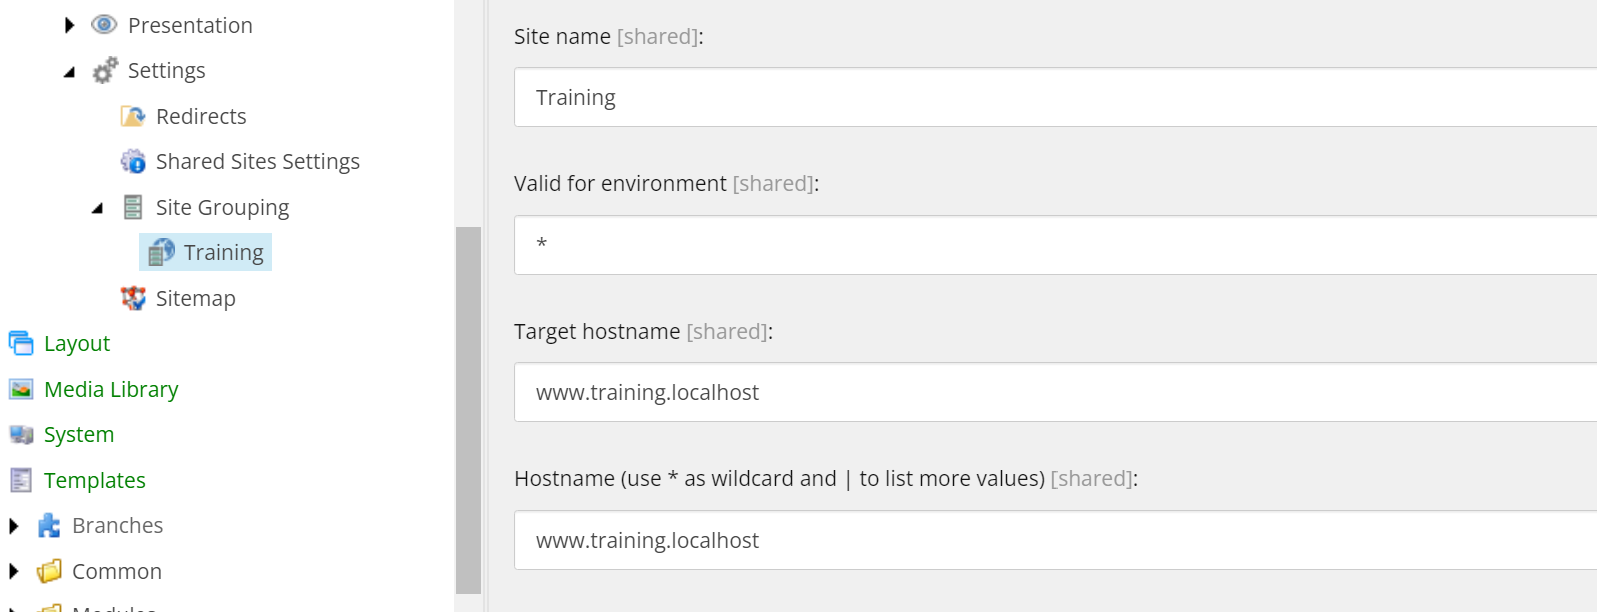
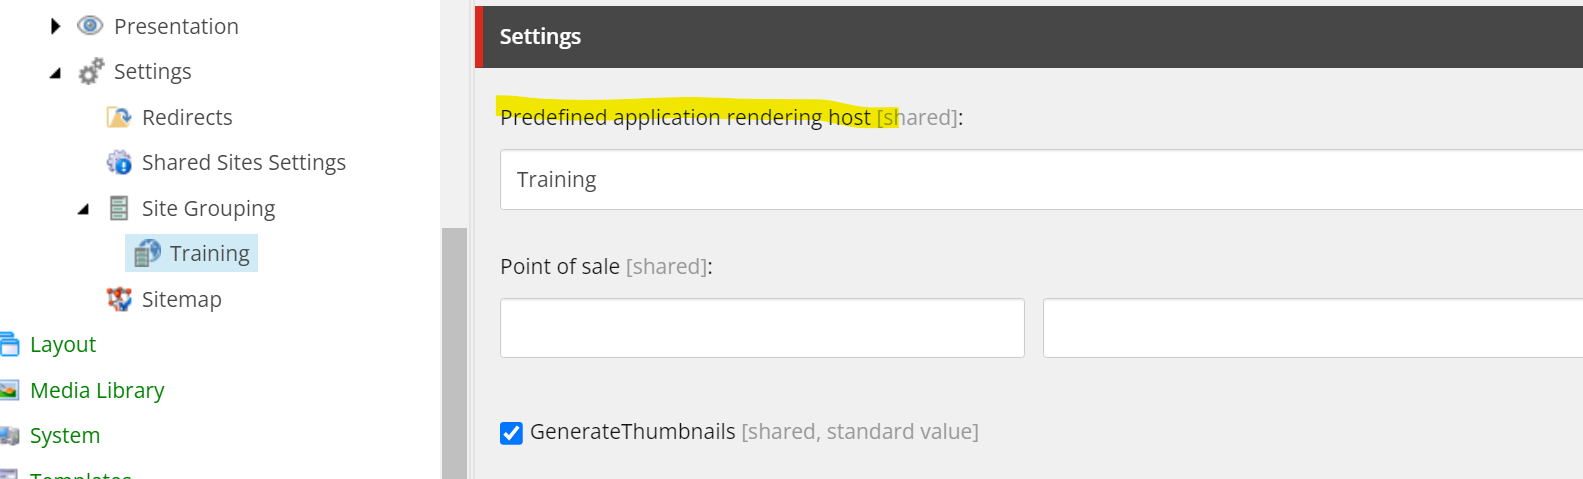
From the drop-down, select the Rendering Host you just created.
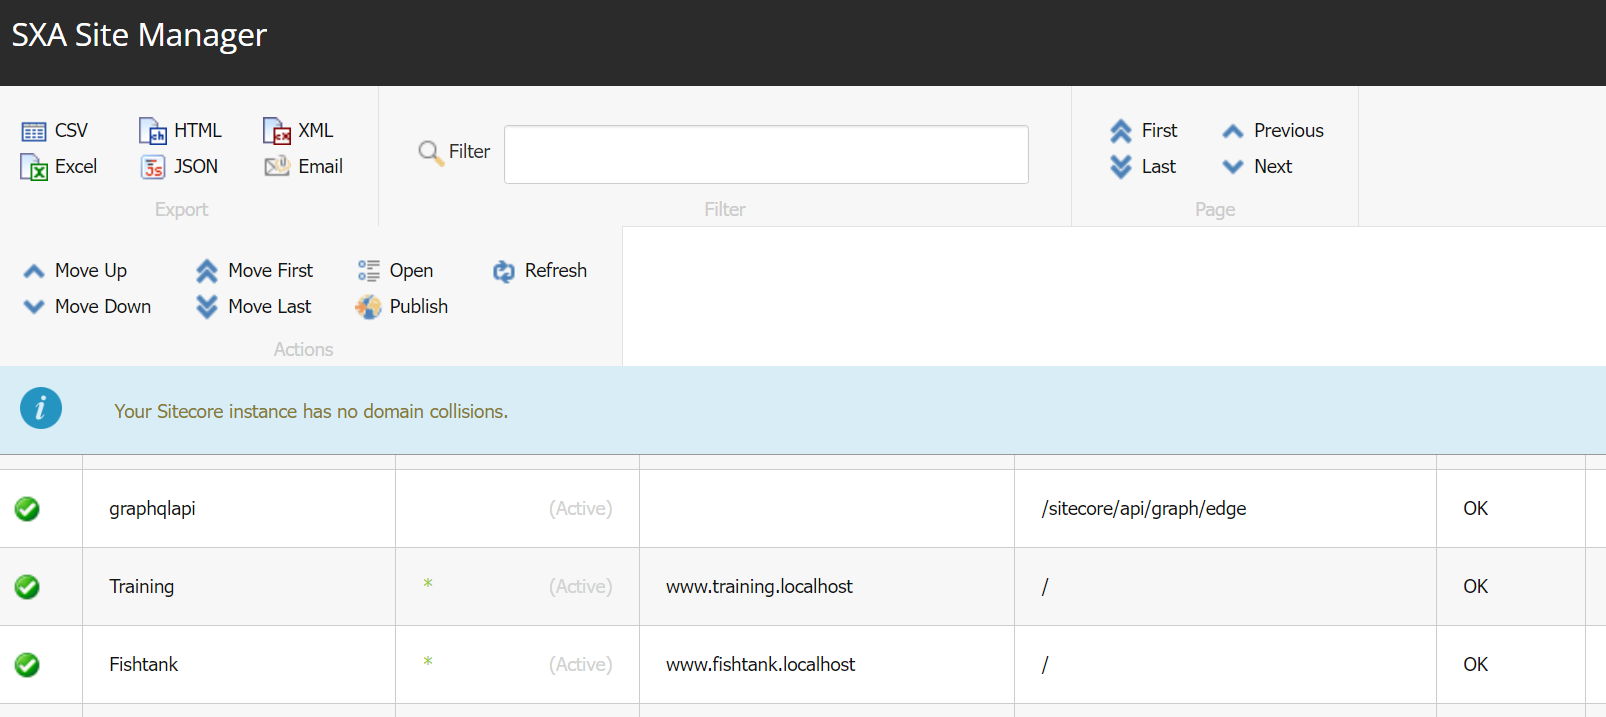
Use the SXA Site Manager (accessible from the PowerShell Toolbox on the Desktop) to validate that your site setup is correct.
In The Code
We're going to make changes to a few files in order for this to be set up, namely:
- a new NextJs app folder. I recommend grabbing a copy of the “rendering” folder from the XM Starter Kit.
- adding a new DockerFile for the app
- .env - in root of project
- docker-compose-override.yml
- init.ps1
- package.json and package-lock.json inside the new rendering folder
- xmcloud.build.json
- certs_config.yaml
- duplicating existing .pem files with new names
First thing to do is to install a new rendering project. The easiest way to do this is to either duplicate your existing project or if that one has too many customizations, copy the rendering project from the XM Starter Kit. Specifically the src/rendering folder. For us, and for the remainder of this article, we've duplicated this folder and called it training.
Updating DockerFile For ‘Training' Rendering
Navigate to docker/build and duplicate the rendering folder. For us, we named it training. Open up the folder and then open up the DockerFile file in your text editor.
We're looking to update specifically the WORkDIR value from /app to /trainingapp as shown below. We need to mount this new app to a different location than the rendering app.
# escape=`

#
# Development-only image for running Next.js in a containerized environment.
# Assumes that the Next.js rendering host source is mounted to c:\app.
#

ARG PARENT_IMAGE
FROM ${PARENT_IMAGE} as debug

WORKDIR /trainingapp

EXPOSE 3000
#ENTRYPOINT "npm install && npm install next@canary && npm run start:connected"
ENTRYPOINT "npm install && npm run start:connected"
Updating .env
In our solution .env file, not the rendering .env we need to add new variables for the new rendering host. You'll notice we've duplicated the following variables, adding TRAINING_ to the front.
COMPOSE_PROJECT_NAMERENDERING_HOSTRENDERING_HOST_INTERNAL_URI
COMPOSE_PROJECT_NAME=fishtank
TRAINING_COMPOSE_PROJECT_NAME=fishtank
# Configure host names, which will be used to configure Traefik proxy routing.
CM_HOST=xmcloudcm.localhost
RENDERING_HOST=www.fishtank.localhost
TRAINING_RENDERING_HOST=www.training.localhost
RENDERING_HOST_INTERNAL_URI=http://rendering:3000
TRAINING_RENDERING_HOST_INTERNAL_URI=http://training:3000
It's important to note the new values. The most important one is the TRAINING_RENDERING_HOST_INTERNAL_URI because this url needs to match the rendering host we used above.
Updating init.ps1
Open up the init.ps1 file and replicate the RENDERING_HOST line with the custom one you created above in the .env file.
# RENDERING_HOST
Set-EnvFileVariable "RENDERING_HOST" -Value "www.fishtank.localhost"
Set-EnvFileVariable "TRAINING_RENDERING_HOST" -Value "www.training.localhost"
Also update the host file entries section with the new host requirements. You can see below we've added a couple.
################################
# Add Windows hosts file entries
################################

Write-Host "Adding Windows hosts file entries..." -ForegroundColor Green

Add-HostsEntry "xmcloudcm.localhost"
Add-HostsEntry "www.fishtank.localhost"
Add-HostsEntry "www.training.localhost"
In addition, around approximately line 78 if you used the XM Starter Kit as a starting place, you'll find references to the certificates (which we will configure below).
Write-Host "Generating Traefik TLS certificate..." -ForegroundColor Green
    & $mkcert -install
    & $mkcert "*.fishtank.localhost"
    & $mkcert "*.training.localhost"
    & $mkcert "xmcloudcm.localhost"
Updating package.json and package-lock.json
Within both of these files we need to update “name” and “appname” values to match our new rendering folder name.
{
  "name": "training",
  "description": "Application utilizing Sitecore JavaScript Services and Next.js",
  "version": "21.0.2",
  "private": true,
  "config": {
    "appName": "training",
    "rootPlaceholders": [
      "jss-main"
    ],
....
Updating docker-compose-override.yml
Opening up this file and we need to copy and duplicate the rendering section and in our case calling it training. It's extremely important that the name of the section here matches that of the rendering host URL hostname. Duplicating the rendering section we paste it right below.
We then update the following values replacing the word “rendering” with “training”.
imagebuild / contextvolumes- matching what we entered in the DockerFileenvironment / PUBLIC_URL- matching the new environment variable.labels- replacing the word rendering with training and theTRAINING_RENDERING_HOST.
training:
    image: ${REGISTRY}${TRAINING_COMPOSE_PROJECT_NAME}-training:${VERSION:-latest}
    build:
      context: ./docker/build/training
      target: ${BUILD_CONFIGURATION}
      args:
        PARENT_IMAGE: ${REGISTRY}${TRAINING_COMPOSE_PROJECT_NAME}-nodejs:${VERSION:-latest}
    volumes:
      - .\src\training:C:\trainingapp
    environment:
      SITECORE_API_HOST: "http://cm"
      NEXTJS_DIST_DIR: ".next-container"
      PUBLIC_URL: "https://${TRAINING_RENDERING_HOST}"
      JSS_EDITING_SECRET: ${JSS_EDITING_SECRET}
      SITECORE_API_KEY: "${SITECORE_API_KEY_xmcloudpreview}"
      DISABLE_SSG_FETCH: ${DISABLE_SSG_FETCH}
    depends_on:
      - cm
      - nodejs
    labels:
      - "traefik.enable=true"
      - "traefik.http.routers.training-secure.entrypoints=websecure"
      - "traefik.http.routers.training-secure.rule=Host(`${TRAINING_RENDERING_HOST}`)"
      - "traefik.http.routers.training-secure.tls=true"
We also need to update the traefik section to have dependance on the new training rendering.
# Mount the Traefik configuration and certs.
  traefik:
    volumes:
      - ./docker/traefik:C:/etc/traefik
    depends_on:
      - rendering
      - training
Updating xmcloud.build.json
Open up the xmcloud.build.json file and duplicate the rendering host section with the new training information. Take note of the path value.
"training": {
  "path": "./src/training",
  "nodeVersion": "16.15.1",
  "jssDeploymentSecret":"110F1C44A496B45478640DD36F80C18C9",
  "enabled": true,
  "type": "sxa",
  "lintCommand": "lint",
  "startCommand": "start:production"
}
Creating New Certificates
Open up the docker/traefik/certs folder and duplicate the default certificates. These might be called sxastarter or whatever your custom rendering is and add the new training rendering.

Let's Activate It
Re-run the init.ps1 setup. This way the host file and certificates are setup. And then after that, run ./up.ps1 and you should see the new rendering host in the list.
I'm hoping this guide will make setting up a multi-site tenant a little less stressful.
👋 Hey Sitecore Enthusiasts!
Sign up to our bi-weekly newsletter for a bite-sized curation of valuable insight from the Sitecore community.
What’s in it for you?
- Stay up-to-date with the latest Sitecore news
- New to Sitecore? Learn tips and tricks to help you navigate this powerful tool
- Sitecore pro? Expand your skill set and discover troubleshooting tips
- Browse open careers and opportunities
- Get a chance to be featured in upcoming editions
- Learn our secret handshake
- And more!

Meet David Austin
Development Team Lead | Sitecore Technology MVP x 3
📷🕹️👪
David is a decorated Development Team Lead with Sitecore Technology MVP and Coveo MVP awards, as well as Sitecore CDP & Personalize Certified. He's worked in IT for 25 years; everything ranging from Developer to Business Analyst to Group Lead helping manage everything from Intranet and Internet sites to facility management and application support. David is a dedicated family man who loves to spend time with his girls. He's also an avid photographer and loves to explore new places.