Custom Event Tracking In Google Analytics 4
There are a number of different ways to track events on your website. We decided to dedicate this blog to creating custom events in Google Analytics 4 (GA4) using Google Tag Manager (GTM). There are a number of steps involved with this process throughout our example, outlined below:
- Finding Your Measurement ID
- Configuring Your GA4 Tag In GTM
- Variable Set Up
- Trigger Set Up
- Tag Configuration
- Debugging Our Tags
- Frequently Asked Questions
Google Analytics 4 Vs. Universal Analytics
With GA4, there are a few key differences from Universal Analytics (UA). Tracking custom events is only one part of what is possible with GA4.
Google has announced that they will be discontinuing the UA platform in June 2023. After July 1, 2023, we will have to say goodbye to UA as it will no longer be processing any new website activity or hits. If you need guidance on setting up your GA4 property, read our latest blog here.
When it comes to tracking events in GTM, we recommend setting up your GA4 tags in parallel to your existing UA tags. Once the data from your GA4 tags is populating correctly, you can be confident that the migration from UA to GA4 will go smoothly after July 1, 2023.
Event Tracking With GA4
GA4 has automatic events tracking, also known as Enhanced Measurement.
There are 4 event types in Google Analytics 4:
- Automatically collected events
- Enhanced Measurement events
- Recommended events
- Custom events
When planning which events you want to track with GA4 consider the following before structuring your events and deciding on names and parameters:
1. Check if the event you want to track is collected amongst the automatically collected events.
2. If it is not an automatically collected event, check if it is already included in the Enhanced Measurement events. These events include:
- page_view
- scroll
- click
- view_search_results
- video_start / video_progress / video_complete
Enhanced Measurement events are not automatically enabled in your GA4 property. To enable or disable Enhanced Measurement, click Admin, and navigate to the property you want to edit. In the Property column, click Data Streams, then Web. Here you can slide the switch under Enhanced measurement to On to enable all options. You can also click Settings to edit individual options as needed.
3. If the event you want to track is not covered in the Enhanced Measurement events, check out the recommended events and Google's naming conventions here for more information:
- Generic (For all properties)
- Online Sales
- Games
4. If none of the above scenarios apply to the event you want to track, we will go over how to create a custom event.
This blog post will focus on the fourth option, creating custom events using GA4 and GTM. Assuming, you have GTM set up on your website. Creating custom events is nearly identical to configuring recommended events, but you need to create your own event names. There are no more Event Category, Event Action, and Event Label fields.
For example, if our custom event was to track form submissions of a contact form, we can name it any of the following:
- generate_lead
- contact_form
- submit_form
Be careful creating too many new events since, at the moment, there is a maximum of 500 unique event names per GA4 property. Once the limit is reached, Google says you won't be able to track any new events or delete any of the old ones.
Creating A Custom GA4 Event In Google Tag Manager
We first need to set up our GA4 tag in the GTM container to make sure our event tracking is connected to our GA4 property and populates accordingly. For this blog, we will be focusing on creating a custom event to track a specific click on our website that isn’t automatically defined by Google in our GA4 property. We want to be able to track our “Let’s Chat” button that directs visitors to the Contact Us page. It looks like this:

Finding Your Measurement ID
First, we need to connect our GA4 property and our GTM container. In your Google Analytics 4 property, select the "Data Streams" option under your property options in the Admin tab.
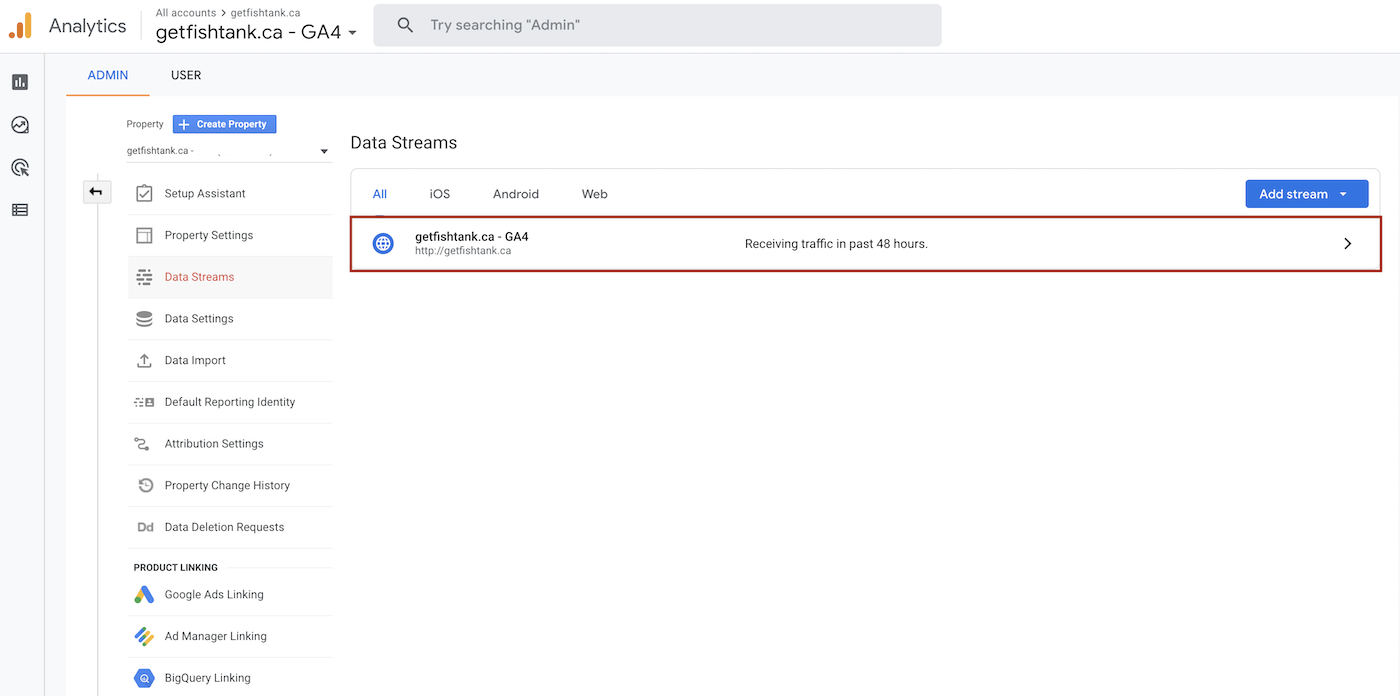
Click the GA4 data stream for your domain.
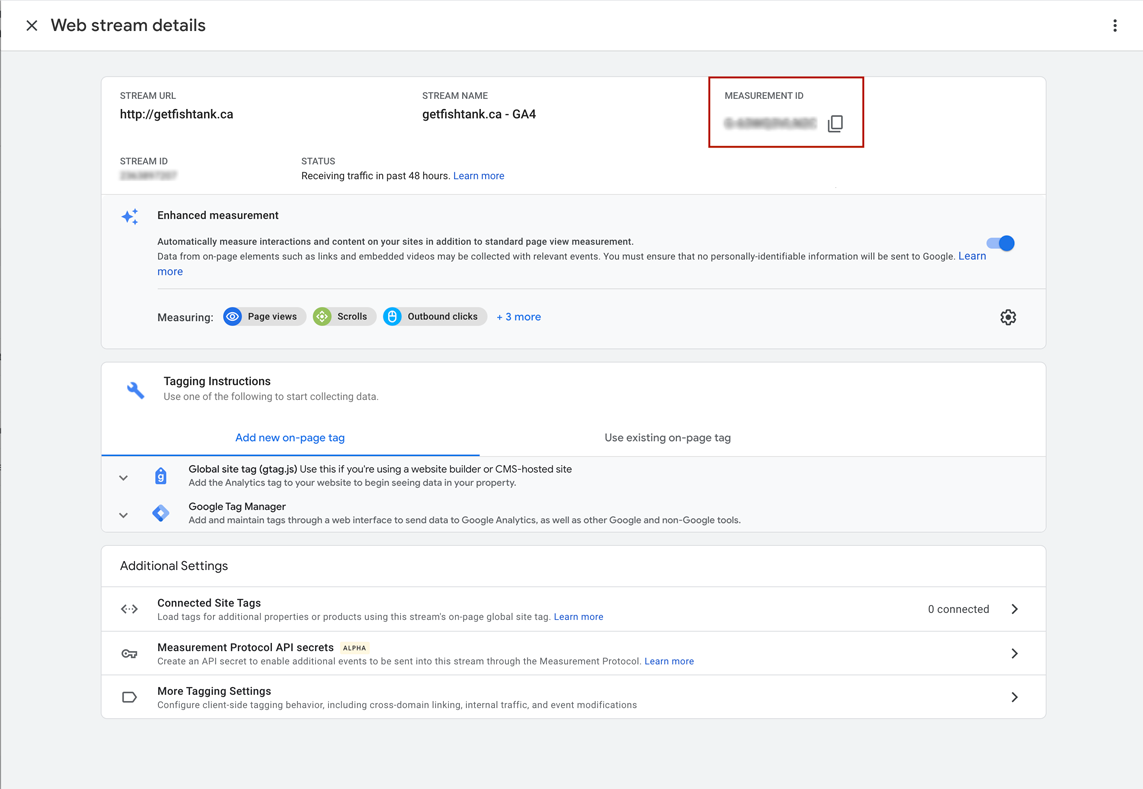
Here you will find your GA4 property's Measurement ID. Copy and paste this into our GA4 Tag Configuration in GTM.
Configuring Your GA4 Tag In Google Tag Manager
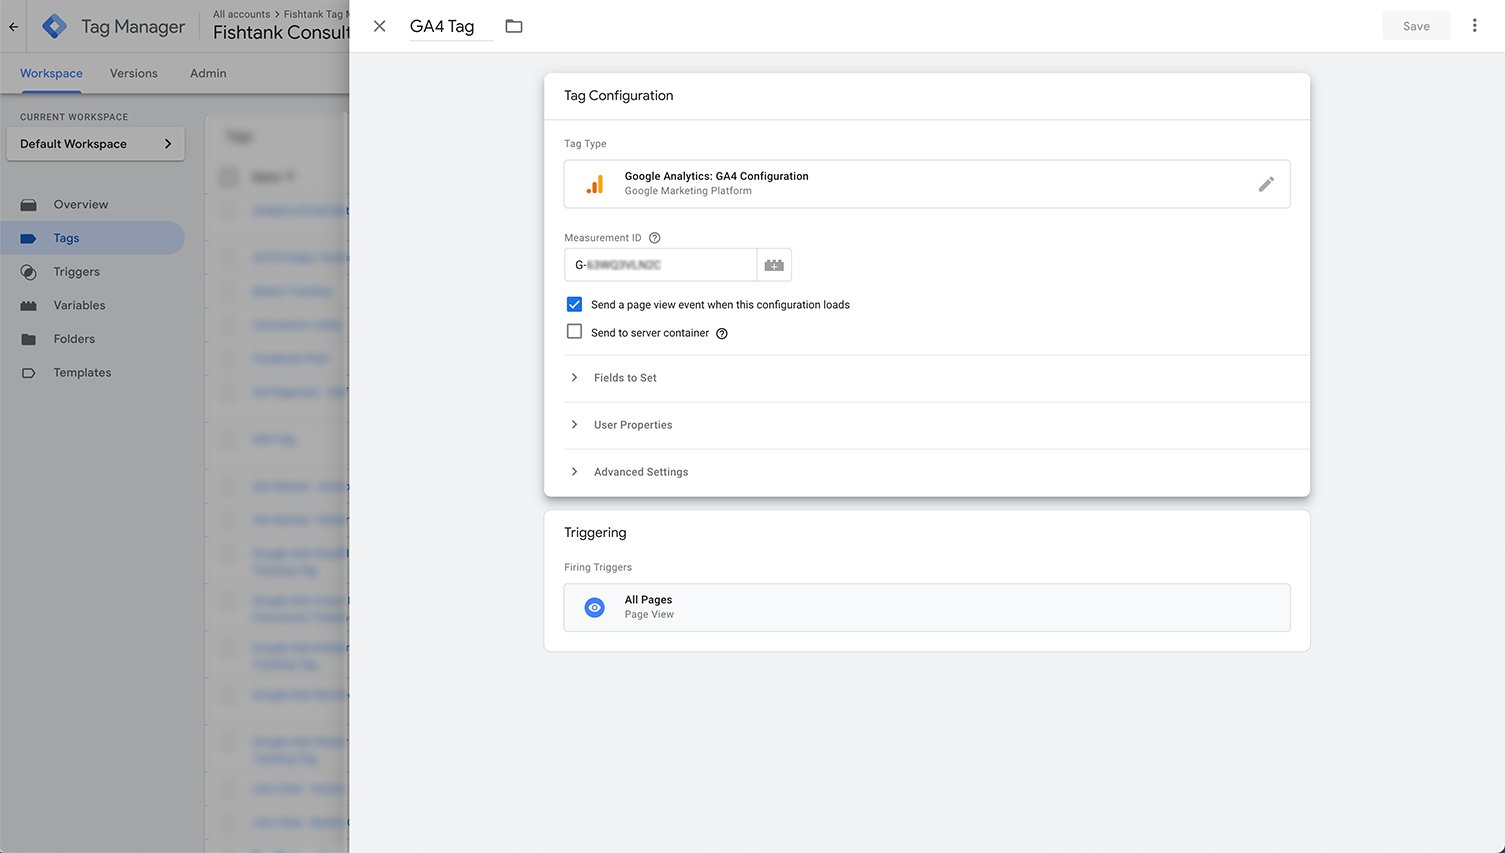
Before creating our custom event tag, we need to first configure our GA4 tag in GTM to connect the two applications. In your GTM container, create a new tag using the following steps:
- Click New Tag
- Label your new GA4 Configuration Tag
- Choose the Google Analytics: GA4 Configuration
- Input Your Measurement ID from GA4
- Click the box "Send a page view event when this configuration loads"
- Click Save
Once our GA4 tag is configured, we need to set up our custom event’s Variables, Triggers, and Tags (preferably in this order).
Variable Set Up
There are two types of variables in our GTM container:
Built-In Variables: Available for the most commonly used tag and trigger configurations. Once enabled, they can be used just like user-defined variables.
User-Defined Variables: Custom web variables to suit specific requirements that aren’t covered by built-in variables.
There are many different Built-In Variables to configure in GTM such as:
- Pages
- Utilities
- Errors
- Clicks
- Forms
- History
- Videos
- Scrolling
- Visibility
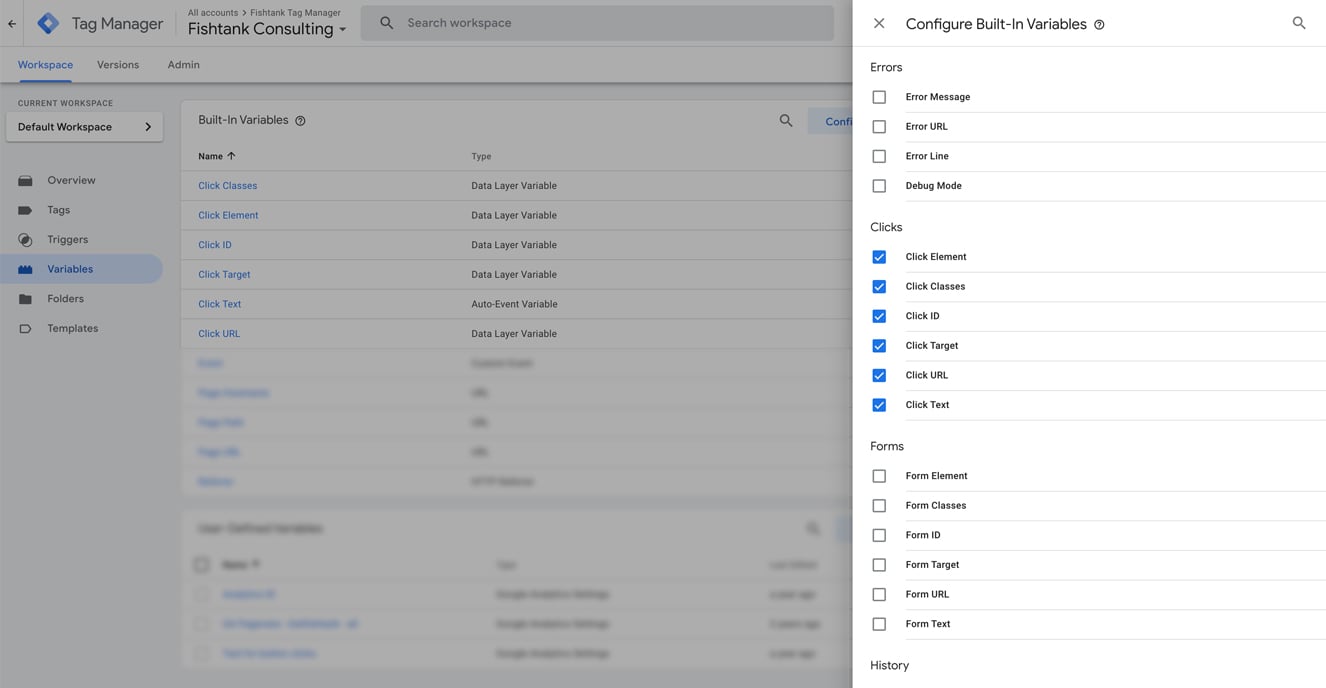
For the purpose of our custom event configuration we want to enable our Click variables.
Enable Click Variables
Because we are tracking custom click events on our website, we will focus on enabling all of the click elements in the list of Built-in Variables in GTM. In order to enable them, simply click Configure in the top right corner of the Built-In Variables section in our Variables tab, and click all the boxes under Clicks.
Trigger Set Up
The custom event trigger is used to track the interactions that occur on our websites/apps in GTM. For our example, when an element is clicked on a page that matches the trigger conditions, GTM will automatically populate values for any active click-based built-in variables.
To create a new custom event trigger in GTM:
- Click Triggers on the left side menu, then clickNew
- Click Trigger Configuration and choose the All Elements under the Click trigger type
- Click Some Clicks
- Configure the conditions which need to be true for this event to fire this trigger
- Click Save.
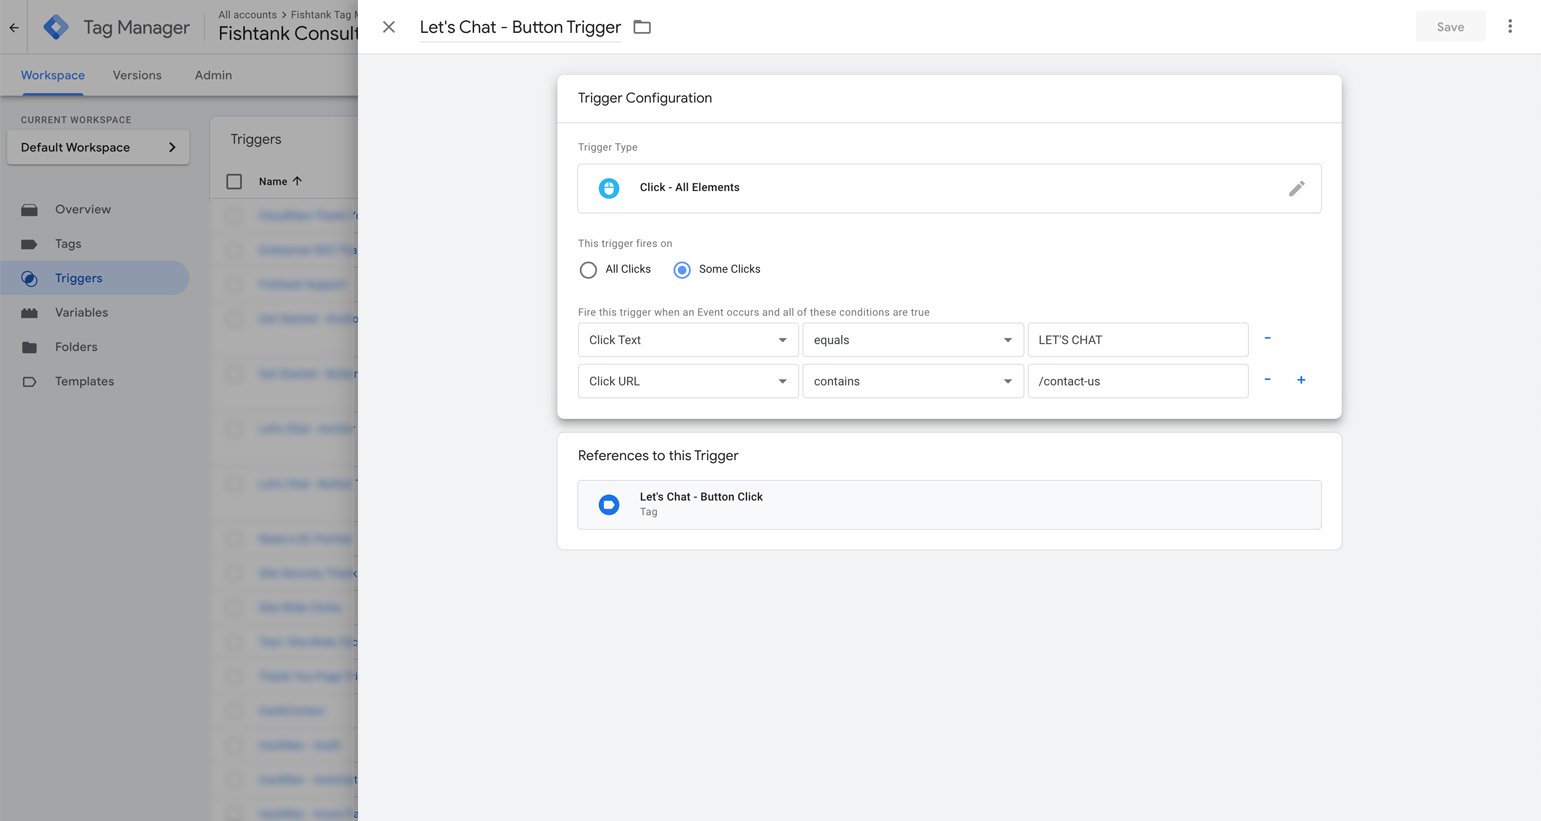
So, configuring our GTM trigger to fire when someone clicks the “Let’s Chat” button on our website will require identifying some trigger conditions. In this example, we indicated that our click text equals LET’S CHAT and our click URL contains /contact-us.
In order to add or remove trigger conditions, simply click the “+” or “-“ symbols next to it.
Here is what our finished Trigger configuration looks like, now let’s click save.
Tag Configuration
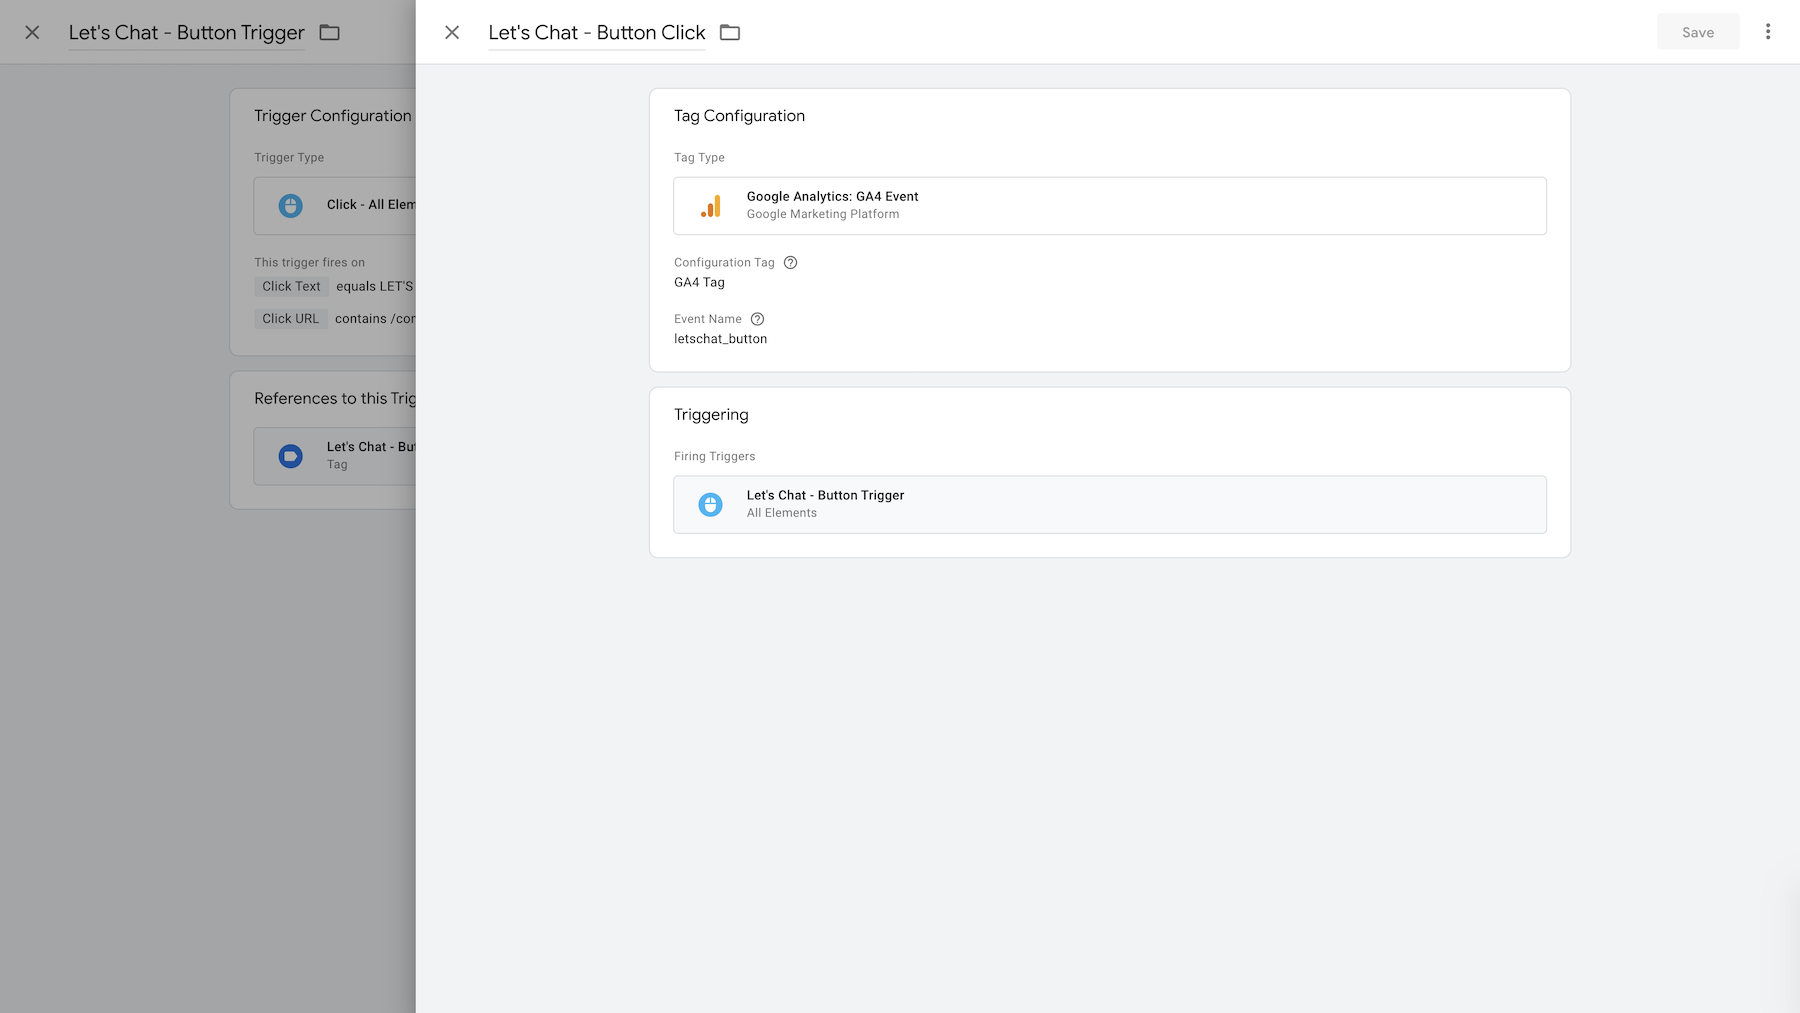
Finally, it’s time to configure our tag for our custom event: Let’s Chat Button Clicks. Since we already set up the bulk of the tag, indicating which trigger conditions will fire the tag when a custom event happens on our website. All we have to do now is create the event tag in GTM to keep track of it in our GA4 property.
- Select Google Analytics: GA4 Event as our Tag Type
- Select GA4 Tag as the Configuration Tag
- Name your custom event, in this case, we will use letschat_button
- Connect our Let’s Chat - Button Trigger to our new tag
- Click Save
Now that our custom event is configured in GTM. We have to make sure our tag works!
Debugging Our Tags
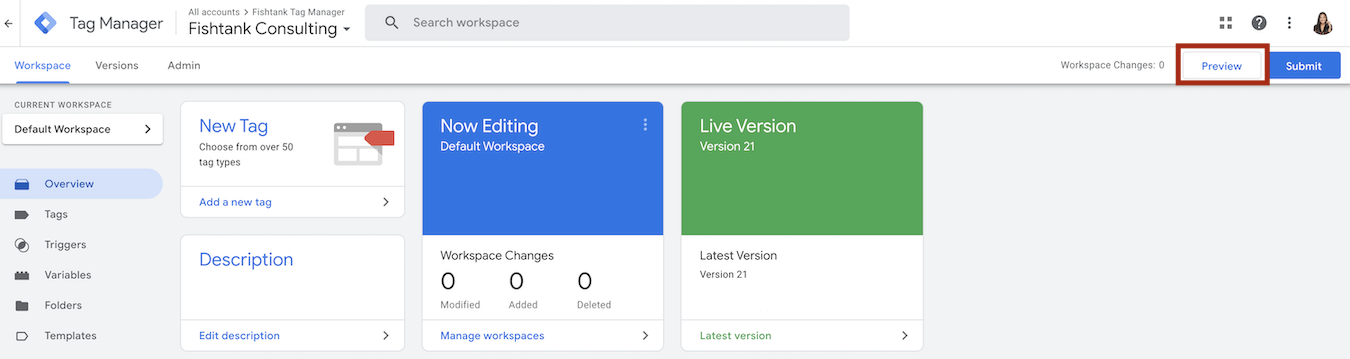
We are almost done finalizing our new tags, but first, we need to test them! GTM has a preview option to be able to load our website and click through the site in an attempt to get our tags to fire. Let’s start by clicking the Preview button in the top right corner of our GTM workspace.
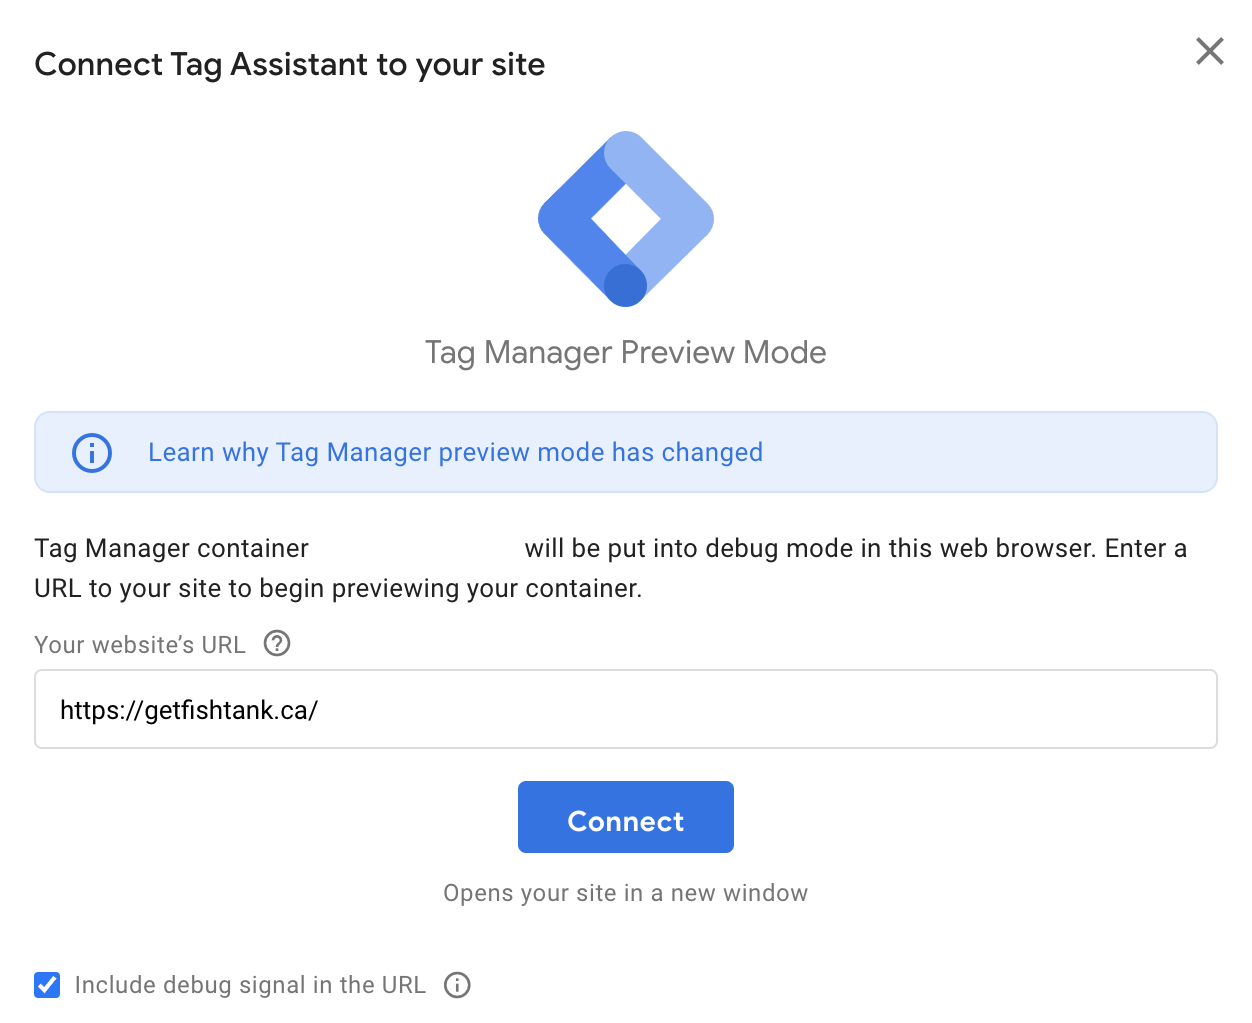
Next, we are going to enter the domain where we want to test our tags using the Google Tag Assistant and click Connect.
This will open your website in a new window and you will be able to navigate your site to get to fire the new tag we just set up. Once you take the necessary steps to satisfy all of the trigger conditions we outlined earlier, we should be able to see which tags fired back in the original Tag Assistant window.
You should see a window that looks like this.
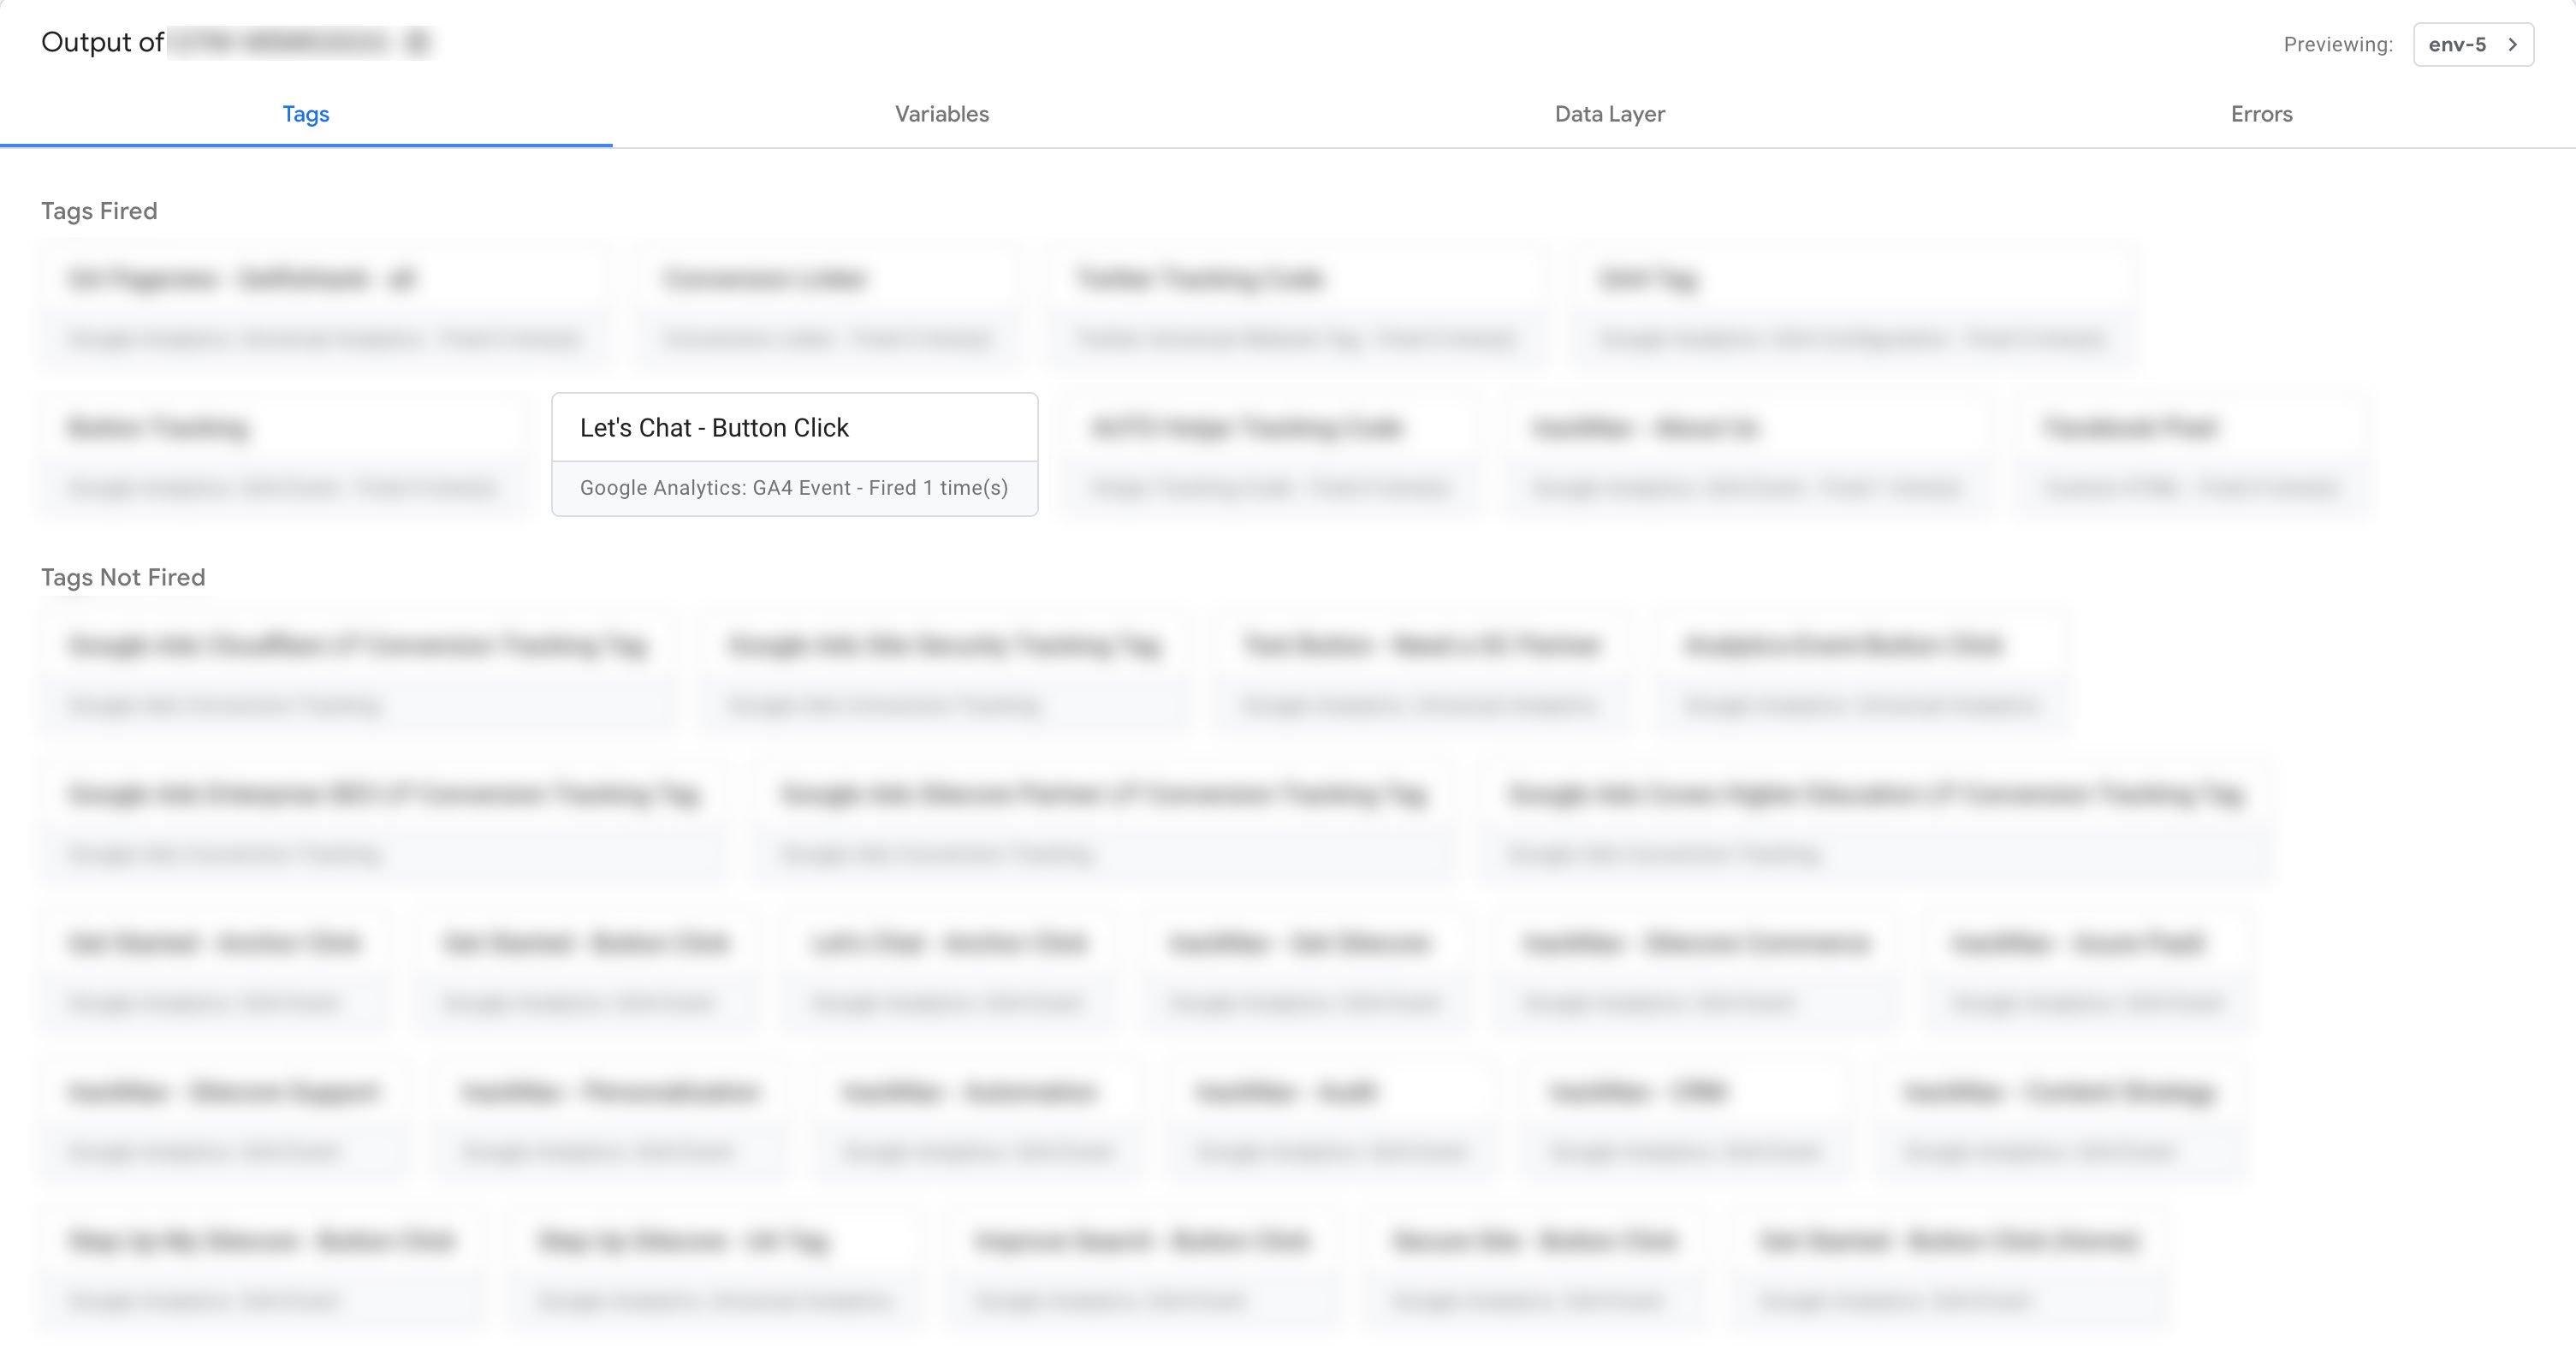
Under the “Tags Fired” section, given everything was set up correctly, we should see our Lets Chat - Button Click. If you don’t, you’ll need to do some troubleshooting to see why the trigger isn’t working and why your tag did not fire properly.
Publishing Our Tags
Once we’ve tested all of our new tags to ensure they are firing properly, it’s time to publish our tags. This makes the tags live and ready to track our custom event data.
Once you’re ready, click Submit and fill in the Version Name and Description of the new workspace changes you want to publish. And you’re done! The new tags should now be live on your site and ready to track events.
Finding Custom Events In Google Analytics 4 Reports
Allow 24 hours for your event data to populate into GA4. Feel free to trigger the event yourself so that your GA4 reports have some event data to compile. The built-in reporting function can be found here:
- Click the Reports tab in GA4 left side menu
- Click Engagement, then Events
Feel free to configure this page to show the specific event information you need in your reporting.
Next Steps
We hope you found this blog helpful in creating custom events using GTM in conjunction with GA4. This method provides us with the ability to create and track events for all of our objectives. GA4's enhanced measurement functionality tracks a lot of valuable information by default. But coupled with GTM's robust built-in functionality and flexibility, we are able to take our GA4 tracking and reporting to a new level.
Remember to mark your calendars for July 1, 2023, to say goodbye to UA and hello to GA4. The friendly folks at Fishtank are here to help your enterprise organization with your GA4 migration and GTM implementation. Reach out to our digital marketing team at [email protected] for all your Google Analytics and Google Tag Manager needs.
GA4 & GTM Frequently Asked Questions
What's the best practice when naming custom events or parameters on recommended events?
If the event you want to track is not covered in the GA4 Enhanced Measurement events, check out Google's naming conventions for recommended events here.
What's the maximum number of custom events you can have in GA4?
Google implemented collection and configuration limit of 500 distinctly named events on a per-property basis. Click here for more information.
When will Google discontinue Universal Analytics?
Google announced they will be discontinuing the Universal Analytics (UA) platform in June 2023. After July 1, 2023, UA will no longer be processing any new website activity and hits and everyone will have to transition over to Google Analytics 4 (GA4) for all their website tracking needs.
If you need help setting up your Google Analytics 4 property, check out our blog.
Can GA4 replace custom events tags created in Google Tag Manager & Universal Analytics?
Until July 1, 2023, We recommend continuing to track your website analytics in both UA and GA4 in parallel. This means continuing to collect data in your Universal Analytics property (using existing UA tags in GTM) and create new GA4 tags for the same events.
Once the data is being reliably populated in GA4 you can confidently migrate to have your GA4 property as your sole source of truth after UA is discontinued.
👋 Hey Sitecore Enthusiasts!
Sign up to our bi-weekly newsletter for a bite-sized curation of valuable insight from the Sitecore community.
What’s in it for you?
- Stay up-to-date with the latest Sitecore news
- New to Sitecore? Learn tips and tricks to help you navigate this powerful tool
- Sitecore pro? Expand your skill set and discover troubleshooting tips
- Browse open careers and opportunities
- Get a chance to be featured in upcoming editions
- Learn our secret handshake
- And more!


Meet Theresa Gutierrez
Sitecore Strategist | Sitecore Strategy MVP
⛳ 🌮👩🏻💻
Theresa, aka 'T', is a high-energy marketing creative with 8+ years of experience across various industries. She's passionate about delivering strategy and design, with a focus on Sitecore SaaS technologies. T is an avid golfer and loving dog momma, appeased only by delicious food and a bevy of something bubbly. Cheers!