Introduction To Workflow
Websites need to be updated often to keep them up to date and so you can communicate effectively with your audiences.
Usually a number of people with different roles and responsibilities are involved in the content creation and publishing process. To keep the process running smoothly and efficiently, Workflow can be used.
In this blog we'll cover:
- What Is A Sitecore Workflow?
- Why Use Workflow?
- How Workflow Works In Practice
- What Makes Up A Workflow?
- Workflow Security
- Where Are Workflows Located?
- Where Is The Workflow Defined For Each Item?
- Workflow Fields On An Item
- Creating A Workflow
- Branching Workflows
- Email Notifications
- Versions
- The Final State
- Moving An Item To The Next Workflow State As An Administrator
- What Is The Sitecore Workbox?
- Accessing The Sitecore Workbox
- Workflow Tips
What Is A Sitecore Workflow?
Sitecore workflows are a very powerful way to manage and review content so that the right content is approved by the right people before it’s published to the site. They’re a governance control mechanism that dictates the processes different items need to go through before they’re published.
Workflows are completely customizable, and can be made as complex or as simple as your organization needs, and can usually be set without writing any code. You can set as many workflows as you like, and can make them as unique as you need to, for your organization or departments.
Example of different workflows:
- Team A creates content for Section A of the website, which is edited by people A, B & C & approved by person D
- Team B creates content for Section B of the website, which is edited by people E & F, and approved by person D
- Workflows A & B are created in Sitecore to reflect this
Using Sitecore workflows streamlines the content creation, management and publishing process and helps to prevent mistakes.
Why Use Workflow?
Workflow gives your organization control over the entire content approval process. It ensures that any content that’s published to your site has been approved by the right people, and stops content from accidentally being published, when it shouldn’t be.
It also ensures that all content has been reviewed, and had someone else look over it before it’s published to ensure it is complete, meets the requirements, is on-brand, has no spelling or grammar errors, etc.
How Workflow Works In Practice
A workflow is defined in Sitecore and applied to the Master of an item. When workflow is implemented on the Master of an item and that item is created, the user will have to ‘submit’ the item using the submit button in the navigation, to move it to the next workflow state.
This item will then move to the next workflow state, and so on, until it is published.
For example, this item when created was in the ‘Editing’ state of the workflow, which is the initial state. If a user now tries to publish the document using any publish buttons, it won’t be published because it hasn’t been moved to the workflow state that has the ‘Final’ checkbox ticked.
If you’re an Administrator, you can change the Workflow state of an item at any time by scrolling down to Workflow in the Content pane on the right, and changing the state using the State dropdown.
What Makes Up A Workflow?
Workflows contain a number of predefined states that an item must go through before it’s published on your site. These states should represent the processes in your organization for creating and approving content.
Since every organization is different and has different needs for workflow and the website approval process, workflow is completely customizable in Sitecore. You can make workflows as simple or as complex as you need, and not all items need to move through all the workflow states that you define. You can apply some states to certain types of content, or make them optional.
All workflows however are made up of 3 elements:
- States
- Commands
- Actions
One thing all workflows have in common, no matter how simple or complex they are, is that they all contain two states - the initial and the final workflow state, and items can only be published if they’re in the final workflow state.
All workflow items live in the content tree, and are made up of the following:
Workflows
The workflow node is the parent item that contains all the sub items that make up the workflow. You can have as many different ‘workflows’ as you need, e.g. Website Workflow. To add a new workflow to Sitecore, you only have to create a workflow node and add its children. It’s based on the System / Workflow / Workflow template.
States
States are the building blocks that make up the workflow and represent the different stages in the content creation process that an item might pass through before it’s published, e.g. Draft, Awaiting Approval & Approved.
All items in a workflow belong to a state in the workflow.
An item’s workflow state establishes:
- Who can edit the item
- Who is currently responsible for the item
- When the item can be published
The State template has only one checkbox field named ‘Final’, which when checked, considers the item to be ready for publishing, and is the only state that items can be published in. State nodes are based on the System / Workflow / State template and are added as children to the Workflow node.
Three stages must exist as a minimum:
- Draft: The Item is being edited
- Awaiting Approval: The item has been submitted and is waiting to be reviewed
- Published/Approved: The Item has been approved and published to the site
Usually each state in a workflow is secured to a specific security role. Only users that belong to that role and have write access to the item can edit it while the item is in that state.
Commands
Commands move content items from one workflow state to another.
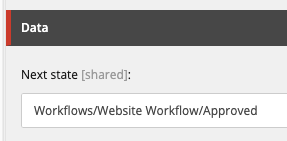
When the command is executed the item is moved to the workflow state that is defined in the command item’s Next State field, e.g. Submit, Approve with test, Approve, Reject.
Adding commands as children to the state node defines the commands that can be executed on an item in that particular state, and all commands require a workflow state as a target.
When the command is executed, the item is moved to the targeted state.
Common commands are Submit and Reject.
NOTE: A targeted state does not need to belong to the current workflow. It is possible to pass an item between workflows using commands. See the Branching Workflows selection below.
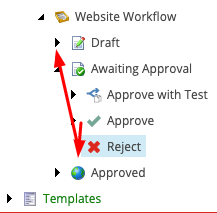
In the example above, the approve command sends pages to the next state - Workflows/Website Workflow/Approved if it is executed by a user with appropriate permissions.
The reject command has Workflows/Website Workflow/Draft as its command, and sends pages back to the draft state if executed by a user with appropriate permissions.
Actions
The actions or functionalities that are performed on the items when they’re in a specific workflow state or when a specific command is executed, e.g. Send email, auto-publish, create test.
Actions can also be created to fire any custom code and can be configured in two places: On a command - When a command is fired, the action is executed. E.g., a Reject command can send an email.
Or on a state - When an item moves into a state that has an action configured, the action is fired. E.g., an item that reaches thePublished state might get auto-published.
Workflow Security
You can secure all states, commands and actions to specific roles and users in Sitecore. There are certain levels of permission a user needs before they’re able to edit an item in the current workflow state.
- They must have write access to the item
- They must have workflow state write access to the current workflow state of the item
These two permissions determine whether a user can edit an item. Also, a user must have read access to the workflow to see the workflow in the Workbox.
Where Are Workflows Located?
Workflows are located and defined in the Content Editor, under System. The order of items in the content editor doesn’t impact the way an item will flow through the workflow though. This is defined by workflow commands.
Where Is The Workflow Defined For Each Item?
Workflows associated with items are defined on the Template or Master of that item in the Workflow section.
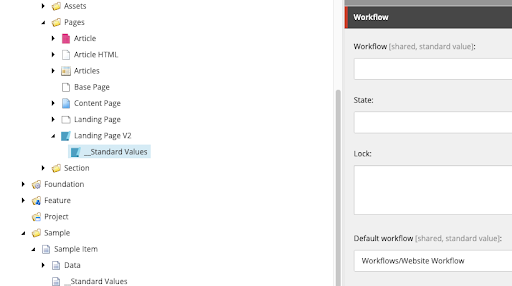
This tells us that any pages created with the Landing Page V2 template will have a workflow of Website Workflow as the default state.
Workflow Fields On An Item
The workflow section on an item contains four fields: Workflow, State, Lock and Default Workflow.
Workflow
The workflow field indicates the item’s workflow. It’s empty if the item isn’t currently in a workflow. All Templates and Masters should have an empty Workflow field. Sitecore populates this field automatically based on the Default Workflow, and the Workflow commands that a user selects.
State
The State field indicates the current item’s workflow state. It’s empty if the item isn’t currently in a workflow. All Templates and Masters should have an empty State field. Sitecore automatically sets this field based on the Default Workflow and the Workflow commands that a user selects.
Lock
The lock field indicates whether an item is locked or not, and who has locked it (meaning it is ‘checked out’ and can’t be edited by anyone else until it is unlocked again). Sitecore automatically sets this field.
Default Workflow
The Default Workflow is the workflow that the item goes into when it’s created or edited. If it’s blank, Sitecore will use the value in the Item’s Template. If the template has a blank workflow then the item won’t be placed in a workflow.
Creating A Workflow
Let’s create a simple workflow that contains three states as an example: Draft, Awaiting Approval, and Approved.
From the Sitecore launchpad, click Content Editor.
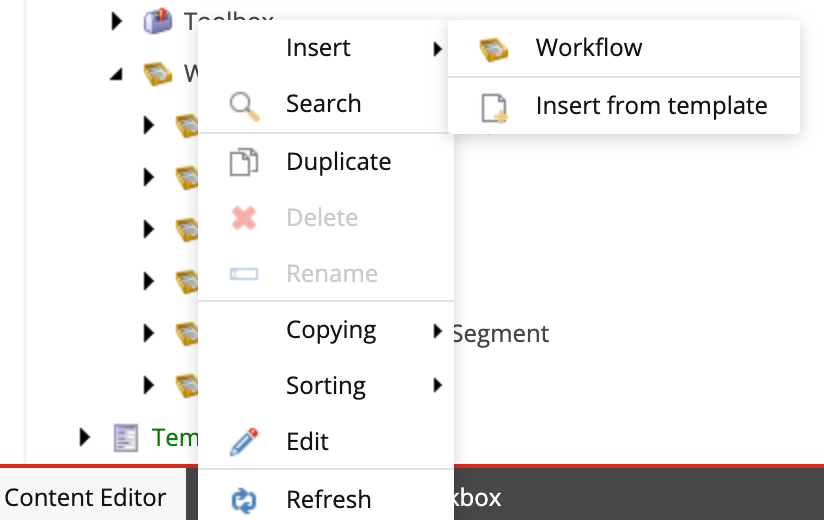
Navigate to /System/Workflows
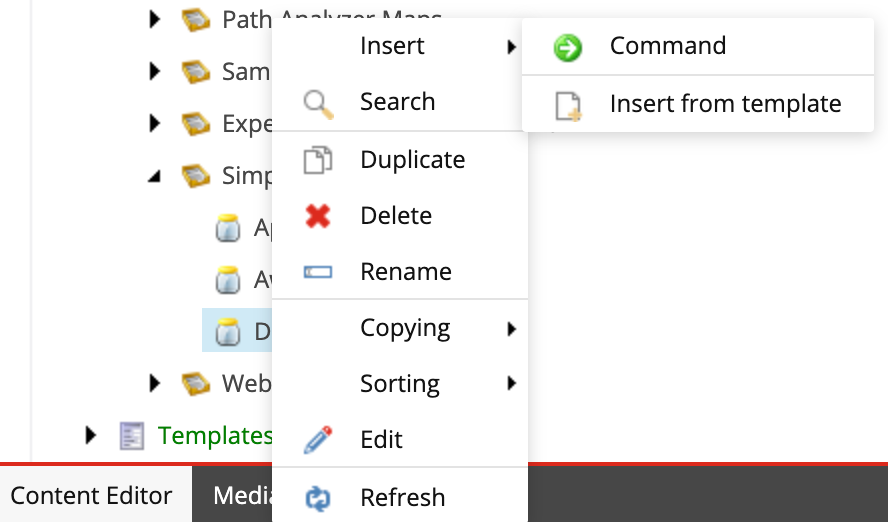
Right-click Workflows and click insert > Workflow.
Name the Workflow Simple Workflow, or anything else you'd like to name it.
Right-click the Simple Workflow item and add these states: Draft, Awaiting Approval, and Approved.
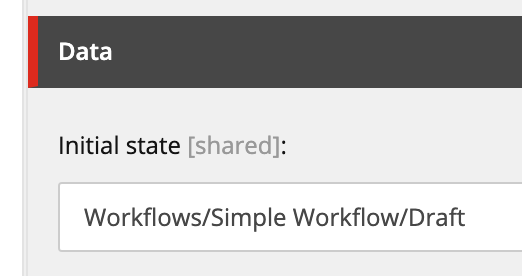
Click the Simple Workflow item. Set the Initial State field to Draft, which will be the first and automatic state an item will start at when progressing through this workflow.
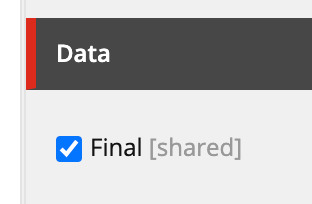
Click on the Approved item, and check the Final checkbox field. This tells Sitecore that when an item is in this state, it can be published.
Now we’ll need to insert commands onto the Workflow states that content authors or approvers can use to move items from one state to the next.
For Draft, add two commands: the ‘Submit’ command and the ‘Submit and Approve’ command.
On each command item, we need to configure what state to move the content to after performing the command.
Under Next State on the Submit command, select the Awaiting Approval state.
Do the same for the Submit and Approve command, except select the Approved state.
Now let’s create two commands for items that are in the Awaiting Approval state: Approve and Reject. Right click on the Awaiting Approval state and click Insert > Command. Name the state Approve. Do the same with the Reject state.
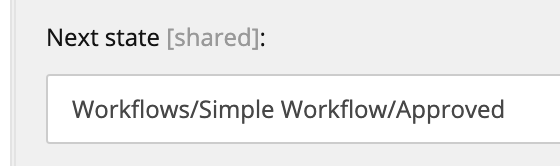
If the Approve command is performed, we’ll move the content to the Approved State (do this by choosing Approved as the next state for the Approve command).
If the Reject command is performed, we’ll move the content back to Draft for a content author to make more changes before approval (do this by choosing Draft as the next state for the Reject command).
Branching Workflows
A branching workflow can be used to bypass or add additional states, commands or actions to the core workflow path.
Adding Additional Steps
For example, if a particular product department needs additional approval states in the workflow, you can create a new command on the editing state, and secure it to that product department's role. When it's executed, the item will move into a new approval state for that product with unique actions and commands.
The item is branched from the main workflow to the approval process specific to that product. The branch can be configured to have any states, actions or commands, but always has a command that links back to the main workflow state.
Bypassing Steps
If a particular content author (i.e. product manager) needs to move items to published from an editing state, you can create an additional command, i.e. Publish that allows only users with their role to view and execute that particular command.
Email Notifications
Sitecore comes with predefined email workflow actions that can be created and configured on workflow states and commands.
They allow you to configure the following:
- The To address: An email address that the email will be sent to
- The From address: The email address that the email will be sent from
- Subject: The subject of the email
- Message: The body of the email
- Mail Server: The IP address of your configured SMTP server
If you need more than one person to receive an email, you can create a new email address that distributes emails to all the people who should receive the email, and only use it for Sitecore notifications.
Versions
Items that are updated a lot can have a tonne of versions, which can slow down the authoring experience.
You can reduce the number of versions of items by removing the oldest ones to keep it nice and tidy.
You should also archive items that aren’t current anymore, rather than just leaving them unpublished in the authoring environment.
Moving An Item To The Next Workflow State As A Content Author
An item that has a Workflow needs to go through all the workflow states before it can be published.
When a new item is created, it automatically has the initial workflow state (Draft), and stays in that state until someone uses a workflow command on it, to move it to the next workflow state.
If the item is rejected by the approver, it reverts back to Draft. If the item is approved and published the workflow is complete. If the item needs to be edited again, the item will be auto-versioned as a new version.
An admin user can overwrite any workflow state and move an item to another state, or publish an item at any time.
If a content author edits an item in a workflow, Sitecore will create a new version of the item and place it in the initial workflow state. If this item is edited again after, the person editing will edit the version of it that’s in the workflow unless they specify that they want to edit a different version.
From the Sitecore launchpad, click Content Editor or Experience Editor depending on which you’d like to use.
Navigate to the item.
NOTE: You might be asked to lock the time before you can edit it or change its Workflow depending on how your environment is set up.
Edit the item and click save.
If the item is in a workflow, you can see the workflow commands here:
Content Editor
On the Review tab, in the Workflow group.
Experience Editor
In the notification bar.
Click the workflow command to send the item to the next workflow state.
Enter a comment about your edits to the item in the dialog box and click OK. The comment will be stored with the new workflow history, which records all the states the item has passed through.
The item will now be in the next workflow state, and new workflow commands will be available in the notification bar. A new user will now be responsible for handling the item and moving it to the next state, or rejecting it back to the previous state.
If you don’t have permission to edit the item in the current workflow state, you can’t lock the item for editing, and the workflow commands won’t be shown to you.
You can open the Sitecore Workbox to see all the items that are currently in workflows.
The Final State
When an item is moved to the ‘Done’ state, it can be published and accessed from a browser.
An item can’t be modified when it’s in a final state. If an editor wants to edit the item, they can press the Edit button on the toolbar, which will create a new version of the item that places iut in the Editing state, and this will start the entire workflow again.
Moving An Item To The Next Workflow State As An Administrator
As mentioned, an administrator can bypass any stage in a workflow, and can move an item directly to published at any moment.
In the Content Editor, click on the item, and in the Content pane on the right scroll down until you reach Workflow.
Change the state using the State dropdown, and then Save and Publish as usual.
You can also use the Workbox to see what state every item is in, in any workflow (if you have the required privileges to see those items).
What Is The Sitecore Workbox?
The Workbox is an interface where you can view and manage all the items in a workflow.
In the workbox you can also see all the items that are currently in workflows, the editing history of each item, each item’s workflow state and the number of items in each workflow state, as well as the actions that you’re able to take.
You can preview, open and compare different versions of the same item in a workflow state. You can also set up an RSS feed, which enables you to receive a notification when there are changes to an item or when a version of an item enters or leaves a specific workflow state.
Accessing The Sitecore Workbox
You can access the Workbox from the Sitecore launchpad, or from the bottom tab in the Content Editor.
At the top, you’ll see a ‘Workbox toolbar’. On this toolbar, you have a list of your workflows. Choose one or more of them by clicking their checkbox.
The window below will show the workflow states in each workflow, and the items that are in each state.
Each of the items has these options:
Preview
This allows you to preview the version of an item that’s in a workflow state. It opens the version of the item in a new browser.
Open
Opens the item in the Content Editor.
Diff
Compares the differences between two versions of the same item. When clicked, a dialog box will open. In the dialog box you can choose the two versions that you want to compare and whether you want to compare them in one field or side by side in two columns.
When you’ve finished reviewing the items, you can apply one of the workflow commands that have been defined for the workflow state. E.g., in the Awaiting Approval workflow state, you can approve or reject the item, which will move it to the next appropriate workflow state.
Workflow Tips
Do What Makes Sense For Your Organization
Throughout this blog I've given you a few examples of workflows, and you might see examples of others elsewhere. While they can be great inspiration of what's possible, you should always create workflows that make sense for the requirements of your business processes for getting content authored and approved.
Don't Underestimate Workflow
Never underestimate the importance of workflows. Your content governance won’t take care of itself. Every time I have seen content that has been published on a site, when it shouldn’t have, it wasn’t part of a workflow and was accidentally published, or published before it should have been.
Don't restrict access to items
Rather than restricting access with role types, set your roles up so each role a user is a part of gives them additional rights. This means that if a user belongs to a number of roles, they might be restricted from editing the item when they are supposed to be able to with another role type.
Don't Spam Your Staff
Only use email notifications for critical workflow states.
Don't Add Workflow On A Component Level
If your organization doesn’t use shared components, then don’t add workflow on a component level. This can make changes complex and messy and slow down your agility.
Listen To Your Users
Apply feedback that you hear from those that are using the workflow. Workflow is supposed to streamline the publishing and content approval process. If the workflow is making it hard for someone to do their job efficiently, make changes accordingly.
Simple Is Best
Keep the number of workflows, states and actions low. The more you add to a workflow, the more you're slowing down the content publishing process. This can also intimidate your users, which you should be empowering instead!
Wrap Up
Thanks for reading! I hope this blog helped you understand Sitecore workflow and answered any questions you might have had about workflow or the workbox.
I love helping people, so if you have any questions, or would like to connect with me, please reach out to me on Twitter or LinkedIn. 'Til next time!
👋 Hey Sitecore Enthusiasts!
Sign up to our bi-weekly newsletter for a bite-sized curation of valuable insight from the Sitecore community.
What’s in it for you?
- Stay up-to-date with the latest Sitecore news
- New to Sitecore? Learn tips and tricks to help you navigate this powerful tool
- Sitecore pro? Expand your skill set and discover troubleshooting tips
- Browse open careers and opportunities
- Get a chance to be featured in upcoming editions
- Learn our secret handshake
- And more!
