You've Played With Advanced Queries, What's Next?
In our last article, we went into details on what are all the different Filter Rules Of A Query Pipeline.
One of those was the Advanced Query (aq). Pushing the (aq) further we have additional capabilities by utilizing what's known as Query Ranking Expressions and Query Functions.
What Are Query Ranking Expressions?
Query ranking Expressions (QRE) are functions which put an item's identified meta data through a Coveo query expression. After a static modifier (think integer) is applied to the ranking score of the items that meet that expression.
Setting up a QRE can be done both in the Coveo Cloud Platform as well as via client-side JavaScript.
It all depends on what you're trying to do and whether what you're doing requires outside information.
You'll find it under Ranking Expressions within a Query Pipeline.
You can find additional information on Query Ranking Expressions in Coveo's documentation.
The nice thing is you can make a QRE apply on a conditional basis. Conditions ranging from language, the query itself, the browser a person is using.
The important thing is to keep track of your QREs and where they are. It can be far too easy to apply them client-side and in the Platform and then when trying to debug an issue, it's all of a sudden a huge challenge to track them all down.
Apply them only as needed. Keep them specific. And test, test, test!
What Are Query Functions?
Query functions (QF) are mathematical expressions performed against every item that will be returned as part of a query, and whose output is stored in a dynamic, temporary field generated at query time. e.g. Distance calculation based upon lat / long values.
The actual expression can be defined using ExprTk syntax.
Important thing to note though, if/else and loop structures are not possible.
Additional details on its use, things you can and cannot do, can be found in Coveo documentation.
Let's See Them In Action
The best way to learn about these two different, but equally useful capabilities, is to see them in action. So that's what I've done.
A perfect example, which can use both QFs and QREs, is if I want to do a search and find the closest fast-food restaurant. Maybe find one based upon what kind of food they serve.
In order for this to work, we're making a couple assumptions.
- My latitude and longitude are obtainable
- We have a data set that has appropriate meta data, including latitude and longitude of said restaurants
While I can get our head office's lat long, as it turns out, I don't have a data set readily available. So let's quickly build one, shall we?
Setup A Source
If you don't have a Coveo organization, or a Coveo Cloud account for that matter, see my article on Getting Started With A Free Coveo Trial. It will get you setup with both if you want to follow along.
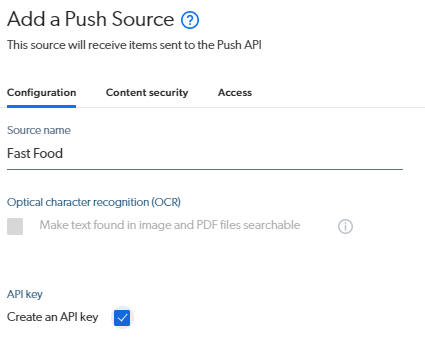
Once ready, create a Push source from the available list of source types.
With that out of the way, let's create the fields necessary. While we can do this one at a time, and there's nothing wrong with that, it just takes time; I like to push all of my fields and their details via the Coveo API. This way I also have a documented record of my fields.
Creating Fields With The Coveo API
Pushing your meta data structure to Coveo is really quite simple and once you get everything sorted the first time, it just speeds the whole process up. If you forget how to get the Access Token, just refer back to Setting Up A Coveo Trial Via The Coveo API
POST https://platform.cloud.coveo.com/rest/organizations/<MyOrganizationId>/indexes/fields/batch/create HTTP/1.1

Content-Type: application/json
Accept: application/json
Authorization: Bearer <MyAccessToken>
Request Payload / Body
[
    {
        "name": "ff_fastfoodrestaurant",
        "description": "Fast Food Restaurant Names",
        "type": "STRING",
        "sort": true
    },
    {
        "name": "ff_foodmenu",
        "description": "Food",
        "type": "STRING",
        "sort": true,
        "multiValueFacet": true
    },
    {
        "name": "ff_longitude",
        "description": "Longitude",
        "type": "DOUBLE"
    },
    {
        "name": "ff_latitude",
        "description": "Latitude",
        "type": "DOUBLE"
    }
]
Creating Field Mappings With The Coveo API
Field mappings are essential for the data to be added to the source. Similarly to creating fields, we can create field mappings for those fields and add them to the Push source we created earlier.
While you could rebuild after this process, it's unnecessary as we don't yet have data, so just set rebuild=false
PUT https://platform.cloud.coveo.com/rest/organizations/<MyOrganizationId>/sources/<MySourceId>/mappings?rebuild= HTTP/1.1

Content-Type: application/json
Accept: application/json
Authorization: Bearer <MyAccessToken>
Request payload / body
{
    "common": {
        "rules": [
        {
            "content": [
            "%[ff_fastfoodrestaurant]"
            ],
            "field": "ff_fastfoodrestaurant"
        },
        {
            "content": [
            "%[ff_foodtype]"
            ],
            "field": "ff_foodtype"
        },
        {
            "content": [
            "%[ff_longitude]"
            ],
            "field": "ff_longitude"
        },
        {
            "content": [
            "%[ff_latitude]"
            ],
            "field": "ff_latitude"
        }
        ]
    },
    "types": []
}
And with that, the source and meta data structure is ready to go. All that is needed is the data.
Using Coveo Push API To Upload Items
I'm not going to go through the steps on uploading a batch load of data. I hope to do that in a future article, so in the mean time, I'll just point you to Coveo's documentation for Managing Batches of Items in a Push Source.
To give you an idea of the info we uploaded, however, here's a sample item. It's kept simple for the purposes of this demo.
{
    "title": "Wendy's",
    "ff_fastfoodrestaurant": "Wendy's",
    "ff_foodmenu":["burgers","chicken", "fries"],
    "ff_latitude":51.045291238382156,
    "ff_longitude":-114.0688156675506
}
Items Are Indexed, What's Next?
Now that we have a source filled with relevant items, it's best we look at the front end.
As we're only focused on Query Ranking Expressions and Query Functions as they pertain to distance between me and the fast-food restaurants; we're going to add both of these to the Advanced Query on the client-side.
Before we begin though, we need a search page. So let's download one from Coveo Seed UI.
You could use npm as we have discussed in a prior article, but we're just downloading the complete zip file for today.
Connect Search Page To Your Push Source
With the search page downloaded, we can actually just open up the local HTML file in your favourite browser and you'll see we have the out-of-the-box standard search page.
Open up the HTML file in your favourite editor and comment out the initialization and replace it with one that points to your Push source. See below for our example:
// Coveo.SearchEndpoint.configureSampleEndpointV2()
// Coveo.init(document.body);
var root = document.getElementById("search");
Coveo.SearchEndpoint.endpoints["default"] = new Coveo.SearchEndpoint({
restUri: "https://platform.cloud.coveo.com/rest/search",
accessToken: "<myaccesstoken>",  // needs an API key with Execute enabled on Search
queryStringArguments: {
        organizationId: "<organization id>"
    },
});
Coveo.init(root);
The Moment Has Arrived
Our source is ready, fields are primed, data is indexed and we have a working search page. Phew! Now let's have some fun.
Add A Query Function To Calculate Distance
Assuming we have access to our latitude and longitude, let's calculate the distance for each item and add it to each result as a meta data value.
This is done using the $qf expression and the dist function. We also pass it the name of the field we want all calculations stored in, distance.
Within the search UI, this will be accessible in the Coveo Result List using @raw.distance.
var getGeoQueryExpression = function (lat, long) {
    // The dist function calculates distance between an indexed item's ff_latitude and ff_longitude values
    // against our own lat and long values.
    // The resulting value is added to a temporary field name called "distance"
    return "$qf(function:'dist(@ff_latitude,@ff_longitude," + lat + "," + long + ")', fieldName: 'distance')";
};
Add A Query Ranking Expression
With each result item having a distance assigned to it, we can determine using the Query Ranking Expression what, if any, a particular result item should have its ranking boosted and by how much.
var getDistanceBoost = function (howFar, boost) {
    // Our expression is comparing the distance in the result item against a set value, 'howFar'.
    // If true, that result item is boosted by the desired value 'boost'
    var expression = "@distance <= " + howFar;
    return "$qre(expression:'" + expression + "', modifier:'" + boost + "')";
};
Add QREs And QFs To The Advanced Query
Creating the QRE and QF expressions are only half the effort, we then have to add them to the Advanced Query.
This is done within the buildingQuery portion of the query pipeline.
Coveo.$$(document.getElementById("search")).on('buildingQuery',
function(e, args) {
    // Create QF distance calculation based upon my own lat / long.
    var expression = getGeoQueryExpression(51.04908247436173, -114.07249142996899);
    args.queryBuilder.advancedExpression.add(expression);

    // Create QRE based upon distance to boost closer restaurants over ones further away.
    // Here we set 3 separate boosts.  One for 10km that gets a boost of 10, one for 5km
    // that gets a boost of 20, and one for 1km that gets a boost of 50.
    expression = getDistanceBoost(10000,10);
    args.queryBuilder.advancedExpression.add(expression);
    expression = getDistanceBoost(5000,20);
    args.queryBuilder.advancedExpression.add(expression);
    expression = getDistanceBoost(1000,50);
    args.queryBuilder.advancedExpression.add(expression);

});
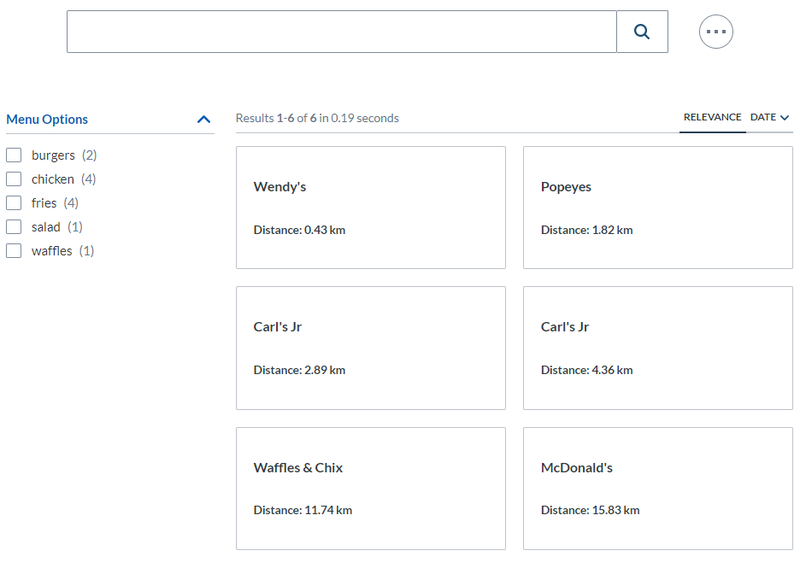
The Result
With that all in place, we now have a search page. I added some facets to the page to illustrate some options to the end-user.
Before we even place a search, you can see that results have already have had their ranking adjusted based upon the distance to the restaurant.
We can see that it is indeed working by using the debug menu (Press and hold the Alt key (Option for Mac) and then double-click the component or result). You will need to check Enable query debug to see an items ranking information.
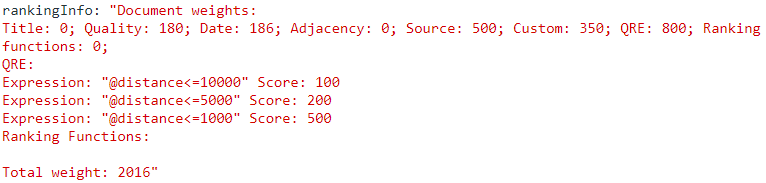
We double-clicked on the first item, "Wendy's". Its ranking information shows that it met all three QRE's and as a result, the ranking was adjusted accordingly.
Now, this might not be a good thing. It really depends on your requirements. It might be better to say if an item's distance is between x and y rather than just less than x. If we defined our expression better we might only match one and not all three.
Obviously this is just a taste of what you can do but I hope this gives you an idea on the power of Query Functions and Query Ranking Expressions.