How To Create A Coveo Turbo Project
If you're looking to enhance your existing Coveo experience or you're supporting implementations, say in Salesforce, then you are likely to utilize a Coveo Turbo project to make it happen. So let's set one up.
First thing first is to setup your local environment. You'll want to have the following as Coveo Turbo utilizing the @coveops/cli is pretty specific in terms of what versions work and what doesn't. So this will just ensure you don't encounter issues in the setup.
Requirements
Python
First thing first is the version of Python. You'll want to have version 2.7 or 2.8. Not version 3. As part of the setup process, the CLI does utilize Python to setup the file structure, and in my experience I had some difficulties with version 3+. Certainly, I think it's possible to get this running in later versions of Python, but utilizing Python 2.8, while deprecated, appears to be the most common.
If you utilize Python virtual environments, you can better manage multiple versions of Python on a single system if the need arises.
Node
As for Node, along with utilizing NVM for Windows, you'll want to ensure you have either version 14.15 or 14.16. This is kind of the sweet spot and the most common Node version when building Turbo projects.
NPM
The NPM version you'll want is 6+. Presently I'm using 6.14.8.
Coveo CLI
If you have setup an NPM project already, be sure to install @coveops/cli. I'd recommend doing this prior to the next step but it does happen during the project setup if needed.
Create The Coveo Turbo Project
The project setup itself is pretty seamless and easy. Simply run the following command with the name of your Coveo Turbo Component. Now before you do, you do have some extra options.
- Use JavaScript instead of TypeScript: Add
--template vanilla - Use CSS instead of Sass: Add
--styles-template vanilla
The typical project creation command is as follows but be sure to change the name of your project from TestComponent to something more meaningful.
npx @coveops/cli create:project TestComponent --create-component --with-styles --with-pageOnce the creation finishes, and it does take a minute or two, you'll end up with a structure similar to the following.
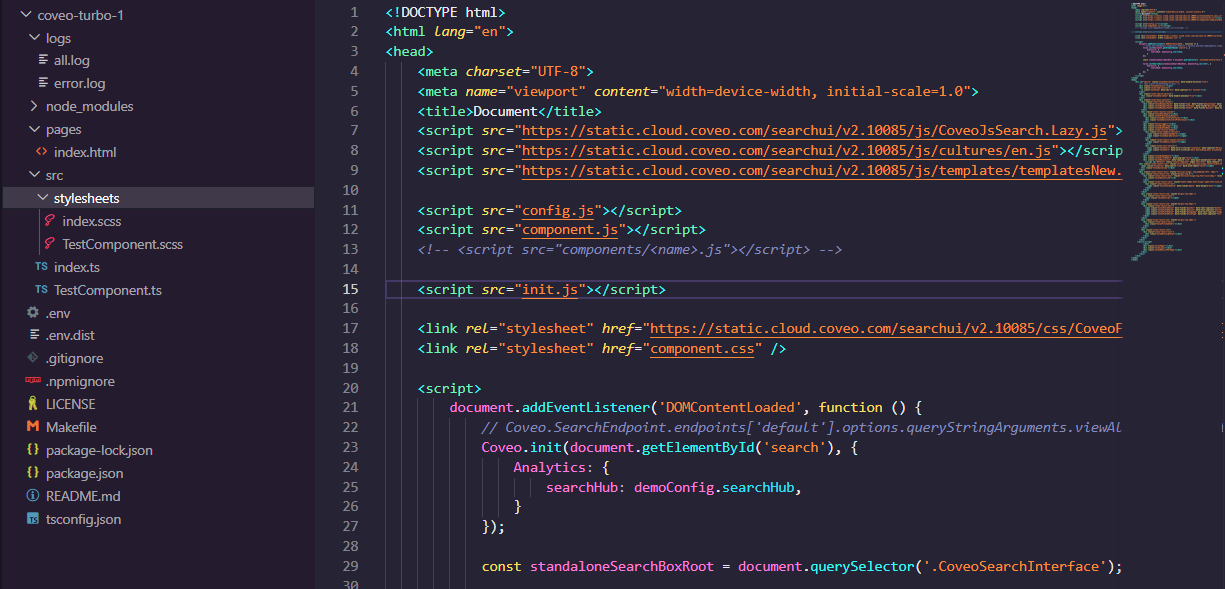
Let's look at it further.
Project Structure
So there are some key files to pay attention to:
/pages/index.html- This is your play space. The component that you create will get added here and will interact with the Coveo Search Interface as you design it to./src/TestComponent.ts- Whatever you named your component in the setup, is what you'll see here. If you have multiple Turbo projects to manage I recommend keeping them separate from each other in other npm projects./src/index.ts- You'll see your component referenced here./src/stylesheets/TestComponent.scss- Obviously the style associated with your component./.env.dist- This file contains the configuration for your setup and will come in handy when you go to testing out your component. By default the search page will return the sample results, but if you are wanting to return content from your organization, this is where you'll edit it./Makefile- If your system supports make, then you'll be able to utilize this, otherwise you'll want to use these commands when building and running your project.
Building Your Project
To build your project, and see if there are any errors, you'll want to run either: make build or npm run build.
Once either has been run, the /dist folder will be generated and you'll get the compiled version of your component.
Run Your Project
As you'll see in the Makefile you can either run make serve or, if you're on a system that doesn't support Make, you'll run the following inserting the information in your .env.dist file.
./node_modules/.bin/coveops serve \
    --org-id $(COVEO_ORG_ID) \
    --token $(COVEO_TOKEN) \
    --port $(SERVER_PORT)
If you get an error similar to the following there is another command you can run:
./node_modules/.bin/coveops : File C:\CoveoDevProjects\coveo-turbo-1\node_modules\.bin\coveops.ps1 cannot be
    loaded because running scripts is disabled on this system. For more information, see
    about_Execution_Policies at https:/go.microsoft.com/fwlink/?LinkID=135170.
    At line:1 char:1
    + ./node_modules/.bin/coveops serve
    + ~~~~~~~~~~~~~~~~~~~~~~~~~~~
        + CategoryInfo          : SecurityError: (:) [], PSSecurityException
        + FullyQualifiedErrorId : UnauthorizedAccess
So if you got the above error, you'll be able to run the same command using npx.
npx @coveops/cli serve --org-id <org_id> --token <coveo api token> --port <port>Once that finishes, you'll be able to browse to it.
Add Your Component
Before you see your component added, you'll actually need to add it to the page. So in our index.html let's do that now. Obviously since our out of the box component doesn't do anything, there's not much to show, so we're going to add a simple function.
First, we will put <div class="CoveoTestComponent">This is a test</div> inside the CoveoSearchInterface in the index.html page. Note we've added some text on the inside. This is just for the purposes of my example.
Next, in our SCSS file we will update it with the following:
.CoveoTestComponent {
    display:none;
    &.show{
        display:block;
    }
}
You'll see by default, the element is hidden so the text won't show, but when the class show is added, it then will display.
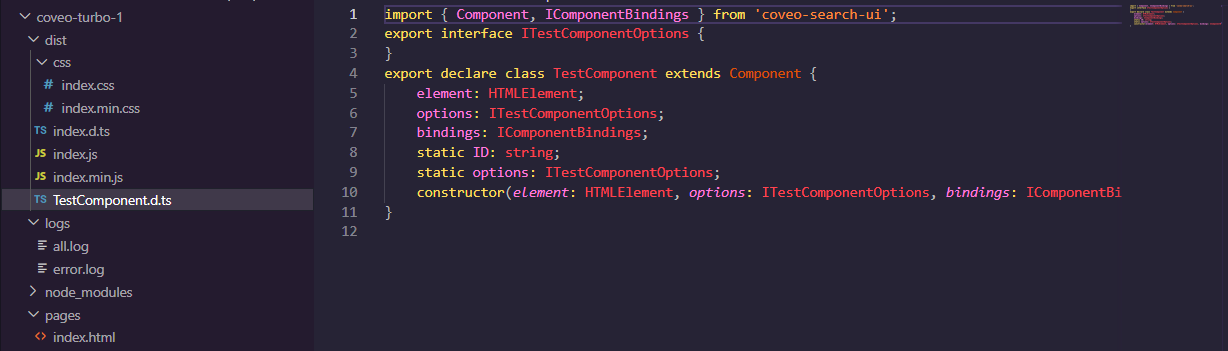
Finally, in our TypeScript component file, we will update it accordingly.
import { $$, Component, IComponentBindings, ComponentOptions, QueryEvents, IQuerySuccessEventArgs } from 'coveo-search-ui';
import { lazyComponent } from '@coveops/turbo-core';

export interface ITestComponentOptions {}

@lazyComponent
export class TestComponent extends Component {
    static ID = 'TestComponent';
    static options: ITestComponentOptions = {};

    constructor(public element: HTMLElement, public options: ITestComponentOptions, public bindings: IComponentBindings) {
        super(element, TestComponent.ID, bindings);
        this.options = ComponentOptions.initComponentOptions(element, TestComponent, options);

        this.bind.onRootElement(QueryEvents.querySuccess, (args: IQuerySuccessEventArgs) => this.handleQuerySuccess(args));
    }

    private handleQuerySuccess(args: IQuerySuccessEventArgs) {
        $$(this.element).toggleClass('show');
    }
}
A Few Things To Point Out
1. Import Statements
We've updated the import to include $$, QueryEvents, and IQuerySuccessEventArgs.
2. Added The handleQuerySuccess Function
This will be the function that, upon a successful query, will toggle the class to include 'show'.
3. Updated Constructor To Trigger On QueryEvents.querySuccess
This will add an event listener to trigger the handleQuerySuccess function after every query. As you can guess, this will cause the "this is a test" to show and then hide and repeat, changing each time a query is made. Nothing crazy, but gives you just a taste of how things can interact with the Coveo event system.
Rebuild And Then Rerun
Once we have built the code changes and re-run the project, we can see the result. Lots of fun to be had in the land of Coveo Turbo!
👋 Hey Sitecore Enthusiasts!
Sign up to our bi-weekly newsletter for a bite-sized curation of valuable insight from the Sitecore community.
What’s in it for you?
- Stay up-to-date with the latest Sitecore news
- New to Sitecore? Learn tips and tricks to help you navigate this powerful tool
- Sitecore pro? Expand your skill set and discover troubleshooting tips
- Browse open careers and opportunities
- Get a chance to be featured in upcoming editions
- Learn our secret handshake
- And more!


Meet David Austin
Development Team Lead | Sitecore Technology MVP x 3
📷🕹️👪
David is a decorated Development Team Lead with Sitecore Technology MVP and Coveo MVP awards, as well as Sitecore CDP & Personalize Certified. He's worked in IT for 25 years; everything ranging from Developer to Business Analyst to Group Lead helping manage everything from Intranet and Internet sites to facility management and application support. David is a dedicated family man who loves to spend time with his girls. He's also an avid photographer and loves to explore new places.