Need Of Testing Accessibility On Mac OS:
When designing a new app or enabling access for an existing app, one needs to plan for the accessibility of the app. Testing user interface is very different from testing accessibility, and Apple provides a tool called VoiceOver to do the same.
How To Enable VoiceOver
VoiceOver can convert text to speech for webpages, and Accessible Rich Internet Applications (ARIA) markup applications can read out dynamic contents.
A Few Shortcuts:
To turn VoiceOver on or off: Command+F5
Pause: Control
Start reading again: Control + Option + A
Read one element at a time: Control + Option + Right Arrow
Show the "Rotor:" Control + Option + U (Then use right/left arrow keys to toggle categories, and down/up arrow keys to select an option)
Navigate through links and form controls: Tab
Using The Accessibility Inspector
In order to access enable any app for assistive technology like VoiceOver, it is better to use Accessibility Inspector, which Apple provides, in order to view the accessibility information.
Step 1: Download Xcode From The Mac App Store For Free
Step 2: Launch Xcode > Open Developer Tools > Accessibility Inspector
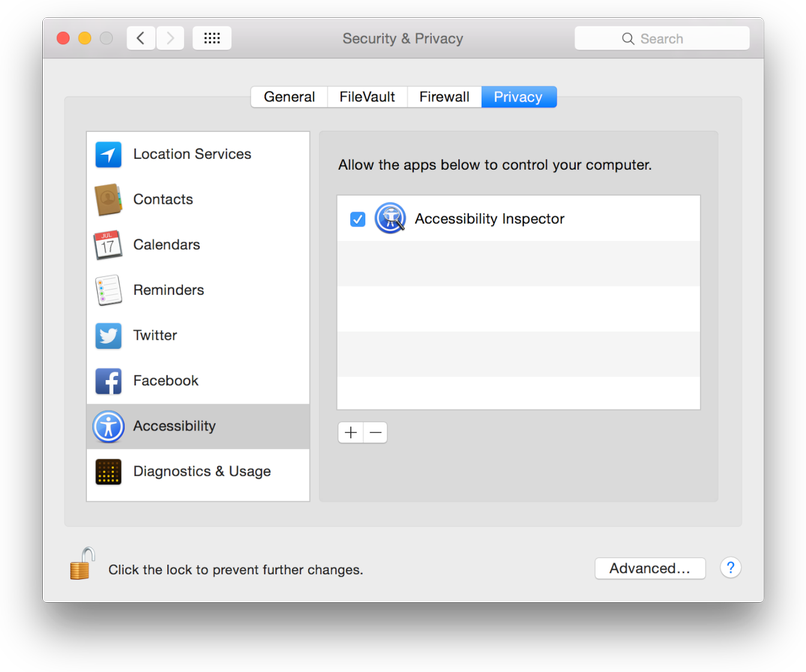
Before using Accessibility Inspector enable permission for it to control your computer. Go to Security and Privacy Preferences > Privacy > Accessibility > Enable by Checking the box.
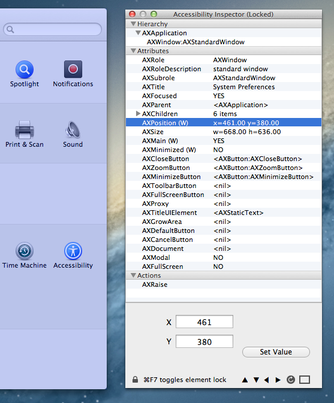
Step 3: Launch Accessibility Inspector + Mouse Over UI Element To Inspect
After launching the Accessibility Inspector move the mouse over the UI element you want to inspect. If you are using VoiceOver to navigate, use the command Ctrl+Command+F5 to navigate. Press Command+F7 to lock the Accessibility Inspector at a location and do further attributes analysis for that location. Accessibility Inspector can be used for modifying any property that is marked (W).
Using The Accessibility Verifier
Accessibility Verifier displays the accessibility hierarchy comprising of the instantiated objects in an app.
To launch Accessibility Verifier, choose Accessibility Inspector > Accessibility Verifier. Prior to that enable permission for Accessibility Verifier at the Security preferences.
Testing With The Accessibility Verifier
Accessibility Verifier can be used for performing the following tests:
- Parent/Child: It checks the integrity of the accessibility hierarchy by making sure each parent-child pair forms a closed loop.
- Window: It checks if all the objects contained in a window contain a reference to that window.
- Missing AXDescription: It checks the element’s descriptive levels.
- Role Verification: It verifies if an accessibility object implements the methods and properties required for its role.
Once the Accessibility Verifier runs the test, it displays the issues as warnings and errors. Eliminating those errors may not guarantee a perfectly accessible app but it ensures that the app or the webpage is accessible.
👋 Hey Sitecore Enthusiasts!
Sign up to our bi-weekly newsletter for a bite-sized curation of valuable insight from the Sitecore community.
What’s in it for you?
- Stay up-to-date with the latest Sitecore news
- New to Sitecore? Learn tips and tricks to help you navigate this powerful tool
- Sitecore pro? Expand your skill set and discover troubleshooting tips
- Browse open careers and opportunities
- Get a chance to be featured in upcoming editions
- Learn our secret handshake
- And more!


Meet Deepa Sannappa
QA Analyst
🧘♀️🌳🧩
Deepa is a QA Analyst who ensures that final products meet quality standards. She studied computer science and has a Bachelor of Engineering with over 5 years of experience in banking and e-commerce spaces. Deepa is passionate about yoga, meditation, and walking outside. She also enjoys solving puzzles. Overall she likes to engage in activities that energize both her body and mind.